Web File Share
- Web File Share User Guide Articles
- Quik File Share - Videos
- Quik File Share - Overview
- What’s new - Changelog
- Sharing Files with Web Links
- Searching files
- Uploading or Adding files
- Web File Share - Quick Start Guide
- E-mailing Files
- Deleting files
- Moving files
- Downloading files and Folders
- Files Comments
- Renaming files
- Copying files
- Locking / Unlocking files
- Files Metadata
- Internal Folder Sharing
- Sharing Folders with Web Links
- Web Links vs Internal Folder Sharing
- Downloading folders
- Uploading folders
- Creating new folders
- Renaming folders
- Moving Folders
- Internal Folder Sharing
- Sharing Files with Web Links
- Sharing Folders with Web Links
- Web Links vs Internal Folder Sharing
- Sync folders with windows (laptop or home computer)
- Sync folders with Android Device
- Sync folders with iOS (iPad or iPhone)
- Sync folders with Mac
- WebDAV
- Editing Files
- Browsing previous file versions
- Restoring / deleting previous file versions
- Extracting Archives
- Creating zip files
- Admin Guide Articles
- Overview
- Adding or removing users from groups
- Adding a group
- Renaming a group
- Deleting a group
- Adding a user
- Independent admin users
- Deactivating a user
- Superuser
- Admin users
- Editing a user
- Deleting a user
- E-mail notification system
- File preview
- Time zone
- Overview
- File indexing and full-text searching
- ImageMagick thumbnail generation and image preview
- Accessing WebDAV
- Character encoding
- File Encryption
- Hiding file types for certain users or groups
- Custom authentication
- Joomla authentication
- Wordpress authentication
- Translating Web File Share
- The API
- Running custom scripts when users perform various actions
- Counting file downloads
- File reference
- Adding custom functionality
- Forcing certain file types to download
- Custom file actions
- Calculating MD5 Checksums
- Adding links to the menu
- Custom even scripts
- External Login Form
- Hiding options from the "Open with..." menu
- Automatic Login
- Custom "Open with" actions
- Custom CSS
- Resetting the FileRun superuser password
- Backup
- ZGL to ionCube
- Upgrading to PHP 5.4
- Migrating to another server
- Installing updates
- Upgrading PHP to version 7
- Changing the MySQL connection information
- Deleting old files
- Upgrading to PHP 5.5 or 5.6
- Overview
- Deleting a role
- Adding a role
- Editing a role
- Choosing A Hosting Service
- Installing ionCube on Top Hosting Providers
- Installing Ioncube Loaders
- Manual "ionCube" installation
- Activity notifications
- File-based Activity Logs
- Mozilla Thunderbird FileLink Addon
- Alternate downloads
- Metadata
- Desktop sync
- Mobile apps
- Upload problems
- Login problems
- Downloading problems
- Large files (>2GB)
- Metadata
- Configuring users’ file access
Web File Share User Guide Articles
Quik File Share - Videos
QuikBox Video Library
Show me all Quik File Share Videos
Show me the entire QuikBox Video Library
Quik File Share - Overview

What’s new - Changelog
Update 2021.12.07
New User Interface
The entire user interface has been reworked, with high attention to every little detail.
-
- Great mobile experience. It adapts to screens of any size to provide a smooth and intuitive experience. Supports touchscreen laptops, handling both mouse and touch selection in the best way.
- It is now a progressive web app (PWA), so that you can add it to your desktop or mobile phone home screen. (Requires HTTPS access.)
New UI options
-
- The folder tree panel can be collapsed for more space for the files list. It is particularlly useful when browsing photos in the new "Photo" view, or documents in the new "Large thumbnails" view. The setting is remembered in the browser.
- Listing files and folders in "Detailed list" now allows you to sort without keeping the list split between folders and files. The option is found under the file list options menu.
- New display mode "Large"
- It shows twice larger thumbnails.
- It displays both documents and photos in full aspect ratio.
- It shows when an image file has transparency.
- It is great for brwosing documents and photos.
- It replaces the previous "Photos" view mode.
- Filter files by metadata file type. You can leave the filter enabled and continue browsing around folders looking for particular types of files. The Image/Audio/Video file list view modes have been removed.
- Tags can be added to multiple files/folders at the same time. Simply select multiple items and use the "Add tags" field on the "Details" panel.
- Multiple files can be star rated at the same time. Just select the desired files and use the star rating option found on the "Details" panel. If any of the selected files already has a rating, its value will be overwritten.
UI Performance improvements
-
- Direct links to subfolders now open instantly, regardless of how deep the folder is located. Browsing directly to a sub folder no longer loads the parent folders unnecessarily. Yet, it still displays the full location, allowing you to browse parent folders.
- Uploading folders now updates the folders structure in the tree menu in real time, so you can browse directly to a subfolder that was just uploaded, or that it hasn't even finished uploading!
- Optimized code for faster display, snappier feeling and less browser memory usage.
- Creating new folders now shows the new folders in the folders tree menu instantly.
- Pagination for large folders! The maximum number of files you wish to list per page can be configured from the FileRun control panel. The pagination also applies to search results, so you can now see the full number of results. (Current limitation to be addressed in the future: sorting inside paginated folders is always done in an alphanumeric way by file name.)
- Very fast thumbnail generation
- Using "libvips" (https://www.libvips.org) instead of ImageMagick/GraphicsMagick, generating thumbnails can be almost instantaneous for average photo files on average server hardware.
- The supported file formats are "jpg,jpeg,tif,tiff,png,webp,pdf,hdr,gif,exr,svg". Other file formats would still be processed with your current ImageMagick/GraphicsMagick configuration.
- The "vipsthumbnail" binary must be installed on the server, and enabled from the FileRun control panel. Make sure you are using Vips version 8.10 or higher.
- Long file management operations, including calculating a large folder size, no longer lock other FileRun action.
- Space quotas no longer slow down the login and the loading of the user interface. Refreshing the quota usage no longer blocks other requests.
- Listing more than 100 subfolders in the folder tree panel no longer loads metadata for the folders, as it becomes too slow to browse. Therefore, in these cases the folders in the tree panel would no longer show if they are shared or if they have notifications or changes.
Much improved file viewer
-
- Much better image viewing experience.
- Shows now all files in the list, regardless if FileRun can generate thubmnails and previews for.
- Faster loading previews for non-image files.
- If files are selected, the viewer will cycle only through the selected files. Use this to preview only certain files.
- It now shows if an image has transparency.
- Added information when previewing an empty file (0 bytes file size).
- Opening the file viewer no longer disturbs the file list scroll position.
Uploading
-
- Uploading a folder which contains files or folders with names which are not allowed, automatically skips those files, no longer interrupting the whole transfer anymore for user input.
- Uploading folders now updates the folder tree in real time. This allows you to browse/manage the uploaded folders before the whole transfer completes.
- The upload panel shows the file upload speed again.
- The large Nextcloud uploads no longer show temporary folders inside the user's home folder. The temporary folders are now hidden. Added support for deleting a temporary upload folder by Nextcloud on a failed chunked upload, so no folders are left behind.
Usability improvements
-
- The list of files is sorted in a more natural way. Sorting is now done in a case-insensitive way, non-latin characters and numbers are sorted better as well. The browser's first preferred language is also taken into consideration.
- The "Activity" panel
- The "Activity" tab now shows also own user actions. $config['app']['folder_activity']['show_own'] config option no longer exists.
- The "Activity" tab now includes the actions made on the folder iteself, when a folder is selected, not only actions made on content.
- When no file or folder in the list is selected, the activity tab will show all the activity inside that folder and subfolders. The list is grouped by file/folder, so instead of seeing multiple actions made on the same file or folder, you will only see the last action for that file/folder. The number of other actions made is shown.
- When selecting a particular file or folder in the list, you see all the actions performed on that file, no longer groupped. $config['app']['folder_activity']['show_all_actions'] config option no longer exists.
- The "Details" panel
- The details panel is collapsed by default on screen sizes that are not large. It can be displayed using the info button on the top toolbar, or by using the new file context menu option "View details".
- The preview on the details panel now shows if the image has a transparent background. This helps also identify the image aspect ratio.
- Added option to change label from the details panel.
- The details panel shows when the file list is filtered (by audio/video/photos).
- The "Deleted from" details now links for quickly opening the location an item was deleted from.
- The "Details" tab now shows the metadata type for the selected file or folder.
- Thumbnails
- Thumbnails are focusing the center for photos and the top for documents.
- Document thumbnail loading is animated, to provide hints on the page size.
- The thumbnail display mode is now flexible, stretching and shrinking folders and files as needed to use all the available space.
- Added control panel option for choosing the seek time for the frame selected out of videos for thumbnails.
- The audio player
- The audio player no longer closes when leaving the music media library folders.
- The audio player no longer opens automatically when browsing the music media library.
- For users who do not have download permissions but they have only preview permission, the audio player now opens directly rather than inside the file viewer.
- It can now be disabled from the control panel.
- Added option to disable autoplaying the next file in the audioplayer.
- Inside the trash folder
- Files in the trash folder can now be previewd.
- You can now read comments on files/folders inside the trash folder.
- The trash folder no longer groups folders at the top, but shows files and folders sorted by deletion date.
- Increased the text/code editor font size.
- Added contextual menu option for copying a folder's path to clipboard.
- Added tooltips on most clickable actions.
- Dragging files and folders over the "Collections" item automatically expands it to be able to drop into a collection.
- Added ability to calculate total file size of multiple collections and photo albums together.
- Better handling renaming current folder.
- Selecting more than one file to delete now shows a confirmation prompt. This can also be used for deleting permanently instead of to the trash.
- Added warning when deleting files from outside the home folder or a shared folder in order to prevent accidental deletion from places such as the Starred, Collections or other virtual locations.
- To prevent accidental file changes, creating a new file from the "+ New" menu no longer allows overwriting existing files.
- Autosave is now enabled by default for the ONLYOFFICE editors.
- The Download cart
- Better feedback adding files and folders to the download cart.
- Added contextual menu option for adding files to download cart, without having to drag the files from the list to the toolbar menu item.
- Prevented dragging folders to the download cart without the permission of downloading folders.
- Keyboards shortcuts
- Added CTRL+A keyboard shortcut to select all files in the list.
- Added ESC keyboard shortcut to clear the file selection.
- Added F5 keyboard shortcut to refresh the file list.
- The keyboard shortcuts 1-5 for star rating files have been removed.
- The logo and welcome message are always shown on the login page, even on small screens.
- Various fixes and improvements regarding toolbars and menu options.
- The shared links now follow the current theme.
- The OAuth2/API authorization pages now follow the configured theme.
- And various other user interface improvements.
Photos Media section
-
- Photo and video thumbnails show with the actual aspect ratio of the image.
- The "Photos" media library now shows both photos and videos.
- The sorting is done by the date the photos or videos were taken.
- Video files are visually identified by having a play icon on the thumbnail.
- Image and video orientation detection has been improved.
- Added support for HEIC metadata import. Requires Imagick PHP extension, enabled from the FileRun control panel.
- Media Albums
- Photos and videos can be organized in albums, which work exactly like the regular FileRun collections.
- Sharing albums with a link, set by default the link mode to gallery.
- Files and folders can be added to albums from the right-click menu, or by dragging to the left folder menu.
- Photo albums can include any other types of files and folders.
- In the future, albums will be shareable with other FileRun users.
Improved apps compatibility
-
- Desktop Sync Nextcloud
- Desktop sync can be now used also when the user doesn't have a home folder. Files and folders shared by other FileRun users can be now kept in sync with the desktop sync app.
- If a user syncs all shares from all users (@Shares) or all shares from a particular user, new shares will get synced as well.
- Sharing files and folders using links from the desktop now works. Changing permissions of existing shared links and removing links also works.
- Use the right-click menu "Nextcloud" to get private or public links to the files.
- Android app Nextcloud
- Sharing files and folders using links now works. Changing permissions of existing shared links and removing links also works.
- Previewing various types of files works.
- You can now add a Nextcloud account to the mobile app by scanning the QR code displayed when generating WebDAV credentials from the FileRun "Account settings" panel.
- Added compatibility with Synology Cloud Sync.
- Added support for Nextcloud/Owncloud Thunderbird addons.
- Tested compatibility with Joplin note-taking app: A FileRun folder can server as a synching source for note taking on various devices.
- Desktop Sync Nextcloud
- Added "Folder Index" plugin for generating printable indexes of folder contents.
Security
-
- Fix against CSRF via HTML files opening in the browser, and via MIME sniffing.
Thanks to Febin Mon Saji (https://www.linkedin.com/in/febin-mon-saji-1787951b1) - Improved protection against CSRF attacks.
- Fixed minor undisclosed security vulnerability.
- For security reasons, SVG files are no longer used natively for thumbnails and previews, but they get PNG rendered versions.
- Improved login security.
- Added option under Password Policy, to enfore two-factor authentication (2FA) on all FileRun user accounts, except guest accounts which they still login using just a link.
- FileRun is now making sure the session cookies are secure, regardless of the PHP configuration.
- Fix against CSRF via HTML files opening in the browser, and via MIME sniffing.
Other Improvements
-
- General server-side speed improvements.
- Sped up the thumbnail generation process via command line.
- Adding/changing file/folder labels no longer require download permission.
- Changing file tags is now logged to the user activity log.
- Better error handling in the "Index file metadata" folder control panel option.
- Audio files get year and genre metadata extracted as tags.
- Web linked galleries now show thumbnails in the natural aspect ratio of the pictures.
- Comments can be added to the user's home folder.
- Better error handling on MySQL connection drop while zipping large folders.
- The metadata autocomplete, such as for adding tags, searches not only terms starting with the typed word, but wider.
- Added support for ImageMagick being used in Imagick PHP extension mode to the "Create photo proof sheet" plugin.
- The user accounts created via the authentication plugin can now have a different role associated with them, compared to accounts created via the self-registration procces.
- Troubleshooting thumbnail or preview generation from the file control panel now keeps the generated thumbnail/preview files, so one can use this to manually request thumbnail generation for a file for which the generation previously failed.
- New FileRun branding.
Fixes
-
- Fixed display of checkboxes in file grid when thumbnails are not enabled.
- Fixed taking into account EXIF orientation when retrieving width and height of images and videos.
- Fixed creating web links via Nextcloud apps.
- Fixed regression bug: GraphicsMagick support.
- Fixed removing password protection from web links.
- Fixed adding file comments using mobile browsers.
- File comments can now be added via the media folders (Photos, Videos, Music).
- The file activity log now shows correct filenames for files in the trash folder.
- Fixed video player showing full size video via web links.
- Fixed image editor skewing the images on particular image orientations.
- Fixed display of login background image when the URL contains ampersand characters.
- The "Forgot password?" function is now available when using an authentication plugin but having the "Allow local users to login" enabled.
- Fixed search results showing files that might be in other users trash folders. This happens only when the other user's home folders are located inside the home folder of the user that is doing the searching.
- Disabling plugins now applies also for the plugins already configured to be used with web links.
- The option of creating file requests is no longer visible if the user had permission to create web links but now he does not have permission to download files.
- Files and folders that are shared without alter permissions can now be added to starred.
- Better handling of zipping folders with large number of items. Better error reporting.
- Better compatiblity with RSS readers for the folders shared with web link in RSS mode. The file URLs now point directly to the file, rather than the file's preview page.
Other changes
-
- FileRun installations need to be registered in order to feature custom logos. Unregistered installs will feature the FileRun branding.
- FileRun no longer works with Internet Explorer. Finally! 🥳
- The "Default display mode:" can no longer be set to Photos, Videos or Music. The only options are now List, Grid or Large grid. The media views are now reserved for the media library sections.
- The Zoho theme has been removed.
- Deprecated $config['app']['ui']['enable_favicon_ico']. Favicons are enabled now by default and can be disabled from the FileRun control panel.
- Improved debug output for "Thumbnail generation" file control panel action.
- Updated SimpleSAMLphp plugin description to confirm compatibility with version 1.19.
- Removed the option of linking the UI logo to a URL.
- Fixed files showing under Starred when their parent folders were moved to trash.
Hidden files and folders
June 28, 2021 (2021.06.27)
- Security Fixes
- Fixed critical security vulnerabilities.
Security audit by Christian Poeschl and Tobias Braeutigam, from "syntegris information solutions GmbH".
- Fixed critical security vulnerabilities.
- Other Improvements
- ONLYOFFICE can be now used to share documents via web links without download permission (requires enabling from the FileRun control panel).
- Added API call for extracting archives.
- Added "-path" option to "cron/make_thumbs.php" command line, to process only a specific folder.
- Other Fixes
- Fixed ocassional error while moving larger folders that have versioned files in subfolders.
- Regression fixes:
- Uploading via web links.
- Right-click on files for independent admin users.
- Alphanumeric sorting in the file grid.
- Uploading CSV files for user import.
- Compatibility warning with Nextcloud deskop app.
- "HTML Editor" plugin security changes:
- Added option to automatically clean the HTML code before opening files in the "HTML Editor" plugin. The option is now enabled by default, but can be turned off from the plugin's settings. Turn off only if you understand the high security risk involved.
- The plugin's option to be used for creating new file is now disabled by default. You can manually enable it back by editing the plugin settings.
- The plugin's option to be used for creating new file is not disabled. You can manually enable it back by editing the plugin settings.
- The plugin is now disabled by default in new FileRun installations.
- Fixed exporting activity log when no date is selected.
- Better handling trying to preview a file after session expired.
- Fixed image editor not preserving file extension case.
- Increased timeout for indexing via Apache Tika in server mode from 5 to 50 seconds.
- Fixed some missing translations.
April 1, 2021 (2021.03.26)
Summary of the most important changes:
- File plugins can be now used with shared web links.
- Allow visitors to edit files shared via web links.
- "Preview without download" permission available for both user accounts or web links.
- New plugins for spliting and merging PDF documents.
- Three new themes.
- Other improvements and fixes
-
Web links improvements
- The following plugins can be now used to display files shared via web links: 3D Viewer, LibreOffice Viewer, ONLYOFFICE, Office Web Viewer, Zoho, OpenDocument Viewer, Markdown Viewer, Bing Maps, Google Maps, Text Editor, E-book Reader, Markdown Viewer, Open in browser, Video Player, Google Docs Viewer, Link Opener, Audio Player.
The plugins used for previewing or editing files via web links can be selected from the FileRun control panel section "Files > Plugins > Defaults". - A web link to a file can now be shared in 4 different modes:
- With preview: it opens a HTML page with a preview.
The preview is generated by the plugin configured for the particular type of files.
Image Viewer plugin can be used to show previews for non web-safe image files, such as raw images, PSD, etc.
Important: This is the default way web links open now. Old links that you might have used to embed files into other applications or web sites, would require the following parameter "&fmode=open" appended to them. - Open in browser
Just lets the browser handle the file. If it's a plain text file, a PDF document, or an image file that is supported by the browser, the browser will open it directly. If browsers can't handle the file type, they usually provide the visitors with the option to save the file to their computers. - Force download
The browser will always provide the visitors with the option to save the file to their computers. - Editable
This mode looks similar to the preview mode, but it can use a different FileRun file plugin, that might provide the ability to edit the file. The plugins used with this mode are configurable for the various types of files from the FileRun control panel, under "Files > Plugins > Defaults".
This mode is available only with the permission to edit the file. This new permission is enabled under the "Advanced" panel when editing the web link.
- With preview: it opens a HTML page with a preview.
- You can now disable the download permission on a link.
- If you set a preview plugin for the web links, the preview will still be shown.
The plugins that can handle non-download previews are the same as above.
If you do not configure plugin previews for web links, they would just show a file type icon with the message that there is no preview available. - This works also when sharing entire folders.
- If you set a preview plugin for the web links, the preview will still be shown.
- The "Prevent the browser from opening the file." option is no longer available. If you wish the links to provide the download, select "Force download" option under the web link URL, or append "&fmode=download" to old web links. $config['app']['weblinks']['force_download'] = ['txt', 'csv']; can still be used to prevent the browser from opening files that have the specific extensions (txt and csv for this example).
- The following plugins can be now used to display files shared via web links: 3D Viewer, LibreOffice Viewer, ONLYOFFICE, Office Web Viewer, Zoho, OpenDocument Viewer, Markdown Viewer, Bing Maps, Google Maps, Text Editor, E-book Reader, Markdown Viewer, Open in browser, Video Player, Google Docs Viewer, Link Opener, Audio Player.
-
Preview without download
Users that are not allowed to download files can be now given permission to preview files.
You can also now disable the download permission on a link which might still allow previewing.
Available preview options:- "LibreOffice Viewer" and "Open in browser" plugins can be configured to allow PDF previews even when the user doesn't have download permissions but has preview permission. The PDF files will open without toolbar, making it difficult (but not impossible!) to save the PDF preview file.
- "Zoho" plugin can also be configured to allow previewing without download permission. Note though that Zoho allows exporting spreadsheets and presentations from the editor to the original file format, so it does not protect from downloading. For word documents, it allows printing, so that can be used for exporting as PDF.
- The "Autodesk" plugin allows previews without permission to download the file. This is safe as the original file never gets on the user's computer.
- The "Audio Player" and "Video Player" plugins can be configured to allow playback of media files without the permission to download the file. Note that this does not keep the original files safe!
- Other plugins, without download permission, will either show the file's thumbnail, an icon or no preview at all.
- In the future, more plugins will be able to display limited previews without downloading capabilities.
- If you do not configure plugin previews for web links, they would just show a file type icon with the message that there is no preview available.
- This is not a safe view-only access to data. There is no such technology. Use this only with non-sensitive data that you do not mind sharing with other people.
- It is still possible to select and copy text, or extract image data from the generated PDF previews.
- It is technically possible to extract textual content out of an image preview.
- It is still technically possible to download/save the generated PDF files to the users computers.
- For image files of smaller resolution, the thumbnail is the same as the file, so saving the thumbnail to the visitors computers would technically be the same as downloading the original file.
-
Unified file preview
- Preview all files in a folder, or from a search result, with next and previous buttons. All file types are now included.
- More screen space for previewing documents and the preview can be made fullscreen.
- Shows edit option for editable files. (This option shows only when the file type has a default editing plugin configured inside the FileRun control panel "Files" > "Plugins" > "Default".)
-
New plugins:
- Extract PDF pages. You can extract a range of pages (1-5 or 5-1), or a list of separate pages (1,2,3), or any combination of ranges and separate pages (1, 5-10). The extracted pages can be in separate PDF files or in a combined one.
- Merge PDF files. Two or more PDF documents can be merged into a new document. The order you select the files dictates the order the pages are copied into the merged document.
- CSV Editor: edit .csv files in a spreadsheet-like way.
- Text Viewer: read plain text files more comfortable and with support for the dark theme.
- Videos can be now browsed through the Videos media library option by the date their were taken and by tags. Date taken and GPS location metadata is now imported from video files, if available. Note that this requires a metadata reindexing.
-
User interface improvements
- New theme "Google Drive". Similar to the default blue, but flat with white top bar.
- New theme "Microsoft OneDrive". Flat with square corners, thin and blue top bar, orange folders.
- New theme "Zoho". Flat with squarer corners, black folder tree, green highlights.
- Added "Edit" right-click option. This option shows only when the file type has a default editing plugin configured inside the FileRun control panel "Files" > "Plugins" > "Default".
- Audio files can be opened in the audio player in a new browser tab.
- Multiple files and folders can be now selected without using the keyboard, but instead using checkboxes that show over their icons when one or more items are selected.
- You can now configure file plugins to hide the options for creating new files. You can allow users to edit files with plugins such as Google Editor without having the options of creating new documents with this plugin under the "NEW" button.
- Added dark theme support for Markdown viewer.
- Various cosmetic and ergonomic improvements.
-
Other Improvements
- The "Autodesk" plugin now reuses uploaded documents for generating previews instead of uploading the files to the Autodesk server on every preview.
- Added option to the "Create photo proof sheet" plugin to autorient images.
- Creating weblinks via API can be now done with all the options available via the user interface.
- Added DPX and EXR as supported image file types.
- Added the possibility of creating a new group of users from other groups or from all existing users.
- The "Image Editor" plugin has now options for adjusting brightness, contrast, saturation and sharpness.
- The E-book reader now opens the book where you left them. It also provides options for adding bookmarks. Note that information on bookmarks and the last read page is saved in the browser's cache.
- Downloading a single file now takes advantage of Chromium automatic download resuming, so it resumes the download when the connection gets interrupted.
- Sped up thumbnail generation for video files by using ffmpeg also for scaling.
- The Image Viewer plugin, which is used when previewing images via web links can now show small resolution previews for non web-compatible image files. This plugin can also be used to show quick previews for non web-safe image files via the versioning panel.
- The metadata fields of type "Single value" can be now filed quicker by typing to jump to a predefined value.
- The metadata fields of type "Small text", "Normal text" and "Multiple values" can be configured with autocompletion, where metadata values from other files are being suggested as the user types in.
-
Other Fixes
- Fixed opening PDF files and previews in newer Chromium versions.
- Fixed possibility of downloading entire home folder.
- Fixed LibreOffice Viewer support for non-Latin characters in file names.
- Fixed file versions being left behind in the file system after a file is being deleted, either directly or via the trash folder.
- Fixed reloading current folder on rename.
- Fixed listing user activity logs for independent admins.
- Labels and other metadata not showing for files in the search results, when searching just by filename.
- Fixed deleting metadata file types.
- Users can no longer create/upload folders with names that makes them hidden (for example folders with names starting with a dot character), nor they can create/upload files with names that makes them hidden (such as ".htaccess", ".DS_Store", or if a custom hidden pattern is configured for the user/group/role). This applies to any method: user interface, API, WebDAV, sync clients.
- Fixed exporting user activity logs when specifying a date range.
- The "Link Opener" plugin which allows you to upen .URL (Internet bookmarks) files now opens the links in separate windows, as most websites block frames nowdays.
- Fixed display of file owner group name under the file control panel.
- Fixed folder listing when locating a file from the search result when the file is located in the root folder of the search.
- Fixed display of large lists of file tags in the file details panel.
- The videos media folder is now hidden for users without download permissions.
- Collections tree option is no longer shown when the user doesn't have download permission.
-
Other changes
- New web links that have an expiration date, will expire at the end of the specified day, rather than the beginning. This does not apply to existing web links.
- Files and folders can now be moved inside a folder shared without download permission. The purpose is to allow file management for uploading files in an organized way, while still preventing the users from moving files from a folder without download permissions to a folder with download permissions.
- 'Thumbs.db' is no longer a hidden file.
- The control panel now opens in a new window and its various sections can be bookmarked for quick access.
- "cron/paths_cleanup.php" can now take the following arguments:--deep Cleans all data related to the cleaned/removed file paths. This includes: shares, web links, metadata, comments, labels, stars, file activity logs, thumbnail caches, old file versions, search indexes, previews, etc.
--aggressive Cleans also files that might exist and are accessible by their paths, but their paths are not perfect (for example, using back slashes or multiple consecutive forward slashes).
--remove-hidden Cleans from FileRun database files and folders that start with a dot character.
--path /your/path Limit the process to a particular folder. - Deprecated config options: $config['app']['weblinks']['show_page_before_download']
November 21, 2020 (2020.11.21)
- Improvements
- Multiple files and folders can be now shared with other FileRun users at the same time.
Do note that changing the sharing setting for multiple items at the same time, will apply the exact same settings to all files and folders and override any other existing sharing options. - Added "LibreOffice Viewer" plugin which can generate browser-friendly previews for Microsoft Office and OpenOffice type documents. The previews are generated on first view, then cached on the server just as thumbnails are, so subsequent previews open without delay. Requires that LibreOffice is installed on the server, and path configured under the FileRun control panel section "Thumbnails and preview".
- Users can now share files metadata via web links. You can choose to prevent sharing of certain fields, by editing the metadata fields options from the FileRun control panel.
- Direct links to files and folders can be copied to clipboard via the contextual menu (under "More options..") or from the sharing panel. These links can be shared with other FileRun users that have access to the file, for pointing to a particular file or folder while collaborating.
- Users can now search for files that have a metadata value equal or larger/lower than a particular numerical value. For example, to list all files rated 3 stars or lower, one would search for "Rating: 3-". To list all files rated 4 stars or higher, one would search for "Rating: 3+".
- Files and folders can be rated with keyboard shortcuts by selecting one item and pressing a key from 0 to 5.
- PDF documents are now handled by the browser on the mobile devices. This means that, if the browser can open the file, it will open it directly, if not, it will prompt the user to save the file to the device before opening with a native app.
- Added "Videos" display mode, which shows only the video files in the current file list.
- Added "Videos" media folder which lists the videos in the user's home folder, sorted by the date the files where uploaded to FileRun.
- Added "Last uploaded" section under "Photos". It shows any type of image file sorted by the date it was uploaded to FileRun.
- Added "[All]" folder under "Photos > By Date > Year" to list all photos taken that particular year, instead of browsing each month separately.
- A metadata field can now offer multiple predefined options of which the user can select multiple ones. For that, create fields of type "Multiple values" and you will get the option of setting predefined values the user can select from.
- Added support for uploading high resolution screenshots via pasting even when the server is configured with small upload limits.
- One user's list of shared folders is now sorted in a natural way.
- The comments input field is resizable for writing larger comments more comfortable.
- Improved compatiblity with the latest version of SimpleSAMLphp. Also made it so that local FileRun user accounts can login, as altenative to SimpleSAMLphp SSO. Added an option to import group names returned by SimpleSAMLphp and an option to restrict access to only certain groups.
- Added control panel option, under "Interface options", to hide the "Download All" button from folders shared by web links.
- Non-image files now open with their own preview, instead of just showing a thumbnail, under folders shared via web links as image galleries.
- Opening HTML files in a new tab now adds HTTP security headers to block forms, JavaScript and other HTTP requests, to prevent XSS attacks.
- Multiple files and folders can be now shared with other FileRun users at the same time.
- Fixes
- Fixed Office Web Viewer plugin.
- The "Photos" media library section no longer shows files which are of a different file type than "Photos" or no type. This is to prevent for example a scan of a document to be shown as a photo.
- Fixed bug preventing users from changing their passwords while 2FA is enabled.
- File activity log not displaying when browser extensions for ad blocking, such as uBlock, are enabled.
- Improved handling of short MySQL wait timeouts, causing database connectivity problems when users download larger files or over slow network connections.
- Fixed login page redirecting to SSO when "Allow local user accounts to login" is unchecked even though SSO is not enabled.
- Fixed the "Shares" section under a file's or folder's control panel not listing shares on the item itself but only for contained items.
- Fixed choosing users and groups for sending files via e-mail.
- Fixed bug preventing users from creating file requests without being password protected.
- Fixed Zoho Editor plugin error when FileRun user name contains non-Latin characters.
- Fixed error message while using Zoho Editor plugin.
- Fixed error when trying to make thumbnails for broken PNG files.
- Copying and moving files (not folders) inside another user's home folder, from the current user's home folder, now logs the receiving actions, for sending notifications.
- Added compatibility with Bitly V4 API.
- When setting manual notifications for "Folder received (via copy)" and for "Folder received (via move)", the messages now include details about the folder name and location and the name of the user that provided the folder.
- Fixed regression bug: selecting multiple items in the list of files was not updating the details panel properly.
- Fixed memory limit hitting when running the "cron/paths_cleanup.php" script.
- Web link records are no longer automatically cleaned if the file/folder is not found. This is to prevent loss of web links in case the storage is temporarily inaccessible.
- Improved display of Markdown content in comments and from files.
- Previewing older versions of the same file with ONLYOFFICE now opens the appropriate version.
- Fixed incorrect space quota calculation, showing wrong information in the user interface and preventing chunked uploads to complete successfully.
- Fixed possible error regarding failing to create subfolders when a race condition happens when uploading folders.
- The "Connected apps" section of the personal settings panel is no longer displayed if the API is disabled.
- Fixed bug leaving empty upload temporary folders when Nextcloud apps are being used to upload larger files.
- Fixed ability of setting different permissions to different users/groups when sharing a file/folder for the first time.
- Various smaller UI fixes and improvements.
December 25, 2019 (2019.12.25)
- File Control Panel
- It's a per file/folder control panel available only for the FileRun superuser.
- It provides a central place for retrieving additional information in relation to a file or a folder and provides tools for troubleshooting FileRun features such as the content indexing, metadata extraction and thumbnail and preview generation.
- The contextual menu option "More options.." > "Index files" is now an option under the File Control Panel.
- The plugin "Admin: Text Indexer Test" is now an option under the File Control Panel.
- The plugin "Admin: Thumbnail troubleshooter" is now an option under the File Control Panel.
- Folder Notifications
- Added control panel option for automatically subscribing users so that they receive notifications when files, comments or labels are being added inside folders that have been shared with them. The option is available under "Files" > "Misc options".
- The folder notification options are now split into the following:
- "New files" -> If the previous option titled "Upload, Delete, Rename, etc." was enabled, it now only covers new files. For getting notifications on deletes, renames, etc. the users now need to manually change the notification options to include the new "Other actions" option. The FileRun update will not enable this automatically for the existing settings.
- "New comments and labels"
- "Downloads and previews" -> This is the previous option titled "Download, Preview, Copy, etc."
- "Other actions"
- Thumbnails and image preview
- The generated image previews are now cached on the server.
- Added option to choose the resolution of the image previews and even allowed image files to be served as they are.
- Image previews are now loading with lower resolution on non-retina displays.
- Added support for the IMagick PHP extension for generating thumbnails using ImageMagick when PHP doesn't have permission to run external programs. Useful for shared hosting environments.
- Additional options for controling the behavior of thumbnail and preview generation have been added to the control panel, under "Interface" > "Thumbnails and preview".
- Added option to rotate previews in the image viewer.
- The same preview system and cached images are now also used when previewing images via shared web links opened in "Image gallery" mode.
- The gallery web links image viewer now supports non web-safe images as well, so you can share folders with raw photographs as galleries that include larger previews.
- To generate previews from the command line, you can use the script cron> php make_thumbs.php --username admin --size large.
- Fixed clearing thumbnail cache via the folder properties panel when a custom cache location is configured.
- Fixed generating thumbnails via command line (cron/make_thumbs.php).
- If the Google Static Maps API key is set, FileRun will generate thumbnails for GPX files.
- Authentication
- Users can now generate additional credentials to be used with third-party WebDAV apps. The option is available under the "Account settings" panel. This is particularly useful when connecting using the WebDAV protocol and your FileRun user account uses 2-Step verification (2FA). (Note that this feature requires the API to be enabled.)
- Authenticating to FileRun via OAuth2 now works with authentication plugins that use SSO (Single sign-on).
- Added the possiblity to limit users login to more than one IP address or range. "$config['app']['login']['restrict_ip'][$USERNAME]" can now be an array of IP addresses or ranges.
- No longer logging failed login attempts when the user is setting up 2FA or being asked for the 2FA code.
- Failed login attempts made from unauthorized IP addresses are now logged to the user activity log.
- Failed logins not attributed to a particular user account are now logged as well to the user activity log, under the FileRun superuser account. Paricularly useful to see when invalid usernames are being used or various other errors from a third-party authentication plugin are happening.
- Nextcloud apps
- Added compatiblity with the version 2.6 of the Nextcloud desktop app.
- Fixed synching shared folders with Nextcloud desktop sync.
- Fixed synching folder renames for Nextcloud apps.
- Nextcloud desktop app showing avatar on account.
- Nextcloud desktop app allowing to open a file/folder in the FileRun web UI. (Note that this currently doesn't work for shared items but only for items inside a FileRun user's home folder.)
- Activity Panel
- The activity panel is now available for the currently opened folder and also for files.
- Added config option ($config['app']['folder_activity']['show_own'] = true;) for enabling own actions to be listed in the Folder Activity panel.
- Added config option ($config['app']['folder_activity']['show_all_actions'] = true;) for disabling grouping of actions in the Folder Activity panel by file.
- Fixed functionality of the "Folder Activity" panel when enabled for shared folders.
- User Interface
- The default view mode using for web links can now be changed from the control panel (Interface > Options). Changing the default mode affects all existing web links, unless they were specifically shared with a view mode other than the default one. Web links that were shared with the parameter "mode" in the URL will not be affected.
- Added file size information for the files shared via "List view" links.
- The width of the folder panel is now being remembered on the same computer accross sessions.
- Links to files from the e-mail notifications are now opening the FileRun user interface with highlighting the file.
- Enabling/disabling or making changes to the FileRun plugins no longer requires users to clear their browser's cache in order to see the change.
- Clicking a file's label in the details panel will search the current folder for all files with that label.
- Clicking to "locate" a file from a search results it now closes the search panel, instead of performing another search inside the found file's folder.
- Text from the Control Panel grids can now be selected for copying.
- Fixed bug causing the file list to scroll up when clicking next to a file.
- The text editor now allows copying, pasting and text selection on mobile devices.
- Making any changes to metadata fields, field sets or file types will reflect immediately, without the users needing to clear their browsers' cache.
- You can hide the list of system default metadata file types (Audio, Documents, Photos, Videos) in the metadata file type search by setting "$config['app']['metadata']['search']['exclude_system_filetypes'] = true;".
- You can hide the list of system default metadata fields (the ones that belong to the "Audio", "Documents", "Photos", "Videos" file types) in the metadata file search by setting "$config['app']['metadata']['search']['exclude_system_fields'] = true;".
- The metadata fields with predefined lists of values now offer the user the option of setting no value.
- Metadata field sets are now sorted alphanumerically based on their names.
- The metadata field type "Date/time" now shows a calendar for choosing a value. The field expects the format "2019-01-29 23:59:59".
- Fix: The login form no longer moves out of the screen when typing in credentials on mobile devices.
- Fixed "Open with.." > "New tab" to allow multiple files to be left opened at the same time.
- Fixed Autodesk plugin opening in a new window.
- Fixed avatar letters being wrong in some cases.
- Fixed downloading file from the image viewer by pressing the Enter key.
- Fixed group avatar when group name contains multibyte characters (non-latin characters)
- Fixed: keyboard shortcuts on Firefox (non-Windows).
- Fixed sharing panel UI glitch preventing users with long names to be removed from a share.
- Fixed folder notification messages to include users' full names.
- Various other small UI improvements and fixes.
- Other Improvements
- Added control panel option for disabling/hiding the "Collections" feature. This applies system-wide.
- The ONLYOFFICE plugin is now available for all filetypes support by ONLYOFFICE, rather than only the common office documents. The full list is the following: "doc", "docx", "dotx", "odt", "ott", "rtf", "txt", "pdf", "html", "epub", "xps", "djvu", "xls", "xlsx", "xltx", "ods", "ots", "csv", "ppt", "pptx", "potx", "odp", "otp".
- The ONLYOFFICE plugin supports JWT authentication.
- The ONLYOFFICE plugin no longer autosaves changes. The user needs to click "File" -> "Save" or use the keyboard shortcut for the changes to be saved to the document.
- Change: the upload chunk size is no longer limited to a max of 20MB but instead it is determined automatically based on the PHP configured "upload_max_filesize" and "post_max_size" (the smallest of these two values). This has two important consequences. One is a potentially negative one, smaller files will be reuploaded from the start if the transfer is interrupted or paused (interrupted downloads are being resumed from the last uploaded chunk). The second consequence, is a positive one, with large files uploaded over fast connections will be uploaded much faster than before (particularly noticeable in local networks). The chunk size can still be manually using '$config['app']['upload']['chunk_size']' (see https://docs.filerun.com/advanced_configuration).
- Changing a folder's notifications options is now logged to the user activity log.
- Adding/removing a user to/from a group is now logged to the user activity log.
- Sending files/folders via e-mail, using web links, now logs the action of creating the web link.
- Saving changes on a web link's settings is no longer logged as an action if no changes were actually made.
- $config['app']['email_notification']['per_item']['limit_actions'] is an array containing a list of actions that notifications are being triggered when using per folder notifications.
- Apache Tika in server mode now requires version 1.22.
- Added options for enabling file indexing for image files and scanned PDFs through OCR. It requires Tesseract. For more informatiom please see https://docs.filerun.com/file_indexing
- Added option for loading a configuration file for Apache Tika.
- The text editor can now open GPX and KML files, with XML code highlighting.
- E-mail notifications for uploading and downloading empty files are no longer instant. This allows users to create new text files and add content to them without having too many notification messages being sent about the particular activity.
- The control panel export function for the user activity logs search results is now triggering a file download rather than saving the file in the superuser's home folder. The activity details are now json encoded.
- Added API method for changing the password.
- Added possiblity of specifying additional options for connecting to the MySQL database by editing "system/data/autoconfig.php" and adding the 'options' element which lists PDO predefined constants.
- File or folder names that end with a space or a dot character are no longer allowed.
- Users with the permission to share files with other FileRun users can now share their entire home folders.
- Other Fixes
- Fixed: Removing a user from a group leaving behind settings attached to files/folders shared with the group.
- Fixed: Removing a user from a shared folder leaving behind settings attached to the files/folders. For example, per-folder notifications enabled, having the users that no longer have access to the shared folder to still receive related notifications.
- Fixed regression bug: superuser not being able to assign users or groups using the "Can interact with" permissions.
- Fix: allow "memory limit hitting fatal error" to be logged to the PHP error log when trying to process Exif data from very large files.
- Fix: FileRun no long attempts to read Exif data from PSD/PSB files.
- Fixed compatiblity with the newer Autodesk API to allow opening CAD files.
- Fixed problem with browsing shared folders with certain WebDAV programs.
- Fixed PHP warning when importing users via CSV.
- Fixed PHP error (Call to undefined function FileRun\Utils\xdebug_get_function_stack() ..) when installing FileRun updates.
- Fixed extracting tar.gz archives.
- Fixed "cron/metadata_index.php" not processing all users when ran without paramaters.
- Fixed delay in reflecting changed control panel settings when PHP OPcache is enabled.
- Fixed error when accessing collections that are supposed to contain files that were removed from outside FileRun.
- Fixed problem with HTML characters typed in the message when sending files via e-mail.
July 01, 2019 (2019.06.01)
New features:
-
3D model file support
- Added 3D viewer with support for: OBJ/MTL, STL, FBX, DAE, X, GLTF/GLB, 3DS, 3MF.
- It supports external resources (texture files located in the same folder).
- It provides the option of saving screenshots from the renders.
- Added icon and file type description for various 3D model files.
- Added option to use https://github.com/unlimitedbacon/stl-thumb for generating thumbnails for STL 3D models.
- Added back the download cart. It is hidden by default and it can be enabled from the control panel, under "Interface" -> "Options".
- Added the possiblity of setting custom icons to specific folders. See this page for more details.
Fixes:
- Fixed several medium and low risk security vulnerabilities.
- Regression fix: Sharing as a link a sub folder of a shared folder would share the parent folder instead. (The current FileRun version has been patched shortly after release.)
- Added "index.html" files to prevent web servers from listing various FileRun application folders.
- Fixed emojis in filenames affecting thumbnail display mode.
- Fixed PHP warning when FileRun user is changing own password.
- Fix: Simple admin users unable to change passwords for the existing user accounts.
- Fixed folder listing sorting in the main UI.
- Fix: Filename with non-ASCII characters on file download on Edge.
- Fix: Form field sizing in the "Options" panel of the "Web Link" panel, on non-English translation, making last field inaccessible.
- Better handling of non-ASCII characters for generating user avatars.
- Fixed the progress bar UI on the upload panel.
- Fixed various UI glitches.
- Other changes
- Change: Due to security reasons, FileRun no longer allows filesystem paths/filenames that contain the < or > characters.
- To prevent getting locked out, the superuser account now has 20 failed login attempt until the account is locked, regardless of the settings for the other user accounts. Make sure you set a secure password for the user account.
- Behavior change: Closing the "Web Link" panel using the "Done" button no longer copies the URL to clipboard. Users have to press the "Copy" button instead.
- Added field for setting the name e-mail notifications are being sent from.
- Added informative notification when assigning the same home folder path to more than one user account.
May 22, 2019 (2019.05.21)
Important notes
- Making a backup of the FileRun installation before installing updates is highly recommended. Read here how.
- The minimum required PHP version for this update is 7.1. For best performance and security, we highly recommend PHP 7.2 or 7.3. The PHP versions 5.6 and 7.0 reached end-of-life from PHP developers, which means no security updates are being released for them. For the safety of your data, FileRun no longer supports them either. (Please see this guide for upgrading to PHP 7.1+.)
- This update breaks compatibility with the FileRun Android app, which will need updating. Please note that a compatible FileRun Android app might not be yet available.
- Using the desktop sync apps or the Nextcloud Android app is now requiring the FileRun API to be enabled. Read here how to enable it.
- After this update, the default language will be set to "English" and the installation will have no translations. The translation system has changed and any files previously uploaded to "system/data/languages" will be removed by this update. For adding translations, please see: https://docs.filerun.com/translating_filerun
- Users without the permission "User can make changes to files and folders", can no longer make copies of files/folders, even if they have the "User can upload files and folders" permission.
- The config option "$config['app']['thumbs']['output_small_filesize']" changed to "$config['thumbs']['output_small_max_filesize']".
- The configuration option "$config['app']['ui']['custom_css_url']" is no longer active or available. For customizations, please create the file "customizables/theme.css" and enabled it from the control panel under "Branding".
- The download cart feature has been removed. Please use the new collections feature or the starring feature to achieve the same.
- The "Creative Cloud" and "Pixlr" plugins have been removed as the services have been discontinued by their developers.
New features
-
Collections
- Files and folders can be added to virtual folders called collections.
- Same file or folder can be added to more than one collection.
- Entire collections can be downloaded with a single click.
- Multiple collections can be downloaded at the same time with a single click.
- Collections can be dragged into each other to add items from one collection to another. (The original collections will still preserve the same items.)
- Collections can be shared using web links. All options still apply:
- You can share the collections as image galleries or audio playlists, password protect the access, etc.
- You can enable file requests (ie. allow uploads from visitors), and all the folders contained in the collection will allow uploads. If the option "Allow visitors to see and download the existing files." is not enabled, the visitors will not have access to the folders contents, but only be able to upload new files.
- Files and folders can be renamed or moved, yet they will still remain in the collections to which they were added.
- Pro tip: use the search to locate files of interest, and add them to a collection, right from the search result.
- Pro tip #2: Share the same file/folder via multiple weblinks with different options, by placing them into collections and sharing the collections instead.
- Note: Collections can currently only contain files and folders from the user's own home folder and not from folders shared by other users.
-
Image editor
- Basic functionality: resize, crop, rotate, flip.
- Has no third-party requirements.
- All types of image files can be opened, as FileRun will convert the data format if necessary. Note, very large image files will be converted to a maximum resolution of 4000x4000 pixels. Editing a RAW image file, for example, will save the edited version as a separate JPG image.
- Can be used to convert various images file formats to JPG.
- The image viewer has a button shortcut for opening the current image in the editor.
-
Added Laravel authentication plugin.
-
Added dark theme.
- PDF documents can be edited with Google Docs Editor.
API
- Added API method for removing web links (http://docs.filerun.com/api#removing_web_links).
- Fixed weblink information when listing via the API files and folders with weblinks.w
- The API endpoint user/info provides now also information about the user's permissions.
Various
- Many performance improvements, making FileRun significantly quicker to load and react.
- Added compatibility with latest Nextcloud Android and desktop apps.
- Added configuration option for the LDAP plugin, to limit access only to users that are members of particular groups.
- The activity logs for files and folders can now be checked also for items from the trash folder.
-
User Interface
- Improvements for mobile browser access:
- The default display mode is "Detailed list" and the control panel set display mode applies only on large screen devices. The user can still change the display mode at any time.
- All inner popups open full screen. Users can rotate device to landscape for better use of wider content.
- Increased various text and element sizes for better accessibility.
- Improved the image viewer's details panel.
- Fix size of the Android app login prompt.
- Added support for LibreOffice for generating thumbnails for office documents, including plain text files and HTML. (https://en.wikipedia.org/wiki/LibreOffice#Supported_file_formats)
- Added breadcrumbs navigation which shows the path of the currently browsed folder and provides a quick way of browsing to the parent folders.
- Added blank theme for custom themeing.
- The custom theme file now loads on top of the selected color theme. To customize an existing theme, enable the option "Apply "customizables/theme.css"" and create the file "customizables/theme.css" where you write your custom CSS code.
- Target folder selector
- Shows a small window for browsing existing folders for performing various actions.
- It is used for copying or moving files and folders. The copy/paste option has been replaced by this feature.
- It is used also for extracting archives to specific locations.
- The web page's title gets updated based on the browsed folder. This helps identify between multiple opened tabs and improve bookmarking.
- Thumbnails
- Narrower thumbnails are now displayed from the top instead from the center. This makes identifying text documents easier.
- File icons are now monochrome, to better distinguish between system icons and thumbnails.
- Improved browser caching for thumbnails sent out from original file contents.
- Improved the loading speed from the server for cached thumbnails.
- Thumbnails are displayed now also for very small image files (smaller than 1KB). This is useful for small SVG icons, or plain text files without much content.
- Better cache handling for files that thumbnail generation fails or provides no output. For example, FileRun tries to generate cover images for MP3 files. Before, even if a file wasn't having one, the server was looking into the file for one, every time the user was listing the file. Now it doesn't.
- Small SVG files no longer employ ImageMagick for thumbnail generation but instead they are displayed natively.
- Default thumbnail size has been increased from 140 pixels to 170.
- Added lazy-loading for thumbnails displayed via weblinks.
- Searching: choosing a metadata field that has a predefined list of options now shows the actual list to the user.
- The refresh button is now on the top toolbar, for easier access.
- The meta-icons have been moved to allow longer file and folder names to display better.
- Added keyboard shortcut "n" (or "N") for creating a new folder.
- The "Locate" context menu option now shows for items in the search result.
- Failed actions now show a red colored message in the left-bottom corner of the screen, to inform the user that there was a problem.
- Restoring files from trash updates only the changes instead of reloading the trash file list.
- Added option for (calculating and) viewing folder sizes.
- Dragging files up and down the grid automatically scrolls the list.
- Added automatic scrolling when dragging items to the folders tree.
- Dragging folders from the tree panel is no longer enabled to prevent accidental folder moves. Moving folders is now done only by dragging from the grid.
- When dragging files and folders around, it's now clearer to see what files/folders are being dragged.
- Fix: the rating and tags widgets are no longer displayed for users that do not have permission to access metadata.
- Fix: file list scroll when playing an audio file from a display mode other than "Music".
- Various other interface improvements and fixes.
- Improvements for mobile browser access:
- Desktop sync
- Fixed uploading new files. The error message was "The server did not acknowledge the last chunk. (No e-tag was present)".
- Fixed uploading files inside the home folder (@Home). The error message was "Not allowed because you don't have permission to add files in that folder".
- Added option to preview old file versions. Versions open in separate browser tabs for easy comparison. They open with the default configured file preview method. If the default file preview method is an editor, saving changes will not update the old version, but it will save it as the current version.
- Files can be permanently deleted (skipping the trash folder) by holding the shift key when performing the action.
- Security: The option "Maximum login attempts" applies now also when a third-party authentication plugin is in use, preventing brute force attacks.
- The admin users can now reset a user's 2-step verification. Useful in case of lost devices.
- Fix: removed limitation on number of users and groups that can be listed inside the "Can interact with" user permission.
- Fix: loading high-res version of images in folders with single quote characters in their names.
- Fix: adding files to an existing Zip archive no longer resets the archive file, so weblinks and other metadata already attached to the archive get preserved.
- Fix: extracting files from a Zip archive, if they overwrite existing files, it no longer resets the target files, so weblinks and other metadata already attached to the existing files get preserved.
- Fix: The option of sharing a web link via QR-code is now enabled by default. (The optional config "$config['app']['weblinks']['showQRCode']" is now called "$config['app']['weblinks']['hideQRCode']".)
- Fixed "User info HTTP method" option not being taken into consideration for the OAuth2 authentication plugin.
- Fix SSO not setting a CSRF token causing users to be unable to delete files or the admin to make changes in the control panel. Affects only the cases where "Inactivity timeout" is set to 0.
- Fix ImageMagick crash when $config['imagemagick_limit_resources'] is enabled.
- Added plugin for troubleshooting the thumbnail generation process. The plugin is available only to the FileRun superuser and disabled by default.
- Added config option $config['app']['enable_catch_all_event']. Set to true, will have FileRun look for "customizables/events/catch-all.php" and run it every time a user performs an action.
- Fix: trying to move a folder to the same location ends with an error message instead of renaming the folder to "Copy of ..".
- Improvement: when a file/folder move attempt fails, the user now gets to know to which of the selected files/folders the returned error refers to.
- Fix: error listing user accounts when the option "Inactive accounts" is set to "Do not delete" under the guest user settings.
- Improvement: when trying to empty the trash folder, if there is an item with errors, the operation will continue with the remaining of the files rather than stop there.
- Fix: user self registration process wasn't registering the user details (Phone, Company, Website) correctly.
- Raw image files 'cr2', 'mos', 'mef', 'nef', 'arw', '3fr', 'iiq', if they don't have an XMP sidecar file, are processed as TIFF for extracting basic Exif data (width, height and date taken).
- Added 'webp' image file format support and it is handled as a web-safe image (just as JPG or PNG). Note that at this time, Safari, the old Internet Explorer, the old Firefox versions and Edge versions 12-17, do not support this file format.
- Fixed error message when trying to import users from a file without mapping both first and last name columns.
- Added AIF, AIFF, 7Z, DCM as recognizable file formats.
- Removed FLV and SWF video playback support.
- Fixed full-screen on EPUB reader on Chrome.
- Added support for vertical languages EPUB books.
- 'file.download' hook has been renamed to 'file.read'
- 'file.upload' hook has been renamed to 'file.write' and it executes before the file is write but after all the needed information has been collected (does not include file contents data). To target particular types of file writing, there are the available hook names "file.write.string", "file.write.upload", "file.write.move", "file.write.copy"
- Other changes
- File downloads (regardless of method - which includes opening a file in the browser for viewing, previewing a bit of a media file, etc.) no longer logs the action to FileRun's activity logs and the per-file activity logs, unless the very end part of the file's contents has been transfered from the server to the client. This is done to avoid thousands of log entries caused by Firefox and other browser that might make very large number of small partial requests when downloading a file. This change means that if a user opens an audio file or video file and doesn't wait until the entire file gets downloaded, the action will not be logged on the server. If this is not a desired behavior for your particular use-case, you can change back to the previous behavior, by adding "$config['app']['logging']['partial_downloads'] = true;" inside "customizables/config.php" (http://docs.filerun.com/advanced_configuration
- The config options "$config['app']['api']['oauth2']['allow_over_http'] = true;" is no longer available, with the option now added to the FileRun control panel.
Sharing Files with Web Links
How to Create a Web Link for Sharing a File
- Right Click on the file (document)
- Click the "Web Link" option from the contextual menu. A text field will be displayed, containing the URL ("Link address") that can be used to share & access the file.
- Choose your sharing options: a) short link -creates a tiny web link, b) set a password - create your own or auto-generated, c) set an expiration period - set it and forget it, d) limit the number times for downloads, e) "receive email notifications" - if you want to get notified automatically every time someone downloads the file, f) add terms & conditions for the file download- such as disclaimers or end user license agreements.
- Choose your sharing method: a) share the link via email post the link on your web site b) post the link in your social media site- Facebook, Twitter & LinkedIn.
- To Exit - Simply close out or click the "Save Changes" button.
Testing your Web Link
Select the "Open" button to test your web link. This allows you to see & experience what your end user will see before sharing the link.
Examples of Sharing a Web Link to a file (i.e. PDF, Word, Excel, PowerPoint, MP4, JPG files)
Files can be easily shared. Web links can be directly sent to from within Web File Share or you can copy the link address and paste it within an email.
Example #1: Send Document Web Links using the Email Function within Web File Share
Example #2: Send Document Web Links from your Outlook
Removing a Web Link
To remove the Web Link from a file, go to the Web Link of the file. Select the "Options" tab. Select the "Remove Web Link" button and "Save Changes".
Searching files
Searching Files
Searching by filename
-
Search by entire filename, example: “Some Document.xls”
-
Search by extension, example “.xls”
-
Search by partial filename, example “Document”
-
Search by partial filename and filter by extension: “Doc%.xls”
Searching by text contents
| Filter | Example | Use this to |
| AND | building AND project | Find files that contain both words "building" and "project" (even if those words are not right next to each other). |
| NOT | building NOT project | Find files that contain the word "building," but not "project". |
| OR | building OR project | Find files that contain either of the words "building" or "project". |
| Quotes | "building project" | Find files that contain the exact phrase "building project". |
| Wildcard | te?t | Find single and multiple character wildcard searches within single terms. To perform a single character wildcard search use the "?" symbol. To perform a multiple character wildcard search use the "*" symbol. For example, to search for "text" or "test" you can use the search: "te?t". |
| Fuzzy Searches | roam~ | To do a fuzzy search use the tilde, "~", symbol at the end of a Single word Term. For example to search for a term similar in spelling to "roam" use the fuzzy search: roam~ This search will find terms like foam and roams. |
| Proximity Searches | "project china"~10 | Find words which are within a specific distance away. To do a proximity search use the tilde, "~", symbol at the end of a Phrase. For example to search for a "project" and "china" within 10 words of each other in a document use the search: "project china"~10 |
Searching by metadata
To search the files by a particular metadata value, click the search button and select “Search metadata” while selecting the desired metadata field. If you have not typed anything in the search box, all files having any value set will be displayed. This can be useful for quickly displaying all the files that have comments, or labels, etc.
Using the search results list
Right-click an item and select “Locate” to open the item's folder location.
Uploading or Adding files
There are two file/folder upload methods:
Drag and Drop
When using "Google Chrome" and "Mozilla Firefox" browsers, this upload method allows you to drag files from your computer on the specified area, to start the file/folder transfer. It works with files up to 4GB.
Select Files/Folder
When using "Microsoft Internet Explorer" or "Apple Safari" browsers, files/folder can be uploaded only by selecting them using the appropriate option under "upload". When using one of these two browsers you can upload files with sizes up to 2GB.
Please note that this upload method does not support resuming interrupted uploads and for files larger than a few hundreds of megabytes.
Please follow these steps to upload files using this method:
To select multiple files, hold the "CTRL" key and click on the file to select it.
The selected file(s)/folder will start uploading.
Once the uploading process is completed, the selected file(s)/folder will start showing up in the desired folder. You can now access them from your network.
Web File Share - Quick Start Guide
Working with Files
- Uploading or Adding files
- Copying files
- Deleting files
- Downloading files
- E-mailing FilesMoving files
- Renaming files
- Searching files
- Files Comments
- Files Metadata
- Locking / Unlocking files
File Versioning
- Browsing previous file versions
- Restoring / Deleting previous file versions
Working with Zip Files
- Creating zip files
- Extracting zip files
Working with Folders
- Creating new folders
- Downloading folders
- Hiding folders
- Moving Folders
- Renaming folders
- Uploading folders
Sharing Files & Folders
- Sharing Files with Web Links
- Sharing Folders with Web Links
- Internal Folder Sharing
- Web Links vs Internal Folder Sharing
Syncing your Files & Folders
- Syncing your network folders with your laptop or home computer
- Bit Torrent Sync Settings for Apple iPad and iPhone
- Sharing folders with Android Device
Connecting to Quik File Share
- WebDAV
E-mailing Files
- You can send large files via e-mail without worries. The recipients will receive links to the files, instead of having the files taking up all the mailbox space.
- You can also be automatically notified by Web File Share via e-mail when the recipient has actually downloaded the file!
To send files as e-mail attachments follow these steps:
- Select one file, or multiple files by holding the CTRL key pressed.
- Click the "E-mail" option from the contextual menu.
- Fill in the displayed form's fields and click "Send"
Instead of attaching the files, to avoid e-mail servers' limitations, Web File Share can also automatically create and attach Web Links to the email. To do that select the "Create and attach WebLinks instead of sending the actual files" checkbox.
To disallow the web access to the files at a later time, you can remove the Web Links as described in the “Web Links” section bellow.
Deleting files
To delete one or multiple files follow these steps:
-
Select one file, or multiple files by holding the CTRL key pressed.
-
Click the “Delete” option from the contextual menu.
-
The deleted file(s) will disappear from the list.
Deleted files can be restored from the "Trash" special folder. If you have checked the "Permanent deletion" option the files have been destroyed and cannot be recovered.
Alternatively
Select "Confirm" after "Delete" to avoid getting the prompt for deletion and deleting the files directly.

Moving files
To move one or multiple files to another folder follow these steps:
-
Select one file, or multiple files by holding the CTRL key pressed.
-
Drag the file(s) from the list to the target folder on the left tree menu.
-
The files list will automatically reload to show the changes.
Downloading files and Folders
To download files right-click them and select “Download” from the contextual menu.
If you select multiple files or a folder, the selected files will be included in one Zip archive.
To download multiple files and folders from different locations at the same time, right-click one of the files or folders and select the “Add to cart” option, under “Download”. Once the download cart is open, you can add more items to it by drag&drop.
Files Comments
To read or add comments to a file follow these steps:
-
Select the file
-
Toggle the “Comments” tab available at the bottom of the file preview pane.
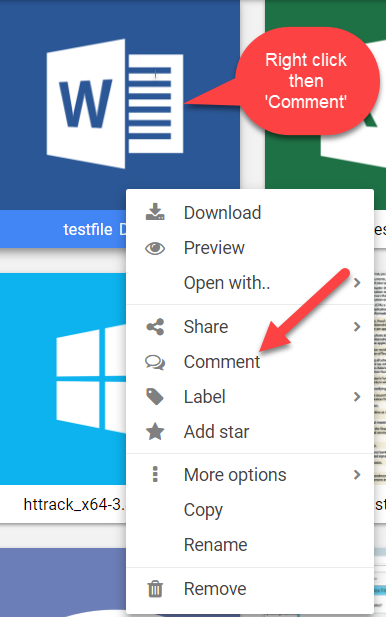
To remove a comment from the list select it and click the “X” button that is displayed on the right-hand side of the comment you are holding the mouse cursor over.
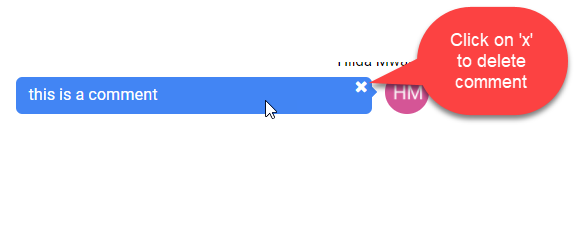
Renaming files
To rename a file follow these steps:
-
Right-click the file and select “Rename” from the contextual menu.
-
Type the new name for the file and click “Ok”.
-
The files list will automatically reload to show the changes.
Copying files
To copy one or multiple files to another folder follow these steps:
-
Select one file, or multiple files by holding the CTRL key pressed.
-
Click the “Copy” option from the contextual menu.
-
Right-click the target folder from the left tree menu and select “Paste copied files”.
-
The files list will automatically reload to show the changes.
Locking / Unlocking files
To lock or unlock a file follow these steps:
-
Select the file
-
Select the “Versioning” option from the contextual menu and click the appropriate action.
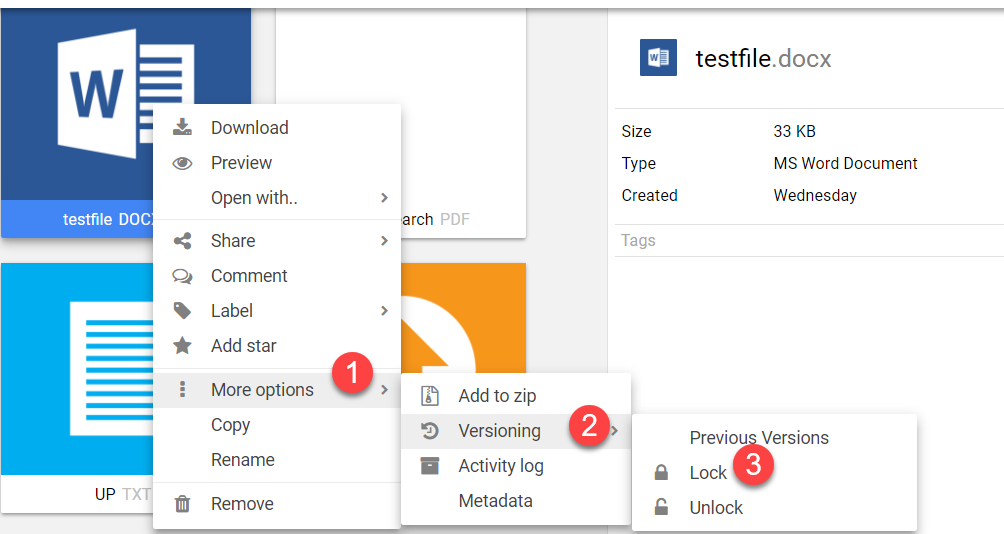
Locked files can be modified only by the users who locked them.
Files Metadata
To coose what metadata information to display in the files list, follow these steps:
-
Move the mouse over any column header and click the arrow icon that appears on its right side.
-
Expand the “Columns” sub-menu and select the columns that you want to display.
Internal Folder Sharing
-
Right-click the folder you want to share and select the “Share” → “With users” option from the contextual menu. A popup window will open.
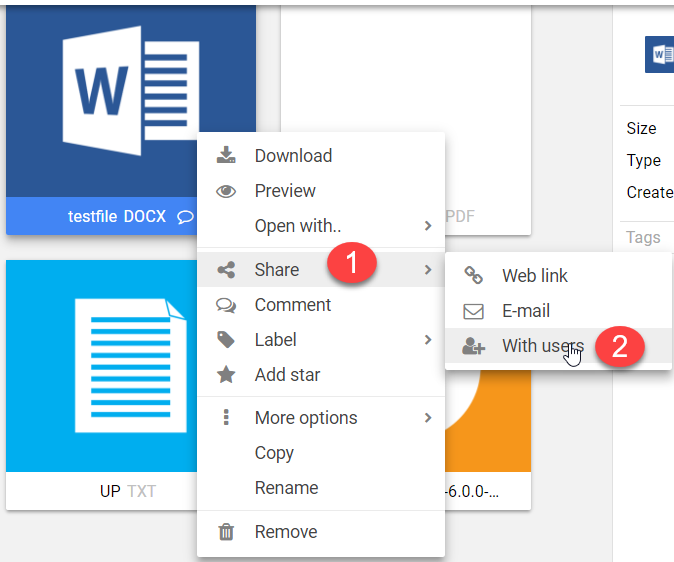
-
Click the “Add Users” button.
-
Select the users or groups of users with which you want to share the folder by clicking their checkboxes.
-
Click the “Ok” button.

-
-
Set the permissions you wish to grant to the selected users
-
“Upload” - allows the user to upload or paste files or folders in the shared folder.
-
“Download/Copy/Preview” - allows access to the existing files' contents.
-
“Add comments” - allows the user to attach comments to the files.
-
“Read comments” - allows the user to read comments that are already attached to the files.
-
“Share” - allows the user to share files as weblinks.
-
“Move/Rename/Delete” - allows the user to perform various organizational actions on the files available in the shared folder.
-
The “Options” tab can be used to share the folder under an alias or to make the folder available to the other users without showing who shared the folder. These options can be different for every selected user or group of users.
-
-
Click “Save”. The folder is now shared.
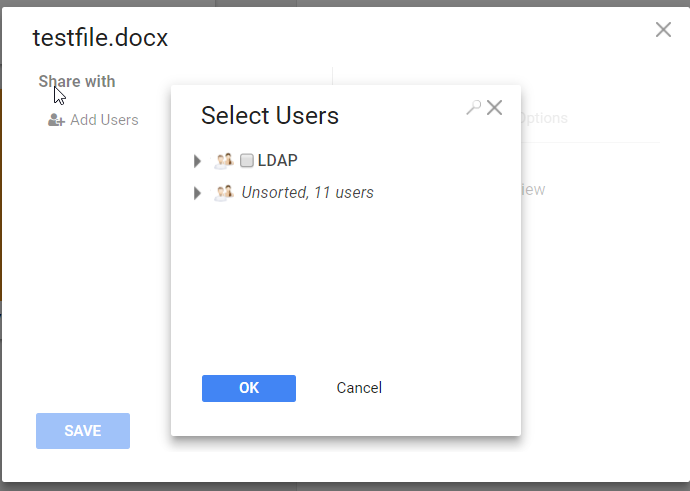
Sharing Folders with Web Links
You can use web links to publish photos, videos, or any other file type on Internet websites, or to share with other people via e-mail or chat.
To create a web link for a file follow these steps:
-
Right-click a file and select “Share” → “Web link”
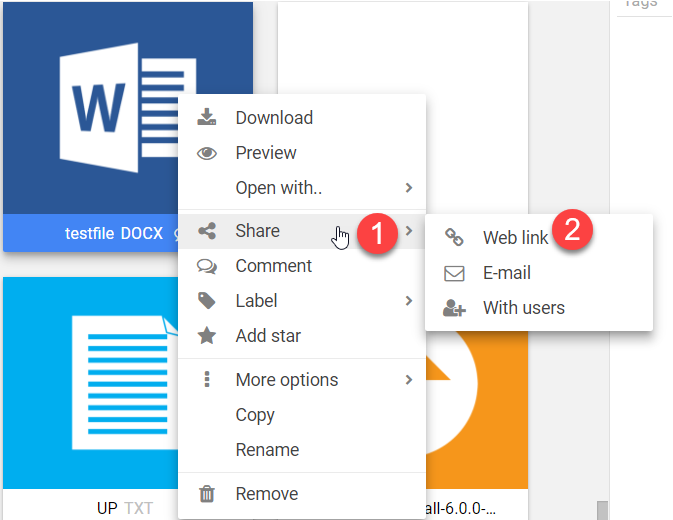
-
A popup will open and a text field will be displayed, containing the URL (web address) that can be used to access the file.
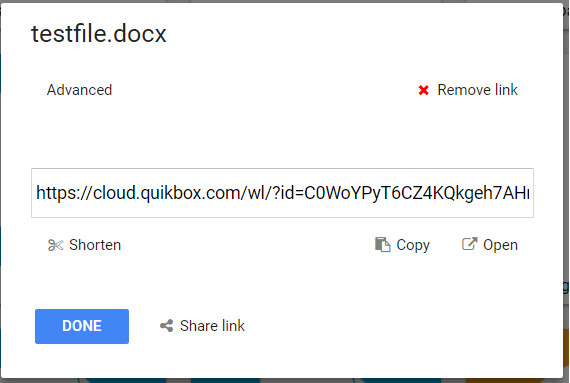
Use the displayed form to change the link's settings or remove the web link by clicking the “Remove link” button.
To create a web link for a folder works exactly the same as for a file.
Testing your Web Link
Select the "Open" button to test your web link. This allows you to see & experience what your end user will see before sharing the link.
Example of Sharing a Folder Web Link in Email
Folder links can be easily shared in email. See the example below.
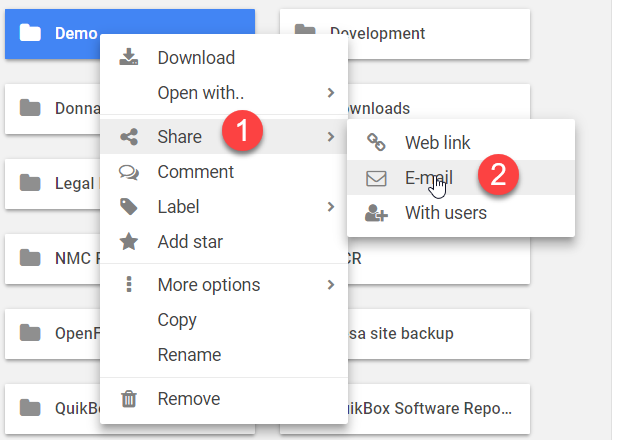
Removing a Web Link
To remove the Web Link, go to the Web Link of the folder. Select the "Options" tab. Select the "Remove Web Link" button and "Save Changes".
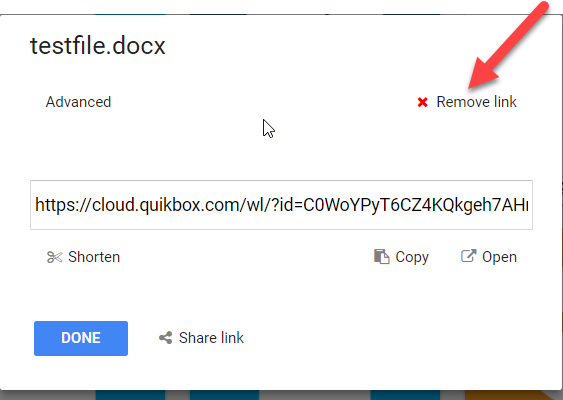
Web Links vs Internal Folder Sharing
Internal folder sharing
web link sharing
Sharing Options - When should I use "Web Links" vs Folder "Sharing"? See below.
Folder Sharing Option
Use the folder "Sharing" option when you want to share a folder or folder structure with other Web Files Share users.
For example, the Accounting Dept. wants to share client invoice files & folders with Sales Management.
This method is not for sharing just one single file. "Sharing" option can only be used for sharing an entire folder or folders with other users.
To learn more see Internal Folder Sharing.
Web Links Options
Use the "Web Links" option when you want to share a file, folder, or folder structure with non-users of Web Files Share such as customers and partners.
For example, ABC Company wants to share brochures and videos on their website and with their Partners.
Web links can be shared via email and placed into web pages. Web links can also be "embedded into web pages". For example, if you want show pictures of your products directly within your web site. You can embed the Web File Share link using a simple HTML iFrame command.
To learn more see Sharing Folders with Web Links and Sharing Files with Web Links.
Downloading folders
For downloading entire folders there are two options.
First Method
- Right-clicking a folder and selecting "Download" will open a Java tool that will help you download the folder, file by file.
- This will open a Download dialog box that will prompt you to select a location for downloading/saving the selected folder on your system
- Select an appropriate location where you want to download the folder.
- As soon as you hit the "Save" button, the downloading process will begin and the folder will be downloaded file by file.
Alternative Method
Right-clicking a folder and selecting "Zip and download" will create a zip archive file and download it on your system.
This however, may not work with heavy files.
Uploading folders
There are two method of uploading folders:
First Method
Zip the folder on your computer, use any upload method to upload the zip archive to your Web File Share account and unzip the archive on the server once it is uploaded.
To know more about uploading folder as a single zipped file click here
Second Method
Use the Java upload method to select a folder instead of individual files. If the upload method mentions that you can drag files from your computer to it, you can also drag folders.
Creating new folders
To create a new folder follow these steps:
-
Right-click the folder under which you want to create the new folder
-
Click the “New sub-folder” option from the contextual menu.
-
Type a name for the new folder and press ENTER on the keyboard
To create a new folder under the directory that you are currently browsing you can also use the “NEW” red button.
Renaming folders
To rename a folder follow these steps:
-
Right-click the folder and select the “Rename” option from the contextual menu.
-
Type the new name for the folder and press ENTER on the keyboard
Moving Folders
To move a folder to another folder follow these steps:
-
Click and hold the folder you wish to move
-
Drag the folder from its location to the desired folder.
-
Click Ok in the confirmation prompt which will open
Internal Folder Sharing
-
Right-click the folder you want to share and select the “Share” → “With users” option from the contextual menu. A popup window will open.
-
Click the “Add Users” button.
-
Select the users or groups of users with which you want to share the folder by clicking their checkboxes.
-
Click the “Ok” button.
-
-
Set the permissions you wish to grant to the selected users
-
“Upload” - allows the user to upload or paste files or folders in the shared folder.
-
“Download/Copy/Preview” - allows access to the existing files' contents.
-
“Add comments” - allows the user to attach comments to the files.
-
“Read comments” - allows the user to read comments that are already attached to the files.
-
“Share” - allows the user to share files as weblinks.
-
“Move/Rename/Delete” - allows the user to perform various organizational actions on the files available in the shared folder.
-
The “Options” tab can be used to share the folder under an alias or to make the folder available to the other users without showing who shared the folder. These options can be different for every selected user or group of users.
-
-
Click “Save”. The folder is now shared.
Sharing Files with Web Links
How to Create a Web Link for Sharing a File
- Right Click on the file (document)
- Click the "Web Link" option from the contextual menu. A text field will be displayed, containing the URL ("Link address") that can be used to share & access the file.
-
Choose your sharing options: a) short link -creates a tiny web link, b) set a password - create your own or auto-generated, c) set an expiration period - set it and forget it, d) limit the number times for downloads, e) "receive email notifications" - if you want to get notified automatically every time someone downloads the file, f) add terms & conditions for the file download- such as disclaimers or end user license agreements.
- Choose your sharing method: a) share the link via email post the link on your web site b) post the link in your social media site- Facebook, Twitter & LinkedIn.
- To Exit - Simply close out or click the "Save Changes" button.
Testing your Web Link
Select the "Open" button to test your web link. This allows you to see & experience what your end user will see before sharing the link.
Examples of Sharing a Web Link to a file (i.e. PDF, Word, Excel, PowerPoint, MP4, JPG files)
Files can be easily shared. Web links can be directly sent to from within Web File Share or you can copy the link address and paste it within an email.
Example #1: Send Document Web Links using the Email Function within Web File Share
Example #2: Send Document Web Links from your Outlook
Removing a Web Link
To remove the Web Link from a file, go to the Web Link of the file. Select the "Options" tab. Select the "Remove Web Link" button and "Save Changes".
See Also
Sharing Folders with Web Links
You can use web links to publish photos, videos, or any other file type on Internet websites, or to share with other people via e-mail or chat.
To create a web link for a file follow these steps:
-
Right-click a file and select “Share” → “Web link”
-
-
A popup will open and a text field will be displayed, containing the URL (web address) that can be used to access the file.
Use the displayed form to change the link's settings or remove the web link by clicking the “Remove link” button.
To create a web link for a folder works exactly the same as for a file.
Testing your Web Link
Select the "Open" button to test your web link. This allows you to see & experience what your end user will see before sharing the link
Example of Sharing a Folder Web Link in Email
Folder links can be easily shared in email. See the example below.
Removing a Web Link
To remove the Web Link, go to the Web Link of the folder. Select the "Options" tab. Select the "Remove Web Link" button and "Save Changes".
Web Links vs Internal Folder Sharing
Internal Folder Sharing
Web Link Sharing
Sharing Options - When should I use "Web Links" vs Folder "Sharing"? See below.
Folder Sharing Option
Use the folder "Sharing" option when you want to share a folder or folder structure with other Web Files Share users.
For example, the Accounting Dept. wants to share client invoice files & folders with Sales Management.
This method is not for sharing just one single file. "Sharing" option can only be used for sharing an entire folder or folders with other users.
To learn more see Internal Folder Sharing.
Web Links Options
Use the "Web Links" option when you want to share a file, folder, or folder structure with non-users of Web Files Share such as customers and partners.
For example, ABC Company wants to share brochures and videos on their website and with their Partners.
Web links can be shared via email and placed into web pages. Web links can also be "embedded into web pages". For example, if you want show pictures of your products directly within your web site. You can embed the Web File Share link using a simple HTML iFrame command.
To learn more see Sharing Folders with Web Links and Sharing Files with Web Links.
Sync folders with windows (laptop or home computer)
BitTorrent sync is a new feature of Quik File Share. It allows users to share or transfer data directly between devices with ease. It never stores your files on servers, but on the devices with which you share your Quik File Share folders. This means your files stay safe all the time from data breaches and prying eyes.
BitTorrent Sync is a free, unlimited, secure file-syncing app. It is available for Windows, Mac, Linux, Android, iOS and BSD. It can sync files between devices on a local network, or between remote devices over the Internet via secure, distributed P2P technology.
Follow the steps below to start syncing your files and folders between different devices easily, efficiently and securely.
Step 1
Right click the Quik File Share folder that you want to share using BitTorrent option. Select "Share" from the contextual menu and then "BitTorrent Sync" from the further sub-menu.
Step 2
Click the "Start Sharing" button from the Sync Folder window to generate a secret code for the Quik File Share folder that you want to share with other devices.
Step 3
Copy the code and save it at a safe place as it would be required when installing BitTorrent Sync app on other devices and sharing this folder with them.
There are two codes generated and each serves different purpose. The Full access secret allows you to modify, delete or write to the folder that you share with other devices. The Read-only secret, on the other hand, allows you to only read the files in the shared folders from other devices but you can't make any changes to it.
Step 4
Download the BitTorrent Sync app on your device, from where you want to access the Quik File Share folder, by visiting the link: http://www.bittorrent.com/sync/downloads
To download the BitTorrent Sync app for your Windows Desktop, follow the steps below:
Step 1
From http://www.bittorrent.com/sync/downloads, click Windows 1.2.82 for Desktop. This will prompt you to run the BitTorrent executive file. Click Run
Step 2
Select the location where you want to install the BitTorrent Sync app.
Step 3
Click Install to initiate the installation process.
Step 4
The BitTorrent Sync app is successfully installed at your specified location. Double click the app to run the BitTorrent Sync Setup file. Select "I have a secret" radiobutton and enter the secret code for the Quik File Share folder you saved earlier. Accept the terms and policies and click "Next".
Step 5
Choose the location where you want to save the sync folder and click "Next".
Step 6
When you see the screen below, you have successfully added your sync folder. You can either read the next two screens or skip.
Final Step
The sync folder successfully appears on the screen. You can sync as many folders as you want by choosing a "Add a Sync Folder" button.
You can now view all the shared Quik File Share folder files on your desktop.
Sync folders with Android Device
There are no file size limits or data caps. If the internet connection breaks in between then the file will resume downloading from the point where it was last left.
Step 1
Right click on the folder that you want to sync with your mobile device. Select "Share" from the contextual menu and then click on "BitTorrent sync".
Step 2
Click on "Connect mobile device" to generate a special bar code called "QR code". Scan this QR code with your mobile device to connect sync folders.
Step 3
From your Android device, download the free BitTorrent Sync software. Open BitTorrent Sync and add a new folder or choose an existing folder on your mobile device to sync with Web File Share.
Adding a new folder
Step 4
Click on "Scan QR code" and click Done. BitTorrent will automatically capture the information from the QR code.
Step 5
If you wish to automatically synchronize this folder, select the "Automatic Sync" option either by checking the "Automatic Sync" box on the Scan QR code screen or by right clicking the sync folder on your device and selecting "Automatic Sync" option from the pop up menu.
OR
If you have a wi-fi connection, BitTorrent sync will automatically start the syncing process and the files will begin to download on your device.
Sync folders with iOS (iPad or iPhone)
You can synchronize your Web File Share folders with your Apple device and access them from anywhere on the go from your favorite mobile device. It can be a one way synchronization where the updated files from the network show up on your handset or two-way communication where the users can modify the files at their convenience from their device and the changes get reflected on the network files.
There are no file size limits or data caps. If the internet connection breaks in between then the file will resume downloading from the point where it was last left.
Step 1
Right click on the folder that you want to sync with your Apple device. Select "Share" from the contextual menu and then click on "BitTorrent sync".
Step 2
Click on "Connect mobile device" to generate a special bar code called "QR code". Scan this QR code with your mobile device to connect sync folders.
To sync a folder on your iPad from your company network, follow the steps below:
1) From the Apple iPhone or iPad device, download the free BitTorrent Sync software from the app store. Open the BitTorrent Sync Software.
2) Click on "Add Sync Folder".
3) Hit the "Scan QR" button.
4) Hold the apple device up to your monitor and the BitTorrent Sync will automatically capture the information from the QR code.
5) Create a new folder (For example, Marketing) on your device for the documents to sync to and select "Done".
6) If you wish your iPad device automatically sync, select the folder that you created (For example, Marketing) and set the "Auto Sync" option. If your internet connection is running, the files will start syncing to your device and you can access them on the go.
Sync folders with Mac
Coming Soon!
WebDAV
Overview
As an alternative to the web browser, Web File Share can be also accessed with a standards-compliant WebDAV application. This can be useful for managing the remote files as they were folders on the local computer.
WebDAV client programs tested with Web File Share:
As an alternative, Web File Share can be also accessed with a standards-compliant WebDAV application. This can be useful for managing the remote files as they are folders on the local computer.
WebDAV client programs tested with Web File Share:
| Program Name | Operating System | License | Notes |
| MacOS Finder | MacOS | - | Guide available down on this page. |
| Cyberduck | MacOS | Free | |
| WebDrive | Windows/MacOS | Free Trial | Recommended by Web File Share! |
| NetDrive | Windows | Free For Personal Use | |
| Bit Kinex | Windows | Free | |
| CloudSafe WebDAV Client | Windows | Free/Unknown | It is designed to work with CloudSafe.com service, but has been successfully tested with Web File Share |
| IT Hit "Map Drive" | Windows | Commercial | |
| GoodSync | Windows/MacOS/Android/iOS | Free/Pro versions | Good for two-ways folder synchronization |
| WebDAV File Manager | Android | Free | |
| WebDAV Navigator | iOS | Free | |
| WebDAV-Sync | Any (Java) | Open-source | Command-line tool for two-ways folder synchronization. Works great. |
| DAVbox | Any (Java) | Commercial | Works great for two-ways folder synchronization. |
An example of the URL you need to use to access Web File Share's WebDAV would be: "http://files.quikbox.com/dav.php/" (for our online demo) Please note that the URL must contain the trailing slash character, after "dav.php".
Note for Apache servers:
If PHP is running as CGI/FastCGI on your server and the HTTP authentication fails, even if you provide valid credentials. If there isn't already a ".htaccess" file in the root folder of your Web File Share installation, create one and make sure it contains the following two lines:
RewriteEngine on
RewriteRule .* - [E=HTTP_AUTHORIZATION:%{HTTP:Authorization},L]
MacOS: Connecting with Finder
Assuming your Web File Share instance is installed at https://www.your-site.com/WebFileShare
In the Finder, choose Go > Connect to Server, type the address of the server in the Server Address field, and click Connect. The server address should be in a form similar to this: ADDRESS/WebFileShare/dav.php/.
For our example, that would be:
https://www.your-site.com/WebFileShare/dav.php/
For details, check the respective vendor documentation at the Apple website: http://support.apple.com/kb/PH3857
Linux: mounting from the command line
Install the WebDAV support using the davfs package. On Debian/Ubuntu, you can use:
sudo apt-get install davfs2
Reconfigure davfs2 to allow access to normal users (select Yes when prompted):
sudo dpkg-reconfigure davfs2
Add the users you want to be able to mount the share to the davfs2 group:
sudo usermod -aG davfs2 <user>
Edit /etc/fstab and add the following line for each user who wants to mount the folder (with your details where appropriate):
your-site.com/WebFileShare/dav.php/ /home/<username>/WebFileShare davfs user,rw,noauto 0 0
Then, as each user who wants to mount the folder:
Create the folders WebFileShare/ and .davfs2/ in your home directory
Create the file secrets inside .davfs2/, fill it with the following (with your credentials where appropriate):
your-site.com/WebFileShare/dav.php/ <username> <password>
Ensure the file is only writable by you either through the file manager, or via:
chmod 600 ~/.davfs2/secrets
Run the command:
mount ~/WebFileShare
To automatically mount the folder on login, add the command you used in step 4 to ./.coderc
Known Issues
Problem: Resource temporarily unavailable
Solution: If you experience trouble when you create a file in the directory, edit /etc/davfs2/davfs2.conf and add:
use_locks 0
Problem: Certificate warnings
Solution: If you use a self-signed certificate, you will get a warning. If you are willing to take the risk of a man in the middle attack, run this command instead:
echo "y" | mount ~/WebFileShare > /dev/null 2>&
Editing Files
You can edit your files using Google Docs or Only Office.
To edit any file, right click then select 'Open With'
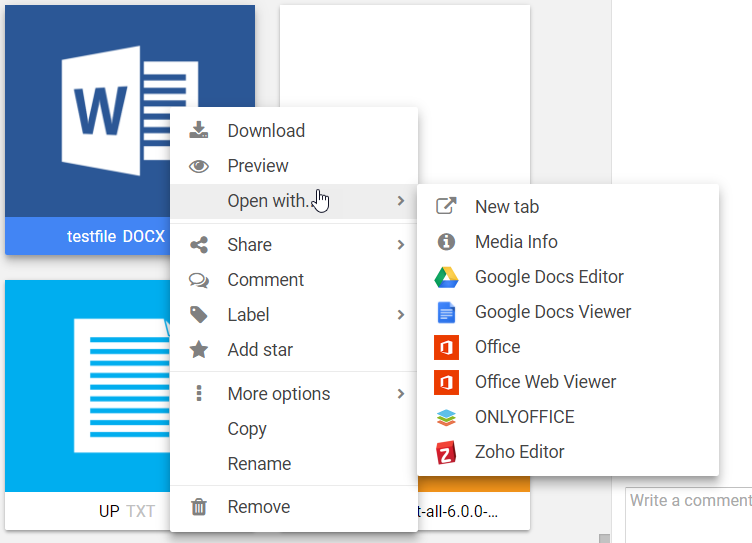
Browsing previous file versions
You can browse the previous versions by selecting a file and clicking the “Versioning” contextual menu option.
Restoring / deleting previous file versions
You can delete or restore a previous version by selecting it and clicking the appropriate contextual menu option.
Extracting Archives
To extract an archive follow these steps:
-
Right-click the file and select “More options” → “Extract archive”.
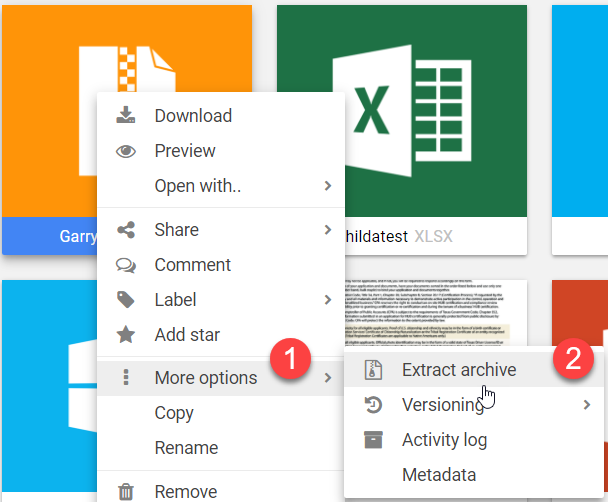
-
Type the name of the folder that will be used to extract the files to.
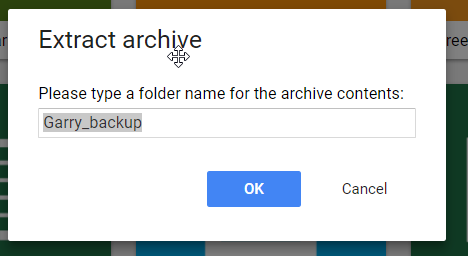
-
The folders list will automatically reload to show the changes.
Creating zip files
To Zip one or multiple files follow these steps:
-
Select one file, or multiple files by holding the CTRL key pressed.
-
Right-click the file and select “More options” → “Add to zip”.
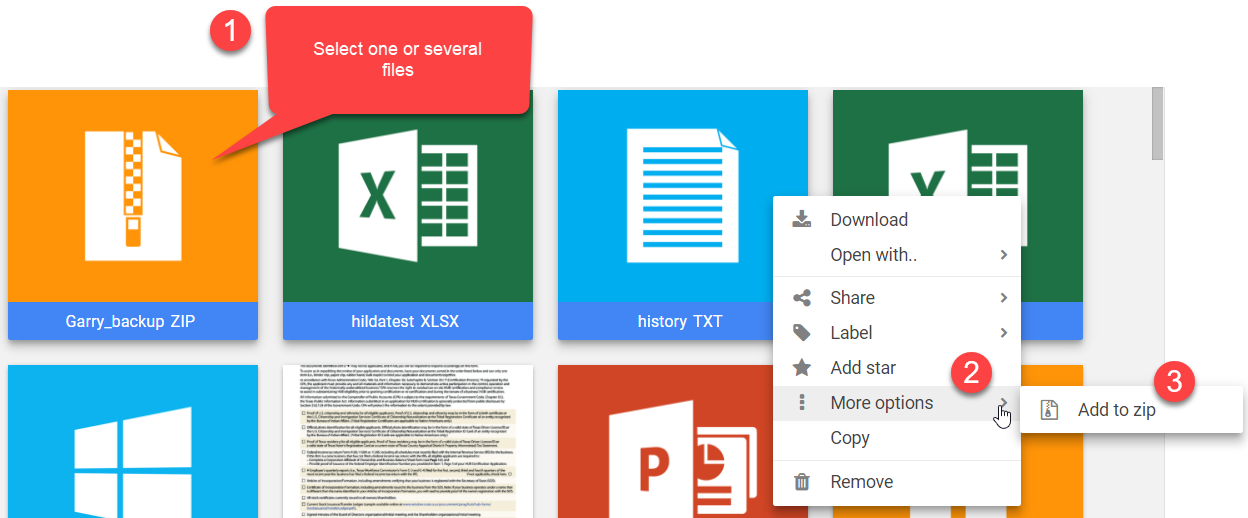
-
Type the new name for the new Zip file and click “Ok”.
-
The files list will automatically reload to show the changes.
To Zip an entire folder the process is identical.
Admin Guide Articles
Overview
Groups can be used for:
- Sharing a folder with multiple users at the same time. (You can also configure a user permissions so that it can only share folders with certain groups of users.)
- Configuring e-mail notifications: adding notification rules involving multiple users at the same time.
- Setting up admin users that can manage only certain groups of users.
Adding or removing users from groups
To add or remove a user from a group follow these steps:
- Open the control panel.
- Select “Users”.
- Select the user you want to add to a group or remove from one.
- Click “Edit user”
- Using the “User group(s)” field, select only the groups that you want the user to be part of.
- Click “Submit” to save the changes.
Adding a group
To create a new group follow these steps:
- Open the control Panle
- Select "Groups".
- Click 'Create New".
- Fill in the form
- Required Field -'Group Name'
- Click “Submit” to create the group with the specified details.
Renaming a group
To change a group's name follow these steps:
- Open the control panel.
- Select “Groups”.
- Select the group that you want to rename
- Click “Edit group”
- Make the appropriate changes in the form.
- Click “Save” to save the changes.
Deleting a group
To delete a group follow these steps:
- Open the control panel.
- Select “Groups”.
- Select the group you want to remove.
- Click “Delete group”.
- Click “Delete” to confirm the group's deletion.
- Deleting a group does not delete the users contained.
Adding a user
To create a new user account follow these steps:
-
Open the control panel.
-
Select “Users”.
-
Click “Create new”.
-
Fill in the form:
-
Required fields:
-
Username
-
Name
-
Home folder
-
-
Click “Submit” to create the user with the specified options.
Click the “Check path” link next to the “Home folder” field, to make sure the path you've set for him points to an existing folder. If it doesn't, the user will see an error message after logging in.
Please use only forward slashes (/) when setting up paths, even if you are running a Microsoft Windows server. If you are not sure how the path should look like, look at your own home folder path which is displayed on the form, inside the read-only field "Your personal home folder is".
Independent admin users
Independent admin users can:
-
See and manage only user accounts, roles and groups created by themselves.
-
See and manage only his e-mail notification settings.
-
Browse his own users' activity logs.
-
Manage his own metadata settings.
When configuring the independent admin's permissions, you can choose:
-
How many user accounts he will be able to create.
-
Whether he will be able to define the path of the users' home folder, or if he will be limited to a specified folder. If you define a “Home folder template path” for the independent admin user, he will not have any home folder related options when adding a new user. If you leave the field blank, all the users he creates will have their home folders automatically created inside the admin's own home folder.
Also, an independent admin user is required to configure space and traffic quotas for the users he creates. He cannot assign more space and traffic then it was assigned for its own account.
Deactivating a user
To deactivate a user account follow these steps:
-
Open the control panel.
-
Select “Users”.
-
Select the user you want to deactivate.
-
Click “Deactivate user account”.
Following these steps again it will reactivate the user account. This can be be used to temporary disable one user's access to FileRun.
Superuser
The superuser is the first account that is automatically created at FileRun installation. Its default username is “admin”.
Along the administrative tasks the other admin users can do, he is the only user that can:
-
Change the system's configuration.
-
Install software updates.
-
Install license upgrades.
The superuser account cannot be deleted or deactivated. It can however be renamed.
It is highly recommended that you do not assign a role to the superuser account.
Admin users
Admin users can:
-
Manage user accounts, except their own and other admins' accounts.
-
Manage roles.
-
Manage user groups.
-
Manage e-mail notification settings.
-
Browse users' activity logs.
-
Manage metadata settings.
When configuring the admin's permissions, you can choose:
-
What administrative section is he allowed to access.
-
Which groups of users he can see and manage.
-
Whether he will be able to define the path of the users' home folder, or if he will be limited to a specified folder.
Editing a user
To edit a user account follow these steps:
-
Open the control panel.
-
Select “Users”.
-
Select the user you want to edit.
-
Click “Edit user”
-
Make the appropriate changes in the form.
-
Click “Submit” to save the changes.
Deleting a user
To delete a user account follow these steps:
-
Open the control panel.
-
Select “Users”.
-
Select the user you want to remove.
-
Click “Delete user”.
-
Click “Delete” to confirm the user's deletion.
Deleting a FileRun user account does not remove the user's home folder or its activity log entries.
What gets deleted:
-
his “Deleted files” folder
-
the WebLinks he created
-
the folder sharing information
E-mail notification system
Configuration
To be able to send e-mails from Web File Share, you need to either have PHP configured with “sendmail” or have Web File Share configured with an SMTP server. Do note that most SMTP servers require authentication, and to prevent spam and other attacks, some don't even allow you to send e-mails from other addresses than the one configured for authentication. So don't be surprised if you are trying to send a file from a particular e-mail address and the recipient sees the message as coming from the address you used for the SMTP authentication.
<?php $config['system']['email']['smtp_options'] = ['SMTPAutoTLS' => false, 'ssl' => ['verify_peer' => false, 'verify_peer_name' =>false,'allow_self_signed' => true]];
Introduction
There are three ways you can configure Web File Share to send e-mail notifications:
(1) Admin users can enable or disable the “Notifications” checkbox for the users, when they create or edit their accounts. In this case the users will receive e-mail notification messages when files are upload or downloaded from their folders or when comments are attached to their files, or when other users share folders with them. The users also have control over this option and they can enable/disable from their “Account settings” panel. One requirement from e-mail notifications to be sent on other users action is the permission to “see and exchange files with”. This is set from the control panel, under the “Permissions” tab, when editing a user account. If user A isn't aware of the existence of user B, user A will not be notified if user B makes changes inside user A's folders.
(2) Admin users can also use the “Control Panel » Notifications” section for setting up rules for notifications. Here you manually select which user-performed actions should send e-mail notifications. Using this option you can configure e-mail notifications to be sent to different e-mail addresses than the ones set for the user accounts.
(3) With the Enterprise Web File Share version, users can choose to be notified when certain actions are being performed in a particular folder, by right-clicking the folder and selecting the “Notifications” option. The users can choose to be notified only about “write” actions or “read” actions. This option allows the users to receive notifications about “write” actions performed in folders that do not belong to them, but have been shared by other users, so the users can get notified when new files are available in these folders.
By default the e-mail notifications messages are sent from the e-mail address “some@email-address.com”. We recommend you to change that (from “Control Panel » System configuration » E-mail settings”) as many e-mail servers do not process messages that come from addresses that use a different domain name then the one used to host the Web File Share installation. In most cases this e-mail address needs to be associated with a valid e-mail account.
Customizing the notification messages
There are more than 70 actions that Web File Share can monitor in order to send e-mail notifications. Each action can have its own e-mail body template. For each action there is a corresponding template file, located inside the folder “customizables/emails/“. For the actions that do not have a template file, the template “customizables/emails/generic.tpl.txt” will be automatically used.
The following information which applies to all outgoing notifications can be customized from the control panel, under “System configuration”, “E-mail”, “Settings”:
-
From e-mail address
-
An optional BCC (Blind carbon copy) e-mail address
-
E-mail subject
-
Body content
E-mail template file format
<Action>
 [...]
 User "{$info.userInfo.name}" has performed the following action: "{$info.details.action}
 [...]
</Action>
The body of the notifications contains Smarty syntax that allows you to use variables and perform various logical operations. For more details on using Smarty, please check this page: http://www.smarty.net/docs/en/smarty.for.designers.tpl
The following Smarty variables are available for use inside the templates:
|
{$info.userInfo.username} |
User’s login name. |
|
{$info.userInfo.name} |
User’s name. |
|
{$info.userInfo.company} |
Company name |
|
{$info.userInfo.website} |
User’s website address. |
|
{$info.userInfo.description} |
User’s admin note. |
|
{$info.config.url.root} |
The URL of the Quik File Share installation. |
|
{$info.settings} |
Array containing Quik File Share’s current settings. |
|
{$info.details} |
Array containing details related to the performed action. The structure varies according to each specific action. |
Adding an email notification template
Each action has a unique keyname. Here are two examples:
-
“upload” for “When a file gets uploaded.”
-
“download” for “When a file gets downloaded”).
(You can check the following table for a full list of keynames.)
To add a custom template for a certain action, a text file named ”keyname.tpl.txt“ should be created in the e-mail notifications templates folder (as pointed above).
Actions keynames
|
Used often |
|
|
upload |
File uploaded |
|
receive_upload |
File received (via upload) |
|
receive_copy |
File received (via copy) |
|
receive_move |
File received (via move) |
|
download |
File downloaded |
|
provide_download |
File downloaded by other user |
|
weblink_access |
WebLink folder access |
|
weblink_download |
WebLink download |
|
weblink_upload |
File received (via WebLink) |
|
shared_folder_available |
New shared folder available |
|
comment_added |
File comment added |
|
comment_received |
Comment received on a file from other user |
|
metadata_changed |
Metadata information changed for a file |
|
login |
Login |
|
folder_shared |
Folder shared |
|
weblink_create |
WebLink created |
|
file_encrypted |
File encrypted |
|
file_decrypted |
File decrypted |
|
Rarely used |
|
|
weblink_update |
WebLink modified |
|
weblink_remove |
WebLink removed |
|
logout |
Logout |
|
login_failed |
Login failed |
|
login_failed_account_deactivated |
Account deactivated |
|
password_changed |
Password changed |
|
user_manually_activated |
Account activated by admin user |
|
user_manually_deactivated |
Account deactivated by admin user |
|
comment_removed |
File comment removed |
|
folder_unshared |
Folder unshared |
|
Successful file actions |
|
|
file_moved |
File moved |
|
file_copied |
File copied |
|
file_deleted |
File deleted |
|
deleted_file_restored |
Restored deleted file |
|
trash_delete_file |
File permanently deleted |
|
file_renamed |
File renamed |
|
zip_files |
Files zipped |
|
files_send_by_email |
Files sent by email |
|
file_locked |
File locked |
|
file_unlocked |
File unlocked |
|
version_restored |
File version restored |
|
version_deleted |
File version deleted |
|
Successful folder actions |
|
|
new_folder |
New folder created |
|
folder_moved |
Folder moved |
|
folder_deleted |
Folder deleted |
|
deleted_folder_restored |
Restored deleted folder |
|
trash_delete_folder |
Folder permanently deleted |
|
folder_renamed |
Folder renamed |
|
folder_copied |
Folder copied |
|
zip_folder |
Folder zipped |
|
Failed file actions |
|
|
upload_failed |
Upload failed |
|
file_copy_failed |
Failed to copy file |
|
file_deletion_failed |
Failed to delete file |
|
file_move_failed |
Failed to move file |
|
failed_file_rename |
Failed to rename file |
|
zip_files_failed |
Failed to zip files |
|
files_send_by_email_failed |
Failed to send files by email |
|
file_lock_failed |
Failed to lock file |
|
file_unlock_failed |
Failed to unlock file |
|
failed_to_add_comment |
Failed to add comment to file |
|
failed_to_remove_comment |
Failed to remove comment from file |
|
version_restoration_failed |
Failed to restore file version |
|
version_deletion_failed |
Failed to delete file version |
|
Failed folder actions |
|
|
new_folder_failed |
Failed to create new folder |
|
failed_folder_rename |
Failed to rename folder |
|
folder_copy_failed |
Failed to copy folder |
|
folder_deletion_failed |
Failed to delete folder |
|
folder_move_failed |
Failed to move folder |
|
zip_folder_failed |
Failed to zip folder |
|
Misc |
|
|
new_user_registration |
New user registration |
|
password_changed |
Password changed |
|
password_recovery |
Password recovery |
|
Administrative |
|
|
user_added |
User added |
|
user_edited |
User edited |
|
user_deleted |
User deleted |
|
role_added |
Role added |
|
role_edited |
Role edited |
|
role_deleted |
Role deleted |
|
space_quota_warning |
Space quota usage warning |
Grouping notifications
You can configure Web File Share to send all the notifications for a certain time period in a single e-mail message. This helps preventing Web File Share from sending hundreds of e-mail messages at a time, when users are uploading many files in a short time span.
To enable this you need to uncheck the option ”Instant email notifications“ available in “Control Panel” » “System configuration” » “E-mail settings”. The notifications will no longer be sent instantly, but queued until you run the script “cron/email_notifications.php” from the command line. On most Linux servers the command looks like this:
php cron/email_notifications.php your.server.hostname.com
In some cases, where you have a custom “php.ini” PHP configuration file for the Web File Share installation folder you might need to specify the path to it, so that the command is executed with the same configuration and not the default one (which usually doesn't load needed extensions, such as ionCube):
php -c php.ini cron/email_notifications.php your.server.hostname.com
Using a Cron job on Linux servers or a scheduled task on Windows, you can choose the time interval the e-mail notifications are getting sent.
You can read more about cron here: http://en.wikipedia.org/wiki/Cron For examples, see this page: http://www.thegeekstuff.com/2009/06/15-practical-crontab-examples/
If you are using a web hosting service, you most probably have a control panel tool for setting up scheduled tasks, so we recommend you to ask your server administrator or hosting service tech support how do you go about setting this up.
File preview
Previewing documents
The following file types can be previewed or opened with Web File Share by default:
Image files:
-
PHP GD extension: jpg, jpeg, gif, png, jpe
-
ImageMagick: most known image file types
Office documents:
-
PDF documents are opened inside the browser, on most browsers, and in some which don't support that, open with Web File Share's HTML5-based PDF viewer.
-
rtf, doc, xls, pps, ppt, docx, xlsx, pptx, odp, fodp, ods, fods, odt, fodt, sxw, sxc, sxi open by default with Box View
-
odp, ods, odt open with Web File Share's own OpenDocument Viewer
-
EPS documents can be previewed with ImageMagick: ImageMagick_thumbnail_generation_and_image_preview
Text documents:
-
svg, class, h, bat, cmd, sh, eml, txt, readme, nfo, htaccess, htm, html, cfm, wml, htt, inc, vbs, js, json, java, jsp, jspx, asp, aspx, ashx, asmx, axd, pl, cgi, php, php3, php4, py, rb, rhtml, erb, pxp, xml, xhtml, sass, css, tpl, sql, sub, srt, log, ini (new extensions can be easly added)
Archive files:
-
ZIP, TAR, TAR.BZ2, TBZ, BZ2, TAR.GZ, TGZ, JAR archives and GZ compressed files can be extracted.
Video files:
-
mpg, mov, webm, mp4, swf, flv, ogv, m4v
-
wmv (usually supported only by Windows computers) - not an official Web File Share feature because of third-party software requirements
Audio files:
-
mp3, mpa, m3u, m3u8, pls, ogg, wav, flac
AutoCAD files:
-
skp, fbx, dwg, dwf, dxf, rvt
Misc file types:
-
URL (opens the web page inside an embedded window)
Third party Online services
Additional preview methods will be displayed in the contextual menu, under “Open with..”, when certain actions can be performed for the selected file.
Google Docs Viewer and Editor
-
can preview, create and edit most common office file types
Microsoft Office Web Viewer (http://officewebviewer.com)
-
can preview most common Microsoft Office file types
Zoho Editor (http://www.zoho.com/)
-
can preview, create and edit most common office file types
Aviary Image Editor (http://www.aviary.com/)
-
Available for: “jpg”, “jpeg”, “png”
Pixlr Image Editor (http://www.pixlr.com/)
-
Available for: “jpg”, “jpeg”, “gif”, “png”, “psd
Autodesk Freewheel Viewer (http://labs.autodesk.com/technologies/freewheel/)
-
available for AutoCAD documents
Google Earth KML Viewer
-
available for “kml” files
Bing Maps KML Viewer
-
available for “kml” files
Cloud Convert
-
available for converting many common file types
Hiding Preview Options
Most preview plugins can be disabled from the control panel, under “System configuration” » “Files” » “Open with.. options”
Setting Default Open Method
You can choose how Web File Share handles each type of file. Simply access the control panel, under “System configuration” » “Files” » “Open with.. options” » “Defaults”
Time zone
When using Web File Share with a webhosting service, sometimes the server is located in a different time zone than you and your users. You can adjust the time difference by configuring Web File Share to use your time zone instead:
Open the file "/path-to-WebFileShare/customizables/config.php" in a text editor and add the following line:
date_default_timezone_set("Asia/Tokyo");
Replace "Asia/Tokyo" with your desired location.
Find a list of available timezone codes for various locations on the planet at http://www.php.net/manual/en/timezones.php
Date/Time Formats
If you also want to change the date/time formats used in the interface, these can be changed by editing the language translation files (See Translating Web File Share).
Overview
Most of the configuration is done from Web File Share's control panel. However, there are additional configuration options that can be set by editing the file “customizables/config.php”. If the files does not exist, you can simply create it.
User Interface
|
$config['app']['ui']['custom_css_url'] = 'custom.css'; |
Loads an additional CSS file with your customizations. It's better to do this than edit Web File Share's existing CSS code. |
|
$config['app']['ui']['enable_favicon_ico'] = true; |
Allows browsers to use the file “favicon.ico” for the bookmark icon. |
|
$config['app']['ui']['ReadMeFileName'] = "README"; |
Sets the name of the file that is used for displaying folder information.
|
|
$config['app']['hidden_file_names'][] = "*.exe"; |
Hides all files who's names are ending with “.exe”. You can add multiple configuration lines like this one, to hide additional files. |
|
$config['app']['hidden_folder_names'][] = "_*"; |
Hides all folders who's names are starting with “_”. You can add multiple configuration lines like this one, to hide additional folders. |
|
$config['app']['upload']['max_simultaneous'] = 5; |
Change the number of files Web File Share is simultaneously uploading. The default number is 3. As a rule of thumb, the larger your files, the smaller this number, and vice-versa. |
|
$config['app']['labels']['default'] = [['color' => 'green', 'text' => 'APPROVED'], ['color' => 'orange', 'text' => 'PENDING'], ['color' => 'red', 'text' => 'REJECTED']]; |
These are the default labels, which can be customized as desired. |
|
$config['imagemagick']['older_than_6_3_2'] = true; |
Use when the version of ImageMagick ont he server is older than 6.3.2, or if the file previews are not centered inside the thumbnails, but aligned on the left side. |
|
$config['app']['thumbs']['output_small_filesize'] = 8388608; |
By default, images smaller than 8MB are send directly to the browser instead of having a thumbnail generated. You can alter this limit. |
|
$config['imagemagick']['fileSizeLimit'] = 1048576; |
Limits the ImageMagick thumbnail generation only for files larger than 1048576 bytes (1MB). |
|
$config['app']['disable_sound_notification'] = true; |
Sets the default state of the sound notifications to off. |
|
$config['app']['media']['music']['latest']['limit'] = 100; $config['app']['media']['music']['random']['limit'] = 100; $config['app']['media']['photos']['latest']['limit'] = 100; $config['app']['media']['photos']['tags']['limit'] = 100; |
Customize various media folder listing limits. |
|
$config['app']['metadata']['search']['results']['limit'] = 200; |
Customize the number of files listed in the search-by-metadata result |
|
$config['app']['metadata']['search']['results']['limit'] = 200; |
Customize the number of files listed in the search-by-metadata result |
|
$config['app']['ui']['login_logos']['acme'] = 'https://www.acne.com/logo.png'; |
Access the Web File Share installation URL by appending “?client=acme” to show that particular pre-configured logo instead of the default configured one. |
File indexing and full-text searching
Web File Share configuration
You can enable the full-text file searching from “Control Panel” » “System configuration” » “Files” » “Indexing”. It is not enabled by default because it requires third-party software (Apache Tika).
If you are running Tika in command line mode, simply provide the path to the “tika-app-1.12.jar” file. That's it! Click the “Check path” to make sure it works. If Java is installed on the server and the file path is correct, you should see the Apache Tika version displayed as a result of the test.
If you are running Tika in server mode, provide the hostname and port number of the Tika server. Click the “Test server” to make sure it works. If everything is in order you should see the Apache Tika version displayed as a result of the test.
Installing Apache Tika
Installing Tika is as simple as uploading a file to your server.
Download the “jar” file from here: https://tika.apache.org/download.html
Download the “tika-app[*].jar” if you want to run Tika from the command line and “tika-server[*].jar” if you want to run it as a server. Running Tika in server mode speeds up the indexing process.
You can read more about Tika here: https://tika.apache.org
Set Index Queue Manager
As extracting the text from a binary file requires a lot of CPU processing, the files are queued and processed one at a time. This requires the script “cron/process_search_index_queue.php” to be executed frequently. We recommend running the script every 5 minutes or so, so you will not have to wait to long until an uploaded file will be found by the search engine.
On a Linux server this can easily be done be setting up a cron job like this:
-
Create a new text file at “cron/process_search_index_queue.sh” and write the following inside:
php -c php.ini process_search_index_queue.php
To find out the path of the “php.ini” used by Web File Share open “http://your-site.com/WebFileShare/info.php” file in your browser.
-
Open a command line console (SSH)
-
Open the crontab editor by running:
crontab -e
-
Write:
* * * * * /path-to-WebFileShare/cron/process_search_index_queue.sh
-
Press “:wq” and “Enter” to save the changes and close the editor.
If your hosting service is running the cPanel administrative tool, it usually provides a web-based tool for setting up cron jobs easier.
On Windows this can be achieved by creating a Windows schedule event which calls a .BAT file containing something like this:
CD cron
C:/PHP/PHP.EXE process_search_index_queue.php
ImageMagick thumbnail generation and image preview
Introduction
GraphicsMagick (http://www.graphicsmagick.org) can also be used, and in some cases it can be faster and more efficient than ImageMagick
Installing ImageMagick
Please see http://www.imagemagick.org
Hewlett-Packard Graphics Language (HPGL) plotter files (.plt) can also be previewed with Web File Share and ImageMagick by installing “Hp2xx” (http://www.gnu.org/software/hp2xx/hp2xx.html). Windows version available here: http://gnuwin32.sourceforge.net/packages/hp2xx.htm
If you are running a Windows server, we recommend you to install ImageMagick to a path without space characters (like “Program Files”). You can install it for example to a path like “C:/ImageMagick”.
PDF Support
For ImageMagick to be able to generate thumbnails for PDF documents you will also need to install Ghostscript (http://www.ghostscript.com/download/gsdnld.html).
Setting up Web File Share
To enable ImageMagick please follow these steps:
-
Login as superuser (default username “admin”).
-
Open “Control Panel”.
-
Go to “System configuration” » “File preview and thumbnails”.
-
Enable ImageMagick.
-
Set path to ImageMagick “convert” binary.
Example of valid paths:
Windows servers: C:/ImageMagick/convert.exe
Windows servers: C:/"Program Files"/ImageMagick/convert.exe
Linux servers: /usr/bin/convert
Troubleshooting
If you see broken icons instead of thumbnails:
-
Make sure ImageMagick is working, running the following command: convert logo: image.jpg
-
Make sure that Ghostscript is working. Try converting a PDF document using the command line: convert example.pdf example.png
-
Make sure the path to ImageMagick is correctly configured in Web File Share's control panel.
-
On Windows servers, make sure PHP can run external application. You need to give the Internet Guest User (IUSR_<your-computer-name>) “read & execute” permission on the file that PHP is trying to run ImageMagick trough. That would be “cmd.exe” (located usually inside the folder “C:/Windows/System32”), the file used for running programs trough the command line.
Accessing WebDAV
As an alternative, Web File Share can be also accessed with a standards-compliant WebDAV application. This can be useful for managing the remote files as they are folders on the local computer.
WebDAV client programs tested with Web File Share:
|
Program Name |
Operating System |
License |
Notes |
|
MacOS Finder |
MacOS |
|
Guide available down on this page. |
|
MacOS |
Free |
|
|
|
Windows/MacOS |
Free Trial |
Recommended by Web File Share! |
|
|
Windows |
Free For Personal Use |
|
|
|
Windows |
Commercial |
|
|
|
Windows/MacOS/Android/iOS |
Free/Pro versions |
Good for two-ways folder synchronization |
|
|
iOS |
Free |
|
|
|
Any (Java) |
Open-source |
Command-line tool for two-ways folder synchronization. Works great. |
|
|
Any (Java) |
Commercial |
Works great for two-ways folder synchronization. |
An example of the URL you need to use to access Web File Share's WebDAV would be: http://demo.webfileshare.com/dav.php/ (for our online demo)
Please note that the URL must contain the trailing slash character, after “dav.php”.
MacOS: Connecting with Finder
Assuming your Web File Share instance is installed at https://www.your-site.com/webfileshare
In the Finder, choose Go > Connect to Server, type the address of the server in the Server Address field, and click Connect. The server address should be in a form similar to this: ADDRESS/webfileshare/dav.php/.
For our example, that would be:
https://www.your-site.com/webfileshare/dav.php/
For details, check the respective vendor documentation at the Apple website: http://support.apple.com/kb/PH3857
Linux: mounting from the command line
Install the WebDAV support using the davfs package. On Debian/Ubuntu, you can use:
sudo apt-get install davfs2
Reconfigure davfs2 to allow access to normal users (select Yes when prompted):
sudo dpkg-reconfigure davfs2
Add the users you want to be able to mount the share to the davfs2 group:
sudo usermod -aG davfs2 <user>
Edit /etc/fstab and add the following line for each user who wants to mount the folder (with your details where appropriate):
your-site.com/webfileshare/dav.php/ /home/<username>/webfileshare davfs user,rw,noauto 0 0
Then, as each user who wants to mount the folder:
Create the folders webfileshare/ and .davfs2/ in your home directory
Create the file secrets inside .davfs2/, fill it with the following (with your credentials where appropriate):
your-site.com/webfileshare/dav.php/ <username> <password>
Ensure the file is only writable by you either through the file manager, or via:
chmod 600 ~/.davfs2/secrets
Run the command:
mount ~/webfileshare
To automatically mount the folder on login, add the command you used in step 4 to ./.coderc
Known Issues
Problem: Resource temporarily unavailable
Solution: If you experience trouble when you create a file in the directory, edit /etc/davfs2/davfs2.conf and add:
use_locks 0
Problem: Certificate warnings
Solution: If you use a self-signed certificate, you will get a warning. If you are willing to take the risk of a man in the middle attack, run this command instead:
echo "y" | mount ~/webfileshare > /dev/null 2>&1
Character encoding
As PHP 5 does not have support for Unicode filenames, Web File Share can handle filenames that use one particular encoding. By default, Web File Share is configured to convert the text to UTF-8. This allows the users to upload files with names in any language, containing any non-English character. The filenames will look properly in the browser and the user will be able o manage them. The down-side is that, on some operating systems such as MS Windows, when using FTP or other methods of accessing the files directly in the filesystem, the names might not look as expected. For example, if the user uploads with Web File Share a file named "Iñtërnâtiônàlizætiøn.zip", when accessing the folder by FTP, the file's name will look something like this "IñtërnâtiônÃlizætiøn.zip".
Zip archives
$config['app']['encoding']['detect'] = "ASCII, UTF-8, BIG-5, EUC-CN"; //this is an example that should help detect Chinese encodings
You can find here "http://www.php.net/manual/en/function.mb-list-encodings.php" the list of encodings that PHP can currently detect.
Note: Most modern programs are using the latest Zip formats and encode the filenames using UTF-8, so there should be no need for any configuration on Web File Share' side.
File Encryption
AES Crypt (http://www.aescrypt.com) is a file encryption software available on several operating systems that uses the industry standard Advanced Encryption Standard (AES) to easily and securely encrypt files. Quik File Share can use it to allow users to encrypt their files. The option is disabled by default. Once "AES Crypt" is installed on your server, follow these steps to enable it inside Quik File Share:
- Open the file "/path-to-Quik File Sharecustomizables/custom_actions/crypt/app.php" in a text editor.
- Replace the line that
var $disabled = true;
with
var $disabled = false;
- Set the path to the "aescript" binary on the line that looks like this:
$pathToAESCrypt = "aescript";
Once it has been enabled, you might need to empty/clear your browser's cache to see the option inside the Quik File Share user interface. To do that, use the CTRL+SHIFT+DELETE keyboard shortcut in your browser.
The feature has been implemented as a "Custom file actions" and it can be easily customized for any other third-party file encryption programs or algorithms.
Hiding file types for certain users or groups
Login as superuser, open the control panel and locate the ID of the group or user you want to configure the filter for. In most browsers, when you keep the cursor over a link, you will see the URL in the browser's status bar. You can use that to easily find the ID of a particular group or user. In most Web File Share control panel URLs, the group ID is marked as "gid" and user ID as "uid".
Open the file "/path-to-WebFileShare/customizables/config.php" in a text or PHP editor.
Add the following line inside the file, before its last line ("?>"):
$config['app']['custom_hidden_files']['groups']['123'] = array("*.dwg", "*.DWG", "*.bak", "*.BAK");
The above line will hide the file types "dwg" and "bak" from all the users in the group with ID 123.
Please note that the extension is case sensitive, that is why are set twice in the example.
$config['app']['custom_hidden_files']['users']['321'] = array("*.ai", "*.AI", "*.dmp", "*.DMP");
The above line will hide the file types "ai" and "dmp" from a particular user with the ID 321.
$config['app']['custom_hidden_files']['roles']['456'] = array("*.jpg", "*.JPG");
The above line will hide the "JPEG" images files from all users with the role ID "456".
You can add as many lines as you need, for different groups and/or users. You can also add as many extensions as you need to a configuration line.
Custom authentication
There are two quick steps (that require PHP knowledge) to set up thirdparty authentication:
- Define the authentication plugin inside the file "/path-to-WebFileShare/customizables/config.php", at line 5. Here's an example for the LDAP authentication:
$config['system']['custom_auth_file'] = "auth/ldap.auth.php";
- Use one of the provided authentication plugin files to setup your own:
- MySQL: "/path-to-WebFileShare/customizables/auth/mysql.auth.php"
- Joomla: "/path-to-WebFileShare/customizables/auth/joomla.auth.php"
- Omnisecure: "/path-to-WebFileShare/customizables/auth/omnisecure.auth.php"
- WordPress: "/path-to-WebFileShare/customizables/auth/wordpress.php"
- LDAP: "/path-to-WebFileShare/customizables/auth/ldap.auth.php"
Before enabling the external authentication, it is recommended to change the Web File Share superuser account's username (default username "admin") to one that matches a username in your external system. This way, when you login to Web File Share with the external credentials you will have superuser privileges.
Joomla authentication
Before setting up the plugin, remember to change the username of the Web File Share superuser account, to match an existing Joomla account. This Joomla account will be used to login as Web File Share superuser once the authentication integration is enabled.
Joomla version 1.5.X and higher
1. Define the authentication plugin file ("joomla_v1.5_auth.php") inside the file "/path-to-Web File Share/customizables/config.php", at line 5, like this:
/* Custom Authentication */
$config['system']['custom_auth_file'] = "auth/joomla/joomla_v1.5_auth.php";
2. Open "/path-to-Web File Share/customizables/joomla_v1.5_auth.php" in a text editor and configure the plugin:
a) Specify the path to your Joomla installation , at line 7:
$this->config['joomla']['paths']['root'] = "/path/to/joomla/";
b) Define the template used for setting up the users' home folder paths:
$this->config['users_home_folder_template'] = "/path/to/{USERNAME}/home/folder/";
3. Login to Joomla's administration section and open the "Extension Manager". Use the "Upload Package File" option to upload and install the module file "/path-to-Web File Share/customizables/Joomla 1.5.x_Web File Share_Authentication_Integration.zip".
4. Go to Joomla's "Plug-in Manager", filter the list of plugins by "Web File Share" and click the plugin "User - Web File Share Authentication Integration". Use the form to enable the plugin. No other changes are needed.
Older Joomla versions
1. Define the authentication plugin file ("joomla.auth.php") inside the file "/path-to-Web File Share/customizables/config.php", at line 5, like this:
/* Custom Authentication */
$config['system']['custom_auth_file'] = "auth/joomla/joomla.auth.php";
2. Open "/path-to-Web File Share/customizables/joomla.auth.php" in a text editor and configure the plugin:
a) Specify the path to your Joomla installation, at line ~31:
$this->config['joomla']['paths']['root'] = "/path/to/joomla/";
b) Define the template used for setting up the users' home folder paths, at line ~142:
"homefolder" => str_replace("{USERNAME}", $username, $users_home_folder_template),
Wordpress authentication
This quick guide will help you configure Web File Share to authenticate the users against the database of an existing Wordpress (http://wordpress.org) installation.
It has been tested with Wordpress version 3.0.1.
Download plugins
Download the file "http://www.WebFileShare.com/downloads/WebFileShare_Wordpress_Login.zip" to your computer.
Install the Wordpress plugin
This plugin is needed for allowing the logged in Wordpress users to access Web File Share without having to login twice.
- Upload the file "WebFileShare-sso.php" inside the folder "/path-to-wordpress/wp-content/plugins/".
- Login to Wordpress as admin, select "Plugins" from the menu and activate the plugin named "Web File Share Single Sign-On"
Install the Web File Share plugin
- Open the file "/path-to-WebFileShare/customizables/config.php" in a text editor and change the line #5 like this:
$config['system']['custom_auth_file'] = "auth/wordpress.php";
Configure the Web File Share plugin
Open the file "/path-to-WebFileShare/customizables/auth/wordpress.php" in a text editor and set the path to your Wordpress installation folder, at line #9:
$this->config['wordpress']['path']['root'] = "/www/wordpress";
Please make sure the path uses only forward slashes, even if you are running a Windows server. Inside this file you can also change the default options and permissions of the Web File Share users.
Testing
You should now be able to login to Web File Share, using Wordpress credentials. To login with Web File Share superuser permissions, use a Wordpress account that has the same username as the Web File Share superuser (default username "admin").
Translating Web File Share
Editing a translation
Select a language by clicking on its name. The translation is split in several parts which refer to particular sections or features of Web File Share.
Click the section you wish to edit and you will see a list of words and phrases.
Simply click the text you wish to edit. Each Web File Share client can maintain its own version of the translations. On the third column of the table you can see the translations of the other clients, including the default translation if one is available. Please note that all the translations are public, so it is best to avoid writing information that you would like to keep private.
After you are done editing, you can download your version of the translation by returning to the page listing the sections and clicking the “Download language file” link. You will get a file named “LanguageName.txt” that you can apply to your Web File Share installation.
The language file can be either uploaded by FTP inside “system/data/languages” folder or through Web File Share's control panel, under “System Configuration > Interface options” page.
Note: If you are uploading a translation file via FTP and the translation does not work, make sure your FTP program isn't altering the file's contents (the line endings).
Translating e-mail notifications
The following e-mail message templates can also have translations: “account_notification.tpl.txt”, “forgot_password.tpl.txt”, “reset_password.tpl.txt”, “signup_email.tpl.txt”, “space_quota_warning.tpl.txt”.
To add a translation create a folder named “language-name” inside “customizables/emails/” and make copies of the template files that you want to customize. This system can also be used for customizing the templates while preventing software updates from overwriting your customization.
The main notification template, which is editable through the control panel, can also have translations. Simply copy the template from the control panel into a file named “notifications.tpl.txt” and place inside “customizables/emails/language-name/”. Make sure it has a <Subject> and <Body> tags as the template file “account_notification.tpl.txt” has.
Manually editing a translation file
-
The lines begging with “+–” should not be modified as they represent the section name (Example: “+– Login Page –+”)
-
The lines beginning with “//” represent comments, and do not require translation.
-
Each translated phrase require 2 consecutive lines, the first line is the key and should not be altered in any way. The second line represents the translation.
-
The translation should not contain more than one line: the line should not be broken by pressing the “ENTER” key.
-
Each phrase translation and section name should be separated by an empty line. Please make sure you don’t leave any blank characters on the separation line, and you do not separate with more than one line.
-
If a key is missing from the translation file, the default English version of that text will be displayed.
The API
Quick start for PHP developers
Authorization
If you are new to OAuth2, here you can find a good article about it here: https://aaronparecki.com/articles/2012/07/29/1/oauth2-simplified
Important note: To use the WebFileShare API, your webserver needs to be configured with a SSL certificate. The URL of the Web File Share installation needs to start with HTTPS. Unsecured HTTP connections will be refused, as it represents a serious security vulnerability. Get a free SSL certificate here: https://letsencrypt.org
Testing without SSL
Adding the following line inside /customizables/config.php would allow OAuth2 to be enabled even though you do not access the Web File Share installation via HTTPS:
$config['app']['api']['oauth2']['allow_over_http'] = true;
Warning: This disables the entire security of the API. Your Web File Share users private information will be at risk. Do not use it for production!
Adding a new client application
Before you can start using OAuth2 with your application, you’ll need to tell Web File Share a bit of information about the application. Follow these steps:
-
Login to Web File Share as superuser
-
Open the control panel and navigate to “System configuration” > “Oauth2” > “Clients”
-
Click “Add” and fill in the form
-
Web File Share will generate a “client id” and a “client secret”. Make a note of these two, as you will need to set them in your application.
Obtain an access token
Before your application can access private data using a Web File Share API, it must obtain an access token that grants access to that API. A single access token can grant varying degrees of access to multiple APIs. A variable parameter called “scope” controls the set of resources and operations that an access token permits. During the access-token request, your application sends one or more values in the “scope” parameter.
There are several ways to make this request, and they vary based on the type of application you are building. For example, a web-based application might request an access token using a browser redirect to Web File Share, while an application installed on a device that has no browser uses web service requests.
Some requests require an authentication step where the user logs in with their Web File Share account. After logging in, the user is asked whether they are willing to grant the permissions that your application is requesting. This process is called *user consent*.
If the user grants the permission, the Web File Share Authorization Server sends your application an access token (or an authorization code that your application can use to obtain an access token). If the user does not grant the permission, the server returns an error.
For web applications
This method is called in OAuth 2.0 terms “the authorization code flow”.
Authentication Endpoint URL: /oauth2/authorize/
The set of query string parameters supported by the Web File Share Authorization Server for web server applications are:
|
Parameter |
Value |
Description |
|
response_type |
code |
Determines whether the Web File Share OAuth 2.0 endpoint returns an authorization code. Web server applications should use code. |
|
client_id |
The “client id” you obtain from the Web File Share control panel |
Identifies the client that is making the request. The value passed in this parameter must exactly match the value shown in the Web File Share Control Panel |
|
redirect_uri |
One of the “redirect uri” values listed for this application |
Determines where the response is sent. The value of this parameter must exactly match one of the values listed for your application in the Web File Share control panel, including the http or https scheme, case, and trailing '/'). |
|
scope |
Space-delimited set of permissions that the application requests. |
Identifies the Web File Share API access type that your application is requesting. |
|
state |
Any string |
Provides any state that might be useful to your application upon receipt of the response. The Web File Share Authorization Server roundtrips this parameter, so your application receives the same value it sent. To mitigate against cross-site request forgery (CSRF), it is strongly recommended to include an anti-forgery token in the state, and confirm it in the response. |
An example request URL is shown below, with line breaks for readability.
https://www.your-site.com/WebFileShare/oauth2/authorize/?
  scope=email%20profile&
  state=SOME-RANDOM-DATA&
  redirect_uri=https%3A%2F%2Fwww.your-app.com%2Fdo-something-with-the-code&
  response_type=code&
  client_id=f9c6f82cb3e872a20e6a310f33a9c450
You web application will be redirecting the users to a similar URL. Web File Share then handles the user authentication and consent. The result is an authorization code, which your application can exchange for an “access token” and a “refresh token”.
Handling the response
The response will be sent to the “redirect_uri” as specified in the request URL. If the user approves the access request, then the response contains an authorization code and the state parameter (if included in the request). If the user does not approve the request, the response contains an error message.
Important: if your response endpoint renders an HTML page, any resources on that page will be able to see the authorization code in the URL. Scripts can read the URL directly, and all resources may be sent the URL in the Referer HTTP header. Carefully consider if you want to send authorization credentials to all resources on that page (especially third-party scripts such as social plugins and analytics). To avoid this issue, we recommend that the server first handle the request, then redirect to another URL that doesn't include the response parameters.
Getting the access token
After your web application receives the authorization code, it should exchange it for an access token and a refresh token, by making an HTTP POST request to the following URL:
Token Endpoint URL: /oauth2/token/
Parameters:
|
Parameter |
Description |
|
code |
The authorization code returned from the initial request. |
|
client_id |
The “client id” obtained from the Web File Share control panel |
|
client_secret |
The client secret obtained from the Web File Share control panel. |
|
redirect_uri |
One of the redirect URIs listed for this project in the |
|
grant_type |
As defined in the OAuth 2.0 specification, this field must contain a value of “authorization_code”. |
A successful response to a request contains the following fields:
|
Parameter |
Description |
|
access_token |
The token that needs to be sent to the Web File Share API for a regular request. |
|
refresh_token |
A token that may be used to obtain a new access token. Refresh tokens expire in 30 days. |
|
expires_in |
The remaining lifetime of the access token. Access tokens expire in 60 minutes. |
|
token_type |
Identifies the type of token returned. At this time, this field will always have the value Bearer. |
{
"access_token":"PJIeg5uIs31JBmTGmcUFap6Gv2xhJQs84IqetJeL",
"token_type":"Bearer",
"expires_in":3600,
"refresh_token":"Sj5267kclpjhrvT0pdcE8mVbYxoZTu3u8flqg5cY"
}
The application should store the refresh token for future use and use the access token to access the Web File Share API. Once the access token expires, the application uses the refresh token to obtain a new one.
For installed applications
This method is called in OAuth 2.0 terms the “resource owner credentials flow”. It is also known as the “password” flow.
Desktop and mobile application, if they cannot redirect the user to the Web File Share URL for authentication and providing consent, they usually just prompt the users for their Web File Share username and password.
The process requires just a direct HTTP POST call to the token endpoint (/oauth2/token/), with the following parameters:
|
Parameter |
Description |
|
username |
The Web File Share user account username. |
|
password |
The Web File Share user account password. |
|
scope |
Space-delimited set of permissions that the application requests. Identifies the Web File Share API access type that your application is requesting. Each API method that your application will be using requires a certain scope. See that further down in the documentation. |
|
client_id |
The “client id” obtained from the Web File Share control panel |
|
client_secret |
The client secret obtained from the Web File Share control panel. |
|
redirect_uri |
One of the redirect URIs listed for this application inside the Web File Share control panel. |
|
grant_type |
As defined in the OAuth 2.0 specification, this field must contain a value of “password”. |
Please see the above section Getting the access token for handling the response.
Note: This type of authorization is protected against brute force attacks, just as the regular Web File Share login. If you type in the wrong password too many times, the Web File Share user account will get deactivated.
Example
curl -X POST -d "username=john&password=love123&scope=upload&client_id=WebFileShare0000000000000000000Mobile&client_secret=0000000000000000NoSecret0000000000000000&redirect_uri=http://localhost&grant_type=password" https://demo.WebFileShare.co/oauth2/token/
Refreshing the access token
As access tokens expire, you will need to get fresh one once in a while. You do that by making a HTTP call to the following URL:
Refresh Token Endpoint URL: /oauth2/token/
Parameters:
| Parameter | Description |
|---|---|
| client_id | The “client id” obtained from the Web File Share control panel |
| client_secret | The client secret obtained from the Web File Share control panel. |
| grant_type | As defined in the OAuth 2.0 specification, this field must contain a value of “refresh_token”. |
| refresh_token | The refresh token you have received along with the access token. |
A successful response to a request will be identical to the response you receive when you are requesting an initial access token (See Getting the access token).
Note: Save refresh tokens in secure long-term storage and continue to use them as long as they remain valid.
Calling the Web File Share API with the access token
After your application obtains an access token, you can use the token to make calls to the Web File Share API on behalf of a given user account. To do this, include the access token in a request to the API by including the “Authorization: Bearer” HTTP header.
Example:
GET /WebFileShare/api.php/account/info HTTP/1.1
Authorization: Bearer 8vDeNtzJ8Nf1P0fH1YsvIubOMGttXpqOmupl3oD1
Host: www.your-site.com
Where “8vDeNtzJ8Nf1P0fH1YsvIubOMGttXpqOmupl3oD1” is the access token received on the previous step.
For most API calls, the server reply will contain a JSON object in the response body. Successful requests will have a property named “success” with the boolean value “true”. For failed requests, the “success” value will be set to “false” and the “error” property will be populated with an textual description of the problem. For tasks which are supposed to provide information, such as attaching a web link to a file, the property “data” will be populated if the operation was successful.
Access tokens are valid only for the set of operations and resources described in the scope of the token request. For example, if an access token is issued for the purpose of listing directory contents (scope=list), it cannot be used for accessing the user's profile information (scope=profile). You can, however, send that access token to the WebFileShare API multiple times for similar operations.
Access tokens have limited lifetimes (around 1 hour). If your application needs access to the Web File Share API beyond the lifetime of a single access token, it can use the obtained refresh token to get a new access token.
API methods
Getting user account information
| Target URL | /api.php/account/info |
| Required scope | profile |
| HTTP Method | GET/POST |
| Output format | JSON |
Retrieving lists of files and folders
| Target URL | /api.php/files/browse/ |
| Required scope | list |
| HTTP Method | GET/POST |
| Output format | JSON |
Request Parameters Reference
| Parameter | Type | Default value | Required | Description |
|---|---|---|---|---|
| path | string | Yes | Examples: /ROOT - shows a list with items like “My Files”, “Shared with me”, “Starred” (the list can change in the future) / - same as above /ROOT/HOME - items located inside the users home folder (My Files) /STARRED - starred items /PHOTOS - latest photos /MUSIC - latest audio files /SHARES - items shared by the user /LINKS - items shared through web links /ROOT/SHARED - users with shares or folders shared anonymously by other users /ROOT/123 - lists folders shared by user with ID 123. /ROOT/123/456 - list items inside the share with ID 456 owned by user with ID 123. |
|
| itemType | string | Yes | Choose type of items to list. Possible values: any - lists both files and folders files - lists only files folders - lists only folders |
|
| recursive | boolean | false | No | List items from all the subfolders. |
| details | array | No | Allows you to choose what information should be retrieved for each file. | |
| details[uuid] | array key | No | unique id which can be used for referencing the file or folder | |
| details[mdate] | array key | No | modified date | |
| details[mdateHuman] | array key | No | modified date in a friendly format | |
| details[cdate] | array key | No | creation date | |
| details[hasWebLink] | array key | No | if file has weblink attached to it or not | |
| details[weblink] | array key | No | retrieve weblink URL | |
| details[weblink-full] | array key | No | retrieve full weblink details | |
| details[description] | array key | No | file type description | |
| details[ext] | array key | No | file extension | |
| details[type] | array key | No | type of file (defined inside system/data/filetypes.php) | |
| details[icon] | array key | No | filename of the Web File Share icon associated with this type of files | |
| details[hasThumb] | array key | No | shows if Web File Share can generate a thumbnail for the file | |
| details[fileSize] | array key | No | includes the file size in bytes | |
| details[nicerFileSize] | array key | No | includes formatted file size | |
| details[commentsCount] | array key | No | includes number of attached user comments | |
| details[label] | array key | No | includes files labels | |
| details[isLocked] | array key | No | shows if file is locked | |
| details[version] | array key | No | includes current file version | |
| details[isShared] | array key | No | shows if folder is currently shared | |
Example
Listing only files from the users home folder, retrieving information about their attached weblinks and also including a formatted filesize:
 path=/ROOT/HOME
 itemType=files
 details[[]]=nicerFileSize
 details[[]]=weblink
path=/ROOT/HOME - the users home folder
itemType=files - listing only files
details[]=nicerFileSize - including a formatted filesize
details[]=weblink - including the URL, if a weblink is attached
Expected output:
{
   "success":true,
   "error":false,
   "data":{
      "meta":{
         "path":"\/ROOT\/HOME",
         "parentPath":"\/ROOT",
         "folderName":"Home Folder",
         "perms":{
            "upload":true,
            "download":"1",
            "alter":true
         }
      },
      "files":[
         {
            "filename":"WebFileShare_Admin_Guide.pdf",
            "weblink":"http:\/\/demo.WebFileShare.com\/wl\/?id=89M",
            "is_dir":false,
            "nicerFileSize":"123 KB"
         },
         {
            "filename":"WebFileShare_License_Agreement.pdf",
            "is_dir":false,
            "nicerFileSize":"116 KB"
         },
         {
            "filename":"WebFileShare_User_Guide.pdf",
            "is_dir":false,
            "nicerFileSize":"195 KB"
         },
         {
            "filename":"Welcome.jpg",
            "is_dir":false,
            "nicerFileSize":"17 KB"
         }
      ]
   }
}
Retrieving metadata
| Target URL | /api.php/files/metadata/ |
| Required scope | metadata |
| HTTP Method | GET/POST |
| Output format | JSON |
Request Parameters Reference
| Parameter | Type | Default value | Required | Description |
|---|---|---|---|---|
| path | string | Yes | Examples: /ROOT/HOME/file.ext - retrieves metadata for a file named file.ext available in the Web File Share user's home folder |
|
Searching files and folders by name
| Target URL | /api.php/files/search/ |
| Required scope | list |
| HTTP Method | GET/POST |
| Output format | JSON |
Request Parameters Reference
| Parameter | Type | Default value | Required | Description |
|---|---|---|---|---|
| path | string | Yes | Path relative to the user's home folder. | |
| keyword | string | Yes | The keyword to search the file names for. | |
| details | array | No | The same as as for the task above. | |
Creating folders
| Target URL | /api.php/files/createfolder/ |
| Required scope | upload |
| HTTP Method | POST/GET |
Request Parameters Reference
| Parameter | Type | Description |
|---|---|---|
| path | string | Web File Share path of the new folder's parent. |
| name | string | Name of the new folder. |
Uploading files
| Target URL | /api.php/files/upload/ |
| Required scope | upload |
| HTTP Method | PUT |
| Output format | JSON |
Request Parameters Reference
| Parameter | Type | Description |
|---|---|---|
| path | string | The Web File Share path of the target file. |
Example
curl -X PUT --header "Authorization: Bearer neY6uAjKO1KqQh98RZZ5DOgYjIPMuu9duvvHGUiN" -T your-file.ext https://demo.WebFileShare.co/api.php/files/upload/?path=/ROOT/HOME/make-new-folder/my-file.ext
Downloading files
| Target URL | /api.php/files/download/ |
| Required scope | download |
| HTTP Method | GET/POST |
| Output format | HTTP DOWNLOAD |
Request Parameters Reference
| Parameter | Type | Description |
|---|---|---|
| path | string | The Web File Share path of the file. |
Downloading thumbnails
| Target URL | /api.php/files/thumbnail/ |
| Required scope | download |
| HTTP Method | GET/POST |
| Output format | HTTP DOWNLOAD |
Request Parameters Reference
| Parameter | Type | Description |
|---|---|---|
| path | string | The Web File Share path of the file. |
Renaming files or folders
| Target URL | /api.php/files/rename/ |
| Required scope | modify |
| HTTP Method | GET/POST |
| Output format | HTTP DOWNLOAD |
Request Parameters Reference
| Parameter | Type | Description |
|---|---|---|
| path | string | |
| newName | The new file/folder name. |
Deleting files or folders
| Target URL | /api.php/files/delete/ |
| Required scope | delete |
| HTTP Method | GET/POST |
| Output format | JSON |
Request Parameters Reference
| Parameter | Type | Description |
|---|---|---|
| path | string | The Web File Share path of the target file. |
| permanent | boolean (1/0) | Either the file should be permanently removed, instead of just moved to the trash folder. |
Starring files or folders
| Target URL (add) | /api.php/files/star/ |
| Target URL (remove) | /api.php/files/unstar/ |
| Required scope | modify |
| HTTP Method | GET/POST |
| Output format | JSON |
Request Parameters Reference
| Parameter | Type | Description |
|---|---|---|
| path | string | The Web File Share path of the target file/folder. |
Create web links on files and folders
| Target URL | /api.php/files/weblink/ |
| Required scope | weblink |
| HTTP Method | GET/POST |
| Output format | JSON |
Request Parameters Reference
| Parameter | Type | Description |
|---|---|---|
| path | string | The Web File Share path of the target file/folder. |
| singleDownload | boolean | Returns a link which is valid for a single download. This does not affect web links the user might have previously created on the file/folder. |
| temporary | boolean | Returns a link which is valid for 15 minutes. This does not affect web links the user might have previously created on the file/folder. |
Example reply:
{
  "success": true,
  "error": false,
  "data": {
    "status": "created", //can also return "existing"
    "url": "http:\/\/www.yoursite.com\/WebFileShare\/wl\/?id=CtmsT8IWoen3JDZIVbxvR3SH45gvvvxs",
    "isdir": false //or true if you are linking a folder
  }
}
Sharing folders
| Target URL | /api.php/files/share/ |
| Required scope | share |
| HTTP Method | GET/POST |
| Output format | JSON |
Request Parameters Reference
| Parameter | Type | Required | Description |
|---|---|---|---|
| path | string | Yes | The Web File Share path of the folder. |
| uid | integer | Yes if no “gid” | ID of Web File Share user to share folder with. |
| gid | integer | Yes if no “uid” | ID of Web File Share group to share folder with. |
| anonymous | boolean | No | Specify if folder is to be shared anonymously. |
| upload | boolean | No | Specify if upload permission is granted. |
| download | boolean | No | Specify if download permission is granted. |
| comment | boolean | No | Specify if the permission to post comments is granted. |
| read_comments | boolean | No | Specify if the permission to read comments is granted. |
| alter | boolean | No | Specify if the permission to make file changes is granted. |
| share | boolean | No | Specify if the permission to share files is granted. |
| alias | string | No | Specify an alias for the shared folder name. |
Note: If the folder was already shared, the share settings will be updated. No errors will be returned in that case.
Unsharing folders
| Target URL | /api.php/files/unshare/ |
| Required scope | share |
| HTTP Method | GET/POST |
| Output format | JSON |
Request Parameters Reference
| Parameter | Type | Required | Description |
|---|---|---|---|
| path | string | Yes | The Web File Share path of the folder. |
| uid | integer | Yes if no “gid” | ID of Web File Share user to be removed from the share. |
| gid | integer | Yes if no “uid” | ID of Web File Share group to be removed from the share. |
Note that the call will return an error if the folder is not shared with the specified user or group.
Get Web File Share user account information
| Target URL | /api.php/admin-users/info |
| Required scope | admin |
| HTTP Method | POST |
| Output format | JSON |
Request Parameters Reference
| Parameter | Type | Required | Description |
|---|---|---|---|
| UID | integer | Yes, if uname not provided |
User ID |
| uname | string | Yes, if UID not provided |
Username |
Add Web File Share user accounts
| Target URL | /api.php/admin-users/add |
| Required scope | admin |
| HTTP Method | POST |
| Output format | JSON |
Request Parameters Reference
| Parameter | Type | Default value | Required | Description |
|---|---|---|---|---|
| generate_password | boolean | No | Set to 1 to have Web File Share assign a randomly generated password which matches the current password policy settings. | |
| create_home_folder | boolean | No | Set to 1 to have Web File Share create the user's home folder if it doesn't exist already. | |
| data[username] | string | Yes | The username may not contain special characters, except for underscores, dashes, @, dots and spaces. | |
| data[name] | string | Yes | ||
| data[password] | string | No | ||
| data[two_step_enabled] | boolean | 0 | No | |
| data[two_step_secret] | string | No | ||
| data[last_pass_change] | date | NULL | No | |
| data[owner] | integer | NULL | No | This can be the ID of the parent independent admin user. |
| data[registration_date] | date | current date | No | |
| data[activated] | boolean | 1 | No | |
| data[expiration_date] | date | NULL | No | |
| data[require_password_change] | boolean | 0 | No | |
| data[email] | string | No | ||
| data[receive_notifications] | boolean | 0 | No | |
| data[company] | string | No | ||
| data[website] | string | No | ||
| data[description] | string | No | ||
| data[logo_url] | string | No | ||
| perms[role] | integer | NULL | No | |
| perms[admin_type] | string | NULL | No | Possible values: simple, indep |
| perms[admin_users] | boolean | 0 | No | |
| perms[admin_roles] | boolean | 0 | No | |
| perms[admin_notifications] | boolean | 0 | No | |
| perms[admin_logs] | boolean | 0 | No | |
| perms[admin_metaperms] | boolean | 0 | No | |
| perms[admin_over] | mixed | No | Set to “-ALL-” if the user is an admin who can manage all other users | |
| perms[admin_max_users] | boolean | 0 | No | |
| perms[admin_homefolder_template] | string | No | ||
| perms[homefolder] | string | Yes | The is an absolute path to a folder existing in the server's file system. Always use forward slash as a path separator, including on Windows servers. | |
| perms[space_quota_max] | integer | 0 | No | |
| perms[space_quota_current] | integer | 0 | No | |
| perms[traffic_quota_max] | integer | 0 | No | |
| perms[traffic_quota_current] | integer | 0 | No | |
| perms[readonly] | boolean | 0 | No | |
| perms[upload] | boolean | 1 | No | |
| perms[download] | boolean | 1 | No | |
| perms[download_folders] | boolean | 1 | No | |
| perms[read_comments] | boolean | 0 | No | |
| perms[write_comments] | boolean | 0 | No | |
| perms[email] | boolean | 0 | No | |
| perms[weblink] | boolean | 0 | No | |
| perms[share] | boolean | 0 | No | |
| perms[btsync] | boolean | 0 | No | |
| perms[metaperms] | boolean | 0 | No | |
| perms[file_history] | boolean | 0 | No | |
| perms[users_may_see] | string | -ALL- | No | |
| perms[change_pass] | boolean | 1 | No | |
| groups | array | No | A list of group names. If groups with the specified names are not found, are automatically created. | |
Example response
Example response after successful request:
{
   "success": true,
   "error": false,
   "data":{
      "generated_password": "12345678",
      "uid": "44"
   }
}
Where “44” is the ID of the newly created user account and “12345678” is the password generated by Web File Share.
Example response after failed request:
{
    "success": false,
    "error": "The value of data[username] needs to be unique in the database",
    "code": "username_in_use"
}
Modify Web File Share user accounts
| Target URL | /api.php/admin-users/edit |
| Required scope | admin |
| HTTP Method | POST |
| Output format | JSON |
Request Parameters Reference
Besides the parameters described higher, for adding user accounts, this API method uses also the following:
| Parameter | Type | Required | Description |
|---|---|---|---|
| UID | integer | Yes | The user ID |
Delete Web File Share user accounts
| Target URL | /api.php/admin-users/delete |
| Required scope | admin |
| HTTP Method | POST |
| Output format | JSON |
Request Parameters Reference
| Parameter | Type | Required | Description |
|---|---|---|---|
| UIDS | array | Yes | Array of user ID integers |
| deleteHomeFolder | boolean | No | If included, this will cause the user(s) home folders to also be deleted. |
Revoking app authorization (for users)
Users can see the authorizations made for the various apps, inside the “Account Settings” and can revoke them from the same location at any time.
Troubleshooting
"Check the "access_token" parameter"
If you cannot get past the error “The request is missing a required parameter, includes an invalid parameter value, includes a parameter more than once, or is otherwise malformed. Check the “access_token” parameter.”, although you have checked and your HTTP request includes the “Authorization” header with a valid “Bearer” token, perhaps PHP doesn't get the variable “$_SERVER['HTTP_AUTHORIZATION']” populated. In which case, if you are running Apache, make sure you have the following code inside the “.htaccess” file:
RewriteEngine On
RewriteCond %{HTTP:Authorization} .+
RewriteRule .* - [[E=HTTP_AUTHORIZATION:%{HTTP:Authorization}]]
If you are using a virtual host, make sure the above is inside the Virtualhost tag, not in Directory tag.
Running custom scripts when users perform various actions
Custom PHP scripts can be automatically executed when the users perform one of the 57 monitored actions (E-mail_notification_system#Actions_keynames).
For example, to automatically run custom PHP code whenever a file is uploaded, you can simply place a PHP file named "upload.php" inside the folder "/path-to-WebFileShare/customizables/events/"
Here's a list of useful scripts:
Set file permissions after upload:
$data = unserialize($data['data']);

chmod($data['full_path'], 0644);
Antivirus check on upload:
<?php

global $auth;

$data = unserialize($data['data']);

$info = array(

                "username" => $auth->currentUserInfo['username'],

                "fullPath" => $data['full_path']

);


$pathToShellScript = "virus_scan.sh";

//virus_scan.sh will be executed with the username and the file's path

@system($pathToShellScript." ".escapeshellarg($info['username'])." ".escapeshellarg($info['fullPath']);
Filter uploaded files by extension:
<?php

$extensions = array("exe", "dll"); //customize the list of banned extensions

/*************************************************************/

global $fm;

$data = unserialize($data['data']);

$ext = $fm->getExtension($data['filename']);

if (in_array($ext, $extensions)) {

                unlink($data['full_path']);

}
Counting file downloads
Applies to Web File Share version (260213)
To keep track of the files' download count, please follow these steps:
- Login as superuser and open the Control Panel
- Select "System configuration » Metadata » Fieldsets" and click "Add"
- Set the "Field set name" (Something like "Info", it doesn't really matter)
- Enable the "Generic field set" option (So that all files show this field set)
- Click "Add Field Set"
- Activate the "Field sets" tab and double-click in the list the newly created field set
- Inside the "Fields" section, click "Add".
- Type "Downloads" for the "Field name" and click "Save".
- You need the ID of the recently added field. You can get that directly from the MySQL database, by browsing the table "df_modules_metadata_fields"
- Create the text file "/path-to-WebFileShare/customizables/events/download.php" and paste the following code inside:
<?php


$fieldId = XXXX; //set here the ID of the metadata field that will be holding the downloads count


/*-----------------------------------------------------------------*/


global $metadata, $db;

$data = unserialize($data['data']);

$metaFileInfo = $metadata->files->getByPath("*", $data['full_path']);//get file metadata record


if (!$metaFileInfo['id']) {

                $id = $metadata->files->addFile($data['full_path']);//add file metadata record if not found

                if ($id) {

                                $metaFileInfo['path'] = $data['full_path'];

                                $metaFileInfo['id'] = $id;

                }

}


$rs = $metadata->get($metaFileInfo['id'], array($fieldId));//get current download count


$downloads = $rs[0]['val'];

if (!$downloads) {

                $downloads = 0;

}

$metadata->set($metaFileInfo['id'], $fieldId, $downloads+1);//increment the download count- Replace the "XXXX" with the ID of your "Downloads" metadata field on the first line of the script file.
The "download.php" script will execute each time a user downloads a file, and it will increment the value it finds in the file's "Downloads" metadata field. You can reset the count at any time, by editing the value from the Metadata menu.
Being a metadata field, you can also display it as a column in the file list view, to have a quick view over how many time the files were downloaded.
File reference
DEV Files
This is a list of most customized Web File Share files and folders:
/css/style.cssThe CSS file that needs to be edited for changing the background for the login page.
/customizables/include.htmlIt can be used to include HTML code inside the login page and on the main user interface. Can be used for including Google Adwords tracking code.
/customizables/config.phpThis is where configuration directives can be set. A list with the available directives can be found here.
/customizables/custom_actions/Contains the plugins responsible with the functionality available under the "Open with.." contextual menu option. The subfolders can be safely removed, if you wish to disable any of the options. For more information about the plugins, click here.
/viewers/ and /viewers_mobile/Includes the code that generates the file previews (for both the normal and mobile user interface).
/system/data/default_home_folder/This is the superuser's default home folder. It is recommended that you change the location of the Web File Share users' home folders outside the public area of your webserver (ie. outside "public_html" or "www").
/system/data/languages/Contains the translation files.
/system/data/autoconfig.phpContains the MySQL connection information. This file needs editing if the connection changes (for example when the password gets updated).
/system/modules/weblinks/sections/default/html/pages/download.htmlDisplays information about a file before being downloaded through a WebLink.
/system/modules/weblinks/sections/default/html/pages/folder.htmlDisplays the list of files for a WebLinked folder.
/system/modules/weblinks/sections/default/html/pages/folder_gallery.htmlDisplayed the image gallery for a WebLinked folder.
/system/modules/weblinks/sections/default/html/pages/folder_rss.htmlGenerates the XML-formatted RSS feed for a WebLinked folder.
/system/modules/weblinks/sections/default/html/pages/invalid_link.htmlDisplays a message to visitors accessing invalid or expired WebLinks.
/system/modules/weblinks/sections/default/html/pages/password.htmlDisplays the password form for password-protected WebLinks.
/system/modules/weblinks/sections/default/html/pages/traffic_limit.htmlDisplays the warning when trying to download a file through a WebLink created by a Web File Share user who's traffic quota has been reached.
Adding custom functionality
Custom Modules
This page provides some details on how to add a custom PHP script to Web File Share's framework. The benefits are that the page can be protected by Web File Share's authentication system and that your script can use Web File Share's API. The API has no public documentation, but if you contact us, we'll help you with the required information.
Creating a custom module
To create a module, simply start by creating a new folder "MyModule" (or a name of your choice) inside "/path-to-Web File Share/system/modules/".
This module can be accessed using the following URL: http://your-site/WebFileShare/?module=MyModule
The above URL will run the file "/path-to-WebFileShare/system/modules/MyModule/sections/default/php/default.php".
Each module is split in sections, so create a folder named "sections" inside "/path-to-WebFileShare/system/modules/MyModule/".
You can specify a section like this: http://your-site/WebFileShare/?module=MyModule§ion=MySection
The above URL will run the file "/path-to-Web File Share/system/modules/MyModule/sections/MySection/php/default.php".
Each section can have multiple pages. To call a different script file than "default.php", you can specify a page like this: http://your-site/WebFileShare/?module=MyModule§ion=MySection&page=MyPage
The above URL will run the file "/path-to-WebFileShare/system/modules/MyModule/sections/MySection/php/MyPage.php".
Inside "MyPage.php" you can execute any PHP code you wish to.
Password protecting the pages
Inside "/path-to-WebFileShare/system/modules/MyModule/", create a file named "config.php".
Pasting the following code inside, will allow only authenticated users to access the page "MyPage" ("/path-to-WebFileShare/system/modules/MyModule/sections/MySection/php/MyPage.php").
<?php

$config['modules'][$moduleName]['sections']['MySection']['perms'] = array(

                'MyPage' => array('must_be_logged' => true)

);
(Make sure you don't include in the file any space character before the "<?php " part.)
You can protect as many pages as you want. Simply add more items to the above Array.
Forcing certain file types to download
When accessing files via WebLinks, if possible, the browser will try to open the file itself, instead of asking the user to save the file. Common file types, like images or text files will automatically open in the browser. You can force the browser to prompt the user for saving the file, instead of letting it automatically open.
Simply open the file "/path-to-WebFileShare/customizables/config.php" in a text editor and add the following line:
$config['app']['weblinks']['force_download'] = array("txt", "jpg");You can replace "txt" and "jpg" with the file extension you want and also add more extensions.
Custom file actions
You can easily add custom options inside the "Open with.." file contextual menu. Here is a step by step guide:
- Make a copy of "/path-to-WebFileShare/customizables/custom_actions/_example" inside the same folder and rename it to "my-action" (you are free to name the folder as you wish). (Writing an underscore in front of the folder's name disables the option.)
- Open the file "my-action/app.php" in a PHP editor:
- Rename the class to "custom_my-action". (Note that this depends on the folder's name.)
- Edit the code according to your requirements:
Define the text that will be displayed for the contextual menu option:
$this->JSconfig['title']Define the URL of the contextual menu option's icon:
$this->JSconfig['icon']Make the option open a popup window with the specified size.
$
);
When using a popup window, the output of the method "custom_my-action::run()" will be displayed inside the popup. The "$this->data" array can be used to find the file's path:
function run() {

 echo $this->data['filePath'];

}
If you wish to execute a JavaScript function (perhaps making an Ajax call) instead of opening a popup, use this instead:
$this->JSconfig['fn'] = "alert('Option clicked!')";Add the following option to display the contextual option only for certain filetypes:
$this->JSconfig['extensions'] => array("txt", "pdf", "doc");Allow only users with download permissions to see and use this plugin:
$this->JSconfig['requiredUserPerms'] => array("download");
Misc custom actions:
- View Office files with Microsoft Office Web Viewer (download)
- View PDFs and annotate with Crocodoc.com (download)
- View documents online with Vuzit.com (download)
Calculating MD5 Checksums
Hash Files
To automatically calculate and store the files' MD5 checksum values, so you can verify their integrity, please follow these steps:
- Go to "Control Panel » System configuration » Metadata » Fieldsets » Create new"
- Set the "Fieldset name" (Something like "Info", it doesn't really matter)
- Tick the "Generic fieldset" checkbox. (So that all files show this fieldset)
- Click "Save" to add the fieldset.
- Click "Manage Fields > Create new"
- Type "Checksum" for the "Field name" and click "Save"
- By holding the mouse cursor over the newly created field name you can find out its ID, from the link's URL (......&fid=X)
- Create the text file "/path-to-WebFileShare/customizables/events/upload.php" and paste the following code inside:
- Replace the "XXXX" with the ID of your "Checksum" metadata field on the first line of the script file.
The "upload.php" script will execute each time a user uploads a file, and it will calculate the file's hash and store it in the file's "Hash" metadata field.
Being a metadata field, you can also display it as a column in the file list view.
Please note that with this method, PHP reads the entire file's contents into memory. This can be slow and might not even work for files larger than PHP's configured "memory_limit" value.
A solution available for Unix type of servers is to replace the line "
$hash = md5(file_get_contents($data['full_path']));", with the following one:
$hash = exec("md5sum "".escapeshellcmd($data['full_path']).""");
Adding links to the menu
Applies to Web File Share version (291210)
To add a link on the main toolbar (next to the "Upload" and "File" options), you open the file in a text editor and add the following code after the line #185:
tbar.push('-');

tbar.push({

 text: FR.T('Your button'), scale: 'medium',

 icon: FR.iconsURL+'/the_icon.gif',

 handler: function() {

   document.location.href = 'http://www.google.com';

 }

});If you want the button to open the page into a window, replace the line
document.location.href = 'http://www.google.com';with the following code:
  FR.UI.popup({

      src: 'http://www.google.com/?',

      width: 680, height: 540, constrain: true, maximizable: true, autoDestroy: true

  });
Please note that this function automatically adds some variables to the specified URL. To avoid troubles, try ending your URL with a question mark (?) character.
Custom even scripts
Custom PHP scripts can be automatically executed when the users perform one of the monitored actions (Actions_keynames).
For example, to automatically run custom PHP code after a file is uploaded, you can simply place a PHP file named “upload.php” inside the folder “customizables/events/”.
Here's an example script:
Set file permissions after upload:
<?php
$data = unserialize($data['data']);
chmod($data['full_path'], 0644);
If you want the code to be executed before the file is saved to the folder, so that you can process it and perhaps reject the uploaded file, you need to name the script file “file.upload.php”.
Here's how an example script would look like in this case:
Clamscan antivirus check on upload:
<?php
global $auth;
$data = unserialize($data['data']);
$out = '';
$int = -1;
exec($command, $out, $int);
exec("clamscan ".escapeshellarg($data['full_path']), $out, $int);
if ($int != 0) {
return array(
	'error' => array('code' => 100, 'msg' => 'This file has been rejected as it contains viruses!'),
	'return' => false
);
}
Prevent non-admin users to delete files labeled as APPROVED.
Place the following code inside “customizables/events/file.delete.php”:
<?php
global $auth;
if (!\WebFileShare\Perms::isSuperUser() && !\WebFileShare\Perms::isSimpleAdmin() && !\WebFileShare\Perms::isIndependentAdmin()) {
	$metaFileInfo = \WebFileShare\MetaFiles::getByPath("*", $extra['filePath']);
	if ($metaFileInfo['id']) {
		$label = \WebFileShare\Labels::getByFileId($metaFileInfo['id']);
		$v = \WebFileShare\Labels::parseValue($label);
		if (strtoupper($v['text']) == 'APPROVED') {
			return array(
				'error' => array('code' => 100, 'msg' => 'Approved files cannot be deleted!'),
				'return' => false
			);
		}
	}
}
For running a script when folders are being deleted the file needs to be named “folder.delete.php”. To run a script when files are being downloaded, name the script file “file.download.php”.
Calculate and store the files' MD5 checksum values in a metadata field
Please follow these steps:
-
Go to “Control Panel » System configuration » Metadata » Fieldsets » Create new”
-
Set the “Fieldset name” (Something like “Info”, it doesn't really matter)
-
Tick the “Generic fieldset” checkbox. (So that all files show this fieldset)
-
Click “Save” to add the fieldset.
-
Click “Manage Fields > Create new”
-
Type “Checksum” for the “Field name” and click “Save”
-
By holding the mouse cursor over the newly created field name you can find out its ID, from the link's URL (……&fid=X)
-
Create the text file “customizables/events/upload.php” and paste the following code inside:
<?php

$fieldId = 15; //set here the ID of the metadata field that will be hold the filename

/*-----------------------------------------------------------------*/

global $db, $fm;
$data = unserialize($data['data']);
$metaFileInfo = \WebFileShare\MetaFiles::getByPath("*", $data['full_path']);//get file metadata record

if (!$metaFileInfo['id']) {
	$id = \WebFileShare\MetaFiles::addFile($data['full_path']);//add file metadata record if not found
	if ($id) {
		$metaFileInfo['path'] = $data['full_path'];
		$metaFileInfo['id'] = $id;
	}
}

$hash = md5(file_get_contents($data['full_path']));

\WebFileShare\MetaValues::set($metaFileInfo['id'], $fieldId, $hash);//set hash as metadata
* Replace the “XXXX” with the ID of your “Checksum” metadata field on the first line of the script file.
The “upload.php” script will execute each time a user uploads a file, and it will calculate the file's hash and store it in the file's “Hash” metadata field.
Being a metadata field, you can also display it as a column in the file list view.
Please note that with this method, PHP reads the entire file's contents into memory. This can be slow and might not even work for files larger than PHP's configured “memory_limit” value. A solution available for Unix type of servers is to replace the line “$hash = md5(file_get_contents($data['full_path']));”, with the following one:
$hash = exec("md5sum \"".escapeshellcmd($data['full_path'])."\"");
External Login Form
The following is a PHP code snippet that displays a login form which provides feedback without showing the Web File Share login screen. This can be used if you would like to have a custom login form integrated into your website and bypass the Web File Share login screen.
<?php
if ($_GET[['feedback']]) {
     echo base64_decode($_GET[['feedback']]);
}
?>
<form method="post" action="URL-OF-WebFileShare/?action=login&nonajax=1">
	<input type="hidden" name="redirectAfterLogin" value="<?php echo base64_encode("URL-OF-FILERUN-OR-WELCOME-PAGE") ?>">
	<input type="hidden" name="redirectOnFailure" value="<?php echo base64_encode("URL-OF-PAGE-HOSTING-THIS-FORM?") ?>">
	<label for="usr">Username:</label>
	<input type="text" name="username" value="" id="usr"/>
	<label for="pass">Password:</label>
	<input type="password" name="password" value="" id="pass" />
	<input type="submit" value="Login">
</form>
You will need to replace the following placeholders: URL-OF-WebFileShare, URL-OF-PAGE-HOSTING-THIS-FORM (leave the question mark at its end) and URL-OF-WebFileShare-OR-WELCOME-PAGE.
You can also make the login Ajax-based, in which case the HTTP request is identical, but the target URL should not contain the “&nonajax=1” part. The server response will then be in JSON format.
Hiding options from the "Open with..." menu
The options that are displayed in the "Open with..." menu are called "custom actions". Each custom action has a folder inside "/path-to-WebFileShare/customizables/custom_actions/". If you want to disable a particular option, you can do that by opening its "app.php" file in a text editor and adding the following line of code;
var $disabled = true;right after the line of code that reads "class custom_ {" (usually located on line number 5).
Simply delete the folder or renaming it to add an underscore character in front of the name. For example, to disable Google Docs Viewer, you would rename the folder "google_docs_viewer" to "_google_docs_viewer". The disadvantage of this method is that it might cause some troubles when installing software updates. Some software updates add improvements to the custom actions and you might need to have to original file structure, for Web File Share to be able to install the update.
If you are not seeing the change, try to clear your browser's cache (delete temporary Internet files).
Automatic Login
If you wish to automatically login visitors to WebFileShare without asking them to fill in the login form, there are two ways:
Using a custom link
http://YOUR-SITE.COM/WebFileShare/?page=login&action=login&nonajax=1&username=USERNAME&password=PASSWORD
Set the session programmatically
Redirect users to a PHP script like this:
<?php
//start WebFileShare session
session_name('WebFileShareSID');
session_start();

$username = "admin";

//set logged in username
$_SESSION[['WebFileShare']][['username']] = $username;

echo "You are now logged in as '".$username."'.";
exit();
Copy the above code inside a file named “autologin.php” and place it inside the Web File Share installation folder and then just access “http://www.your-site.com/WebFileShare/autologin.php”
Custom "Open with" actions
Creating a custom “Open with..” file contextual menu option:
The plugin folder structure
-
Create a new empty folder inside “customizables/custom_actions/”. For this example we'll name it “hello”.
-
Create a file “customizables/custom_actions/hello/app.php”
The PHP class
Inside “customizables/custom_actions/hello/app.php”, start with the following example:
<?php

class custom_hello {//required class name "custom_<folder-name>"

	var $online = true; //set this to true if the plugin requires Internet connection. it also makes the option show after the plugins that Web File Share comes with.

	var $disabled = false; //you can use this or the method bellow
	function isDisabled() {//optional method for dynamically enabling/disabling this plugin
		return false;
	}

	function init() {//required method
		//contains only configuration data
		//no other functionality here

		$this->JSconfig = array(
			//required
			"title" => self::t("Hello World"),

			"popup" => true, //opens a popup and runs the method run() inside

				//popup styling
				'iconCls' => 'fa fa-fw fa-file-text-o', //CSS class for menu item icon, remove the bellow if using this
				"icon" => 'url/to/icon.png', //image file for menu item icon, remove the above if using this
				"loadingMsg" => self::t('The plugin is loading. Please wait.'),
				"width" => 500,
				"height" => 500,

				"external" => true, //makes the popup an actual browser popup instead of an in-page one

			"ajax" => true, //instead of the popup above, it makes an Ajax call for the run() method


			"multiple" => true, //show menu item also when multiple files are being selected
			"onlyMultiple" => true, //show menu item ONLY when multiple files are being selected

			"folder" => true, //show menu item only for folders

			'extensions' => [
				'pdf' //show only for PDF files
			],
			'useWith' => [//the above setting takes precedence over this one
				'txt',  //show only for plain text files
				'office', //show only for office files
				'noext' //.. and files without extension
			],
			"requiredUserPerms" => ["download", "upload"]
		);
	}

	static function t($text) {//utility method for allowing the plugin to be translated to various languages
		$section = 'Custom Actions: Hello World'; //the translation section
		return \WebFileShare\Lang::t($text, $section);
	}

	function run() {//called inside the popup, or by the Ajax request

		\WebFileShare::checkPerms("download");//important security stuff!


		echo 'Hello World!';
		echo '\\';
		echo 'Relative file path: '.$this->data['filePath'];
		echo '\\';
		echo 'Full file path: '.$this->data['fileName'];
		echo '\\';
		echo 'File name: '.$this->data['relativePath'];
		echo '\\';
		echo 'Full path of plugin folder: '.$this->path;


		//add the action to the user activity log
		\WebFileShare\Log::add(false, "preview", [
			"relative_path" => $this->data['relativePath'],
			"full_path" => $this->data['filePath'],
			"method" => "Hello"
		]);
	}

	function dummy() {
		//your popup can access this method through the following URL: ?module=custom_actions&action=hello&method=dummy
	}
}
Custom CSS
As software updates are replacing Web File Share's files regardless of the fact that they have been customized, there is a way to make CSS modification which will be preserved between software updates. You can specify the URL of an external CSS file which will get loaded. Simply add the following line inside the configuration file (customizables/config.php):
$config['app']['ui']['custom_css_url'] = 'http://www.your-site.com/your-file.css';
Replace the example URL with your own valid URL.
Resetting the FileRun superuser password
Running the following from the command line should give you a new password:
cd cron
cron> php reset_superuser_pass.php your-site.com newpass
You will need to replace your-site.com with the actual domain/hostname of your web server. If you do not specify newpass, a random one will be generated and displayed in the command's output.
Backup
Making a backup
This article doesn't cover backing up your user files, but only the Web File Share installation which includes the user settings, WebLink information, metadata, file comments and any other data the Web File Share users might attach to the files and folders.
There are two parts to a complete back up of your Web File Share installation:
1. MySQL
If you are using a hosting service, you most probably have a MySQL database backup option in the hosting control panel. It should help you download an “.sql” file that contains the database' structure and data.
If there isn't a dedicated backup option, there is most probably “phpMyAdmin”, which is a tool for managing MySQL databases that you can use to make the backup.
Backup the database using "phpMyAdmin"
Backup the database from the command line
You will need SSH access to the server or direct access to the server's command line prompt.
cd /path/to/Web File Share/
Web File Share> mysqldump --add-drop-table -h localhost -u mysqlusername -p databasename -c > Web File Share.backup.sql
Replace “mysqlusername” and “databasename” with the actual names. You can find them inside “system/data/autoconfig.php”. You will be asked to enter your MySQL password. Type it and hit Enter.
2. Web File Share application files and folders
This is simple as making a duplicate copy of the Web File Share installation folder. You can use any method (FTP, SSH, or the hosting control panel file manager).
ZGL to ionCube
If you are running Web File Share for "Zend Guard Loader" and want to upgrade to PHP 5.4, or simply switch from "Zend Guard Loader" to "ionCube", you will need to replace the Web File Share application files with more appropriate versions.
You can of course download the latest Web File Share version from the client account and install that, but that will mean reconfiguring the user accounts and the settings and loosing the weblinks, shares, file comments, metadata etc.
In order to preserve the current configuration, you need to have a Web File Share installation zip file that matches the version of your current Web File Share installation and which works with "ionCube". If it's not available for download from your Web File Share client account, you can receive an older installation package by contacting us and letting us know your current Web File Share version.
If your Web File Share installation is still running, you can find the its version by appending "?Web File ShareVersion" to its URL. For example: http://demo.WebFileShare.com/?WebFileShareVersion
If your installation is no longer working (due to the server upgrade), run the following SQL command against the MySQL database:
SELECT `val` AS 'Web File Share Version' FROM `df_settings` WHERE `var`='currentVersion'to get the Web File Share version. If you do not know how to do that, we can retrieve the version for you, if you contact us and provide us FTP access to your Web File Share installation folder.
Once you have a Web File Share installation zip that works with "ionCube", please follow these steps:
- Make a backup copy of your existing Web File Share installation folder!
- Rename the existing Web File Share installation folder (not the backup copy that you made) to "old_WebFileShare_install".
- Extract the contents of the Web File Share installation zip archive for "ionCube" in a folder named like your original Web File Share installation folder. For this example, let's assume the folder name was "WebFileShare".
- Delete the default folder "WebFileShare/system/data" and move "old_WebFileShare_install/system/data" inside "WebFileShare/system/" folder to replace the deleted one. Make sure you make no change to the contents of "old_WebFileShare_install", to prevent loosing users documents and settings.
- Open a browser and make sure Web File Share works the same as it used to work when the server was running with "Zend Guard Loader". If everything is in order, you can delete the folder "old_WebFileShare_install".
Upgrading to PHP 5.4
PHP5.4
If you are running Web File Share on PHP 5.3 with "ionCube", then you can upgrade your server to PHP 5.4 without any additional change.
If you are running any other version, you will need to replace the Web File Share installation with one that works with PHP 5.4.
You can of course download the latest Web File Share version from the client account and install that, but that will mean reconfiguring the user accounts and the settings and loosing the weblinks, shares, file comments, metadata etc.
In order to preserve the current configuration you need to have a Web File Share installation zip file that matches the version of your current Web File Share installation, and which works with PHP 5.4. You can contact us for it.
If your Web File Share installation is still running, you can find its version by appending "?Web File Share Version" to its URL. For example: http://demo.WebFileShare.com/?WebFileShareVersion
If your installation is no longer working (due to the server upgrade), run the following SQL command against the MySQL database:
SELECT `val` AS 'Web File Share Version' FROM `df_settings` WHERE `var`='currentVersion'to get the Web File Share version. If you do not know how to do that, we can retrieve the version for you, if you contact us and provide us FTP access to your Web File Share installation folder.
Once you have a Web File Share installation zip for PHP 5.4, please follow these steps:
- Make a backup copy of your existing WebFileShare installation folder!
- Rename the existing WebFileShare installation folder (not the backup copy that you made) to "old_WebFileShare_install".
- Extract the contents of the Web File Share installation zip archive for PHP 5.4 in a folder named like your original Web File Share installation folder. For this example, let's assume the folder name was "WebFileShare".
- Delete the default folder "WebFileShare/system/data" and move "old_WebFileShare_install/system/data" inside "WebFileShare/system/" folder to replace the deleted one. Make sure you make no change to the contents of "old_Web File Share_install", to prevent loosing users documents and settings.
- Open a browser and make sure Web File Share works properly. If everything is in order, you can delete the folder "old_WebFileShare_install".
Migrating to another server
Migrating to a new server
There are three components to a Web File Share installation:
-
The application files
-
The MySQL database
-
The user files
The application files
The MySQL database
To move the MySQL database to the new server, please follow the official guide: https://dev.mysql.com/doc/refman/5.7/en/copying-databases.html
If the connection information to the new server differs from the old one, you can update it by opening the system/data/autoconfig.php file in a text editor. You can change the MySQL server hostname, username and password from inside this file.
The user files
If the user files paths no longer match on the new server, you will be required to update them in the MySQL database. The following SQL queries can be ran, via either a tool such phpMyAdmin, or directly from the MySQL command line client:
UPDATE `df_modules_search_index_queue` SET `path` = REPLACE(path, '/YOUR/OLD-PATH/', '/YOUR/NEW-PATH/');
UPDATE `df_modules_search_index_queue` SET `path` = '/YOUR/NEW-PATH' WHERE `path` = '/YOUR/OLD-PATH';

UPDATE `df_paths` SET `path` = REPLACE(path, '/YOUR/OLD-PATH/', '/YOUR/NEW-PATH/');
UPDATE `df_paths` SET `path` = '/YOUR/NEW-PATH', `filename` = 'NEW-PATH' WHERE `path` = '/YOUR/OLD-PATH';

UPDATE `df_users_permissions` SET `homefolder` = REPLACE(homefolder, '/YOUR/OLD-PATH/', '/YOUR/NEW-PATH/');
UPDATE `df_users_permissions` SET `homefolder` = '/YOUR/NEW-PATH' WHERE `homefolder` = '/YOUR/OLD-PATH';

UPDATE `df_modules_user_roles` SET `homefolder` = REPLACE(homefolder, '/YOUR/OLD-PATH/', '/YOUR/NEW-PATH/');
UPDATE `df_modules_user_roles` SET `homefolder` = '/YOUR/NEW-PATH' WHERE `homefolder` = '/YOUR/OLD-PATH';
You will need to replace /YOUR/OLD-PATH, /YOUR/NEW-PATH and NEW-PATH above with your actual server file paths. You will need to respect the trailing slashes. You will be replacing /some/old/path with /some/new/path and /some/old/path/ with /some/new/path/.
Make sure you always use forward slashes (/), even on Windows servers (example: c:/your/path).
Make sure the case are used as before. If a user's home folder was previously set to /my/User, do not change to /my/user even if your new file system might be case insensitive.
Installing updates
To install software updates please follow these steps:
-
Access your Web File Share installation and log in as superuser (The default login name of the superuser is “admin”).
-
Open “Control Panel”
-
Go to “System configuration” » “Software update”
-
(Important!) In most cases, the software updates install easily with just a click from the Web File Share control panel section. However, if your Web File Share installation is under production and people depend on its functionality, we strongly recommend you to make a full backup of it before installing the update. If the update's installation fails, you will need to restore this backup to get Web File Share back online.
-
If PHP will not be able to replace a file, because of its permission settings, the update will fail and the Web File Share installation may become unusable. To avoid this, please try to set the permissions of the the entire Web File Share installation folder so that PHP can replace all files without problems. You will be able to set the permissions back, after installing the update. Also: make sure the MySQL user that Web File Share is configured with, has temporary ALTER and DROP permissions. You can remove this permission after you are done with the updates.
-
Click “Check for updates” and wait while Web File Share shows the result.
-
Read carefully the update's description and notes.
-
Click “Download update” and wait for the update to download.
-
Click “Install update” to install the update.
-
Read the update log carefully and check for error messages. If you encounter errors that you do not know how to fix, drop us a quick message.
If you are having troubles with file permissions on Linux servers, please contact your server administrator to help you make sure PHP has write access over the Web File Share application files.
If you are using Microsft IIS web server, you need to right click the Web File Share installation folder and add the system user “IUSR_<computer-name>” (Internet guest account) user to the list of users who have access to the folder, enabling the “Modify” and “Write” permissions.
Recovering a broken installation
If you ignored the advice about creating a backup, tried to install an update and failed, leaving your Web File Share installation unusable, here are the steps to fix it:
(You can still make a backup of the broken Web File Share installation folder and its database now, to avoid loosing your user accounts, settings and documents by mistake!)
-
You need a Web File Share installation kit that matches the Web File Share version you were last running, before it got broken. It is important that you have the exact same version, because you are going to replace the application files and these need to match the MySQL database structure.
-
Move the folder “system/data” (and any other file that you might have customized and the update did not overwrite) from the broken installation to a safe location.
-
Delete the Web File Share installation folder (after making sure you have the folder “system/data” in a safe location)
-
Extract the contents of the Web File Share installation kit mentioned at step #1, at the exact same location of your old installation. It is very important to have the application files in the same location as before and not in some other folder.
-
Replace the newly extracted “system/data” folder with the old one, the one you saved to a safe location at step #2
-
Access your Web File Share installation using the browser and make sure things work as they used to, before installing the update.
-
Make a backup of your now working Web File Share installation and follow the above update installation guide, without skipping any step ;)
Upgrading PHP to version 7
To determine which Web File Share version you are currently running, sign in as superuser, open the control panel and navigate to “Software update”.
If, for example, you are running version 2016.11.07 you will need the installation package named Web File Share_2016_11_07_PHP7.zip. Note the “PHP7” part in the filename. The latest Web File Share version can always be downloaded from our homepage, but if you wish to upgrade an older Web File Share version, contact us for receiving an appropriate installation package for your version.
Let's assume you are updating version 2016.11.07 and your Web File Share installation folder is located inside /www/WebFileShare/. Please follow these steps:
-
Make a backup of your folder /www/WebFileShare/. Preferably on a completely different server/computer.
-
Create a subfolder /www/WebFileShare/@old.
-
Move everything from /www/WebFileShare/ to the @old subfolder.
-
Extract the archive WebFileShare_2016_11_07_PHP7.zip inside /www/WebFileShare
-
Delete (or rename/move - just to be safe and make sure you are not deleting the wrong folder) the folder /www/WebFileShare/system/data.
-
Move the folder /www/WebFileShare/@old/system/data inside /www/WebFileShare/system/. (This basically transfers over your settings and data.)
-
If you are getting a licensing error, simply access http://YOUR-SITE.COM/WebFileShare/?alicense=1&key=YOUR-WebFileShare-LICENSE-KEY to update the license.
-
After confirming that the installation is working fine, you can delete the remaining /www/WebFileShare/@old subfolder.
And that's it. If you have upgraded PHP to version 7, then the WebFileShare installation should also be up and running now.
Changing the MySQL connection information
You can change the MySQL connection information inside the file “system/data/autoconfig.php”.
Simply open the file in a text or code editor and make the appropriate changes.
Deleting old files
The following command line script can be used for deleting old files from users home folders.
php cron/delete_old_files.php 2592000 admin confirm2592000 is 30 days in seconds, admin is the username of the account that is being cleaned and confirm is needed for executing the task. If confirm is omitted then the command will only simulate the action, showing you what will happen without actually deleting the files. If the username is omitted, the process will run for all user accounts in the system. 2592000 is the smallest value you can use, preventing you from deleting files younger than 30 days.
Important note: the date used for determining a file's age is the “modified” date, not the “created” date. If you have files created a long time ago, but were recently modified, they will not be deleted. For any other desired behavior, the file “system/modules/fileman/sections/cli/php/delete_old_files.php” is freely editable.
Upgrading to PHP 5.5 or 5.6
If you were running a recent Web File Share version on PHP 5.3 or PHP 5.4, you should be able to update PHP to 5.5 or 5.6 without any change made to the Web File Share installation.
Overview
Roles can be used to easily apply sets of permissions to multiple users at the same time.
If you select a role for a user, you will no longer be able to set individual permissions and settings for that user.
Deleting a role
To delete a role follow these steps:
-
Open the control panel.
-
Select “Roles”.
-
Select the role you want to remove.
-
Click “Delete role”.
-
Click “Delete” to confirm the role's deletion.
Deleting a role will not delete any user account.
Deleting a role will not delete any user account.
Adding a role
To create a new role follow these steps:
-
Open the control panel.
-
Select “Roles”.
-
Click “Create new”.
-
Fill in they form:
-
Required fields:
-
Role name
-
-
Click “Submit” to create the role with the specified details.
Editing a role
To edit a role follow these steps:
-
Open the control panel.
-
Select “Roles”.
-
Select the role you want to edit.
-
Click “Edit role”
-
Make the appropriate changes in the form.
-
Click “Submit” to save the changes.
Choosing A Hosting Service
The following is a note for people using shared/budget hosting plans, the ones that usually charge less than $5/month. These cheap plans are very good for hosting a simple website. However, some of them are not suitable for running a serious application like WebFileShare. That is because most WebFileShare processes require:
-
a larger amount of server RAM memory
-
longer PHP script execution times
-
longer client requests (large uploads) and longer server replies (large downloads)
These are expensive resources and the hosting companies limit clients access to them, to be able to host a large number of clients on a small number of servers, and keep the costs low. These servers are configured to automatically stop requests that are taking a long time to execute. So if you have users with low bandwidth (poor Internet connections), that require a very long time to upload or download even the smaller files, you should look for a better hosting plan, like a VPS, where you are allowed to use more server resources and for longer periods of time.
If you are mostly dealing with documents, small image files or other types of files with sizes that do not exceed 100MB, a budget hosting service can work quite fine.
We recommend that before purchasing a WebFileShare license, contact us to help you review the server configuration, to make sure WebFileShare will work great for you.
Installing ionCube on Top Hosting Providers
Installing ionCube on Ubuntu
Please see https://www.digitalocean.com/community/tutorials/how-to-install-ioncube-on-ubuntu-16-04
Shared Hosting Support
On the PHP details page, search for the “ioncube” word. If you can't find anything similar, then it is not enabled. Search the hosting FAQ, forum for any instruction to enable ionCube. The best solution would be to contact your hosting support. It is just matter of seconds for them to enable ionCube for you.
Installing ionCube on 1&1
For Linux packages, please follow this link: http://help.1and1.com/hosting-c37630/scripts-and-programming-languages-c85099/php-c37728/manually-install-ioncube-loader-a726806.html
Installing ionCube on HostGator
-
Log into the HostGator cPanel – yourdomain.com/cpanel
-
Go to the Software » Services in cPanel
-
Click the “PHP Config” option and select the “PHP5 (Single php.ini) option
-
And click “Save Changes.”
You will be directed to Install Default php.ini page
-
Click the option to install IonCube.
-
Check “IonCube” and click “Install” button to install.
-
Use te “Go Back” option from bottom once done
-
Go to your “File Manager”
-
Select Web Root (public_html/www) to load in file manager
-
Browse and find newly created php.ini.default
-
Select and Rename the file as php.ini
-
Now the IonCube is enabled.
Installing ionCube on Just Host
https://my.justhost.com/cgi/help/149
Installing ionCube on iPage
http://members.ipage.com/knowledgebase/beta/article.bml?ArticleID=950&type=How%20To#Nugget_1034
Installing ionCube on Blue Host
https://my.bluehost.com/cgi/help/149
Installing ionCube on Hostmonster
https://my.hostmonster.com/cgi/help/149
Installing ionCube on Fatcow
Contact hosting support
Installing ionCube on Blue Domino
-
Log into the Control Panel with the account username and password.
-
Click on CGI and Scripted Language Support under Scripting and Add-Ons.
-
Click on PHP Scripting.
-
Add the following line:
zend_extension = /usr/local/lib/ioncube/ioncube_loader_lin_x.x.so
(Where x.x is the version of your php)
-
Click on the Save button
Installing ionCube on Dreamhost
http://wiki.dreamhost.com/IonCube_Loader
Installing ionCube on Glow Host
Must open a support ticket and request Ioncube support.
Installing ionCube on Godaddy
http://support.godaddy.com/help/article/5608/installing-ioncube-on-your-linux-hosting-account
Installing ionCube on IPOWER
http://www.ipower.com/knowledgebase/read_article.bml?kbid=6041
Installing ionCube on Jaguar PC
http://www.jaguarpc.com/support/kbase/index.php?action=list&faq=697
Installing ionCube on Lunarpages
https://support.lunarpages.com/knowledge_bases/article/317
Installing ionCube on OVH
Add the following line to a custom .htaccess file:
SetEnv IONCUBE 1
SetEnv PHP_VER 5
Or create a file called .htaccess, and using a text editor put the above code lines in it, save changes, and upload it to the root of the store files.
Installing ionCube on Pow Web
http://www.powweb.com/knowledgebase/read_article.bml?kbid=6041
Installing ionCube on Netfirms
http://support.netfirms.com/idx.php/0/831/article/How-do-I-use-Ioncube-with-my-site.html
Installing ionCube on Site Ground
http://kb.siteground.com/article/Is_IonCube_supported.html
Installing ionCube on Start Logic
http://www.startlogic.com/knowledgebase/read_article.bml?kbid=6041
Installing Ioncube Loaders
Assisted installation (Loader Wizard)
The “Loader Wizard” is a PHP script that can help you with the installation. Download the script file from the ionCube website and upload it to your server. Launch the script in your browser for guidance on installation and selection of the correct Loader package. For more info you can refer to http://www.ioncube.com/loader_installation.php
Checking if ionCube is installed
Type http://yourdomain.com/webfileshare/info.php
If “info.php” does not exist, create one and add the following code inside:
<?php
phpinfo();
Now “http://yourdomain.com/filerun/info.php” should provide information about your PHP configuration, as in the following example:

Choosing the right version
The first highlighted item describes the PHP version and server OS details e.g. PHP 5.5 in Ubuntu 3
Second item describes the system processor type e.g. x86-64. This is needed to download appropriate loaders e.g. as in image Linux (x86-64) package. You should enable the correct loader file with OS type and PHP version e.g.
zend_extension = /usr/local/ioncube/ioncube_loader_lin_5.5.so
The third highlighted item tells if PHP is threaded or not. In this example PHP is not threaded, if thread safety is enabled then your PHP configuration line should look like this:
zend_extension = /usr/local/ioncube/ioncube_loader_lin_5.5_ts.so
(note the “_ts” part)
Manual "ionCube" installation
You can do it your self, if you have access to the PHP configuration file “php.ini”. Most hosting service allow you to either create a custom PHP configuration file inside any of your folders, or they provide a PHP configuration editor inside their control panels.
Depending on the PHP details that you checked above, your configuration line might look like this:
For linux and php 5.5, add a line like this:
zend_extension = /usr/local/ioncube/ioncube_loader_lin_5.5.soFor FreeBSD and php 5.3, add a line like this
zend_extension_ts = /usr/local/ioncube/ioncube_loader_fre_5.5_ts.soFor Windows and php 5.5, add a line like this
zend_extension_ts = c:WINNTioncube_loader_win_5.5.dllIt is always best and easier to contact your hosting company tech support and ask them about the appropriate configuration line.
Shared Hosting Support
On the PHP details page, search for the "ioncube" word. If you can't find anything similar, then it is not enabled. Search the hosting FAQ, forum for any instruction to enable ionCube. The best solution would be to contact your hosting support. It is just matter of seconds for them to enable ionCube for you.
Loader Wizard
The "Loader Wizard" is a PHP script that can help you with the installation. Download the script file from the ionCube website and upload it to your server. Lunch the script in your browser for guidance on installation and selection of the correct Loader package. For more info you can refer to http://www.ioncube.com/loader_installation.php
Activity notifications
Since version 301013, Quik File Share provides a way for the users to quickly see changes made by other users.
On the right side of the folders menu, there is a new option that opens a drop-down menu showing a log with the latest actions performed by other users anywhere inside your home folder.
The icon of the option is black and white when there are no notifications and blue when there are. There is also an overlay that shows the number of new actions.
Unless the real-time notifications are enabled, as described below, the notifications will be updated every time the user accesses a new folder or clicks the "Refresh" button to reload the list of files.
To see what actions have been performed by other Web File Share users inside your home folder, access the “Folder Activity” tab available on the “Details and activity” panel on the right side of the user interface. To see the tab, access the folder without selecting any items inside.
Real-time notifications with Pusher.com
The notifications can be made real-time, by enabling Pusher.com integration:
-
Signup for a free Pusher API account at http://pusher.com/pricing
-
Access the Web File Share control panel as superuser and go to “System configuration” > “Misc options” section.
-
Enable the main checkbox and configure the App ID, Key and Secret that you get from your Pusher.com account.
The users will be notified in real-time about files that have been uploaded, files that have been downloaded, previewed or commented by other users.
Disabling the sound
Each user can enable/disable the sound notifications from their Account Settings panel. The preference persists between browser sessions, so the user will not have to use the toggle every time he is accessing Web File Share. The sound is enabled by default for all users. To mute it by default, add the following to the configuration file:
$config[['app']][['disable_sound_notification']] = true;
The sound played on notification can be customized by replacing the two files “sounds/new.mp3” and “sounds/new.ogg”.
Limitations
-
The users will be notified only about actions performed inside their own home folder. They will not be notified about actions performed in folders that are shared to them by other users.
-
If user doesn't have permission to read file comments in its own home folder, the number of new events will still increase when comments are being added.
-
This feature doesn't work properly with hidden folders. Users will be notified about actions performed inside hidden folders, so you will wish to disable the feature for the users with hidden folders. (The option for hiding folders will be dropped in future versions)
Disabling the feature
This feature is connected to the “file-based activity logs” feature. Disabling the user's “User can access the files' activity logs” permission, will disable this feature as well.
File-based Activity Logs
Note: making changes or accessing files using third-party methods will not be visible in these logs.
It can be globally disabled from “Control Panel » System configuration » Misc options”. While disabled, no activity will get logged on the files, although existing records will not get deleted and will be accessible once the feature is enabled again.
It can also be enable/disabled per user or role, from the list of user permissions.
Activity logs can be accessed only on files located inside the user's home folder. The activity logs of shared files are not accessible. Not even inside anonymously shared folders. So users can share folders without worries that the history of their own actions will be shown to other users.
Additional details are displayed for certain actions. For example, sending a file by e-mail will show the list of recipients. However, only the user that performed the action and the admin users are able to see these details.
Mozilla Thunderbird FileLink Addon
This is an add-on to be used with Mozilla Thunderbird e-mail program.
This add-on allows you to easily e-mail large file attachments by uploading those attachments to your Web File Share user account and then inserting a web link to the file into the body of your email.
The add-on will not require you to share your Web File Share username and password with Thunderbird, but instead it leverages Web File Share's OAuth2 server to authorize Thunderbird to perform limited operations on behalf of your Web File Share account.
Files uploaded to Web File Share through this add-on will be located inside the automatically created folder “Apps/Thunderbird”.
Note: Thunderbird will not have access to any other folder and will not be able to perform other operations with your Web File Share user account.
Alternate downloads
If your RAW photographs are very large and it takes a long time for WebFileShare/ImageMagick to generate a preview, or your 4K videos cannot be previewed by clients with slower Internet connections, it can be more practical to share with your clients a folder containing low resolution versions of your media. To still provide the users with the option of downloading the high res/raw version of the files, you can use this plugin. It will add an “Open with..” option called “Alternate Download”. To enable the plugin, edit it from the “Files” → “Plugins” control panel section and set a configuration JSON.
You can configure as many folders with alternate downloads as you wish. Here's an example configuration:
{
	"paths": [{
		"normal": "/your/files",
		"alternate": "/your/alternate/files",
		"extension": "jpg"
	}]
}-
'normal' is the folder you wish to enable the plugin for.
-
'alternate' is the path of the folder you wish to use for the source of alternate files.
-
'extension' is optional, if the alternate files have a different extension than the one selected by the user.
Note that the download actions are being logged to the normal file (the file which was selected by the user), not to the alternate file. You can see when a user is downloading the alternate version of the file when the download log entry shows “alternate_download” in the details.
P.S. The folders containing alternate versions need not be accessible by the Web File Share user.
Metadata
Metadata is information that a file can have attached to it. You can attach information like: comments, title, author, tags, etc.
Fields
Metadata information is stored in metadata fields. You manage the fields from inside the “Control Panel » System configuration » Metadata” administrative section.
When setting up a metadata field, you can define a list of options. The user will be presented with the predefined list to choose from. If you do not define a list of values, the user will be free to type in any value he wishes.
Field sets
Every metadata field needs to be part of a metadata field set. Field sets can be used to group more fields.
File types
To automatically associate certain field sets with certain types of files, you define metadata file types. You might want, for example to have a set with fields such as “Photographer”, “Camera”, “Location” associated with image files, so that when you edit the metadata for an image file you are presented by default with these fields.
By defining a field set as generic, its fields will be automatically displayed inside the metadata window, no matter what “file type” the user selects for the file.
Metadata information can be displayed in the list of files as new columns, by clicking the arrow icon that appears while holding the cursor over a column's header and selecting the metadata fields from the list of possible columns.
Metadata fields, filed sets and file types created by independent admin user are available only to these users and the user accounts he creates.
Desktop sync
You can keep your remote folders in sync with your local ones, or the other way around with the desktop sync apps.
On the first run, you will be asked to provide your Web File Share installation URL, your Web File Share username and password. You can either sync your entire account, or choose particular folders.
Mobile apps
To be able to use the mobile apps with your Web File Share installation you need to enable the API.
A SSL enabled web server is required. (Your Web File Share URL needs to start with “https://” and not “http://”). (For testing only, you can temporarily enable the API via “http://”. See “Testing without SSL”)
Please follow these steps:
-
Login to the Web File Share installation as superuser.
-
Open the control panel.
-
Select “API” from the menu (under “Security”).
-
Select the “Enable API” checkbox.
-
Click “Save Changes”.
Upload problems
Drag & drop upload mode
The "Drag files from your computer here" text is not displayed
The drag&drop upload mode requires Java support enabled in your browser. You can click here to verify if it's enabled and up to date.
The progress bar stays at 0%
Please make sure you have confirmed the Java security prompt, as described in the following image. If you have already clicked "Cancel" you will need to close the browser and reopen it, in order to see the security prompt again.

The file is not on the server after the transfer is completed
There are multiple possible causes for this:
Your computer uses a proxy server: The Java upload applet cannot inherit the browser's proxy settings so you will need to add these settings into Web File Share by clicking the "Proxy settings" link available under the drag&drop area.
File permissions: The folder where you want to upload doesn't have write permissions.
Error: Please specify a file for upload.
Most probably the "Drag&Drop upload chunk size" you have configured inside the "Control Panel » System configuration » Misc options" administrative section is higher than your "upload_max_filesize" or "post_max_size" PHP configuration directives. Please note that a larger chunk size will not help you upload larger files, on the contrary, it will prevent the drag&drop upload mode from avoiding the limitations of your server. If you are getting this error please set the value back to its default value (2MB).
A login prompt keeps popping up
Please make sure "session.use_only_cookies" is set to "Off" in your PHP configuration.
Error: Upload failed: javax.net.ssl.SSLHandshakeException: [...] unable to find valid certification path to requested target
You are using a self-signed SSL certificate or the certificate that you are using was not installed properly on your web server.
Please try following these steps:
- Locate your intermediate bundle file and open it. When you open it, you will see 2 different areas starting with BEGIN CERTIFICATE.
- Cut the top certificate starting at "-----BEGIN CERTIFICATE-----" and ending with "-----END CERTIFICATE-----".
- Paste it below the next certificate so it is now at the bottom of the file. Save file and restart the web server.
If this information doesn't look familiar to you, please contact your server administrator or hosting service tech support to help you with this issue, as it is not Web File Share related.
Error: Failed to upload file. creation failed: copyFile error: source file /tmp/php7B.tmp doesn't exist
PHP doesn't have permission to place files in the temporary folder. You need to give write permission over the "upload_tmp_dir" configured PHP folder to the user under which PHP is running. If "upload_tmp_dir" is not specified, PHP will use the system's default temporary folder.
Login problems
Error: The path of your home folder doesn't point to an existing folder.
When setting a user's home folder path, please use the "[Check path]" button next to the text input, to make sure the path is valid and points to an existing folder.
If the account is using a role, you need to check the role's settings to see if the path is correct.
If you are receiving this error when logging in as superuser, you can fix it by accessing the control panel directly, by the following URL: http://www.your-site.com/WebFileShare/panel/
The HTTP authentication for the mobile version doesn't work
If PHP is installed as CGI, please try to create a file named ".htaccess" inside the root folder of your Web File Share installation and write the following inside:
RewriteEngine on

RewriteRule .* - [E=HTTP_AUTHORIZATION:%{HTTP:Authorization},L]
Apache module "mod_rewrite" is required for this to work.
Downloading problems
Internet Explorer over HTTPS: Internet Explorer Cannot Download [...]
Please set "session.cache_limiter" to "private_no_expire", in your PHP configuration. It should fix the problem. The problem is caused by a weird Internet Explorer behavior.
Downloading very large files
For FastCGI Servers (Usually Microsoft IIS)
If the transfer stops for no apparent reason while downloading large files, try increasing the values of "RequestTimeout" and "ActivityTimeout" FastCGI configuration directives (on Windows servers, the location of the file is usually "%WINDIR%system32inetsrvfcgiext.ini"). The default values do not accommodate downloading large files over slow Internet connections.
For Apache Web Servers
Applies to Web File Share version (020710A)
Requirements
- Apache web server (it doesn't work with IIS or other web servers)
- Apache module "mod_rewrite" needs to be enabled
- (on Linux servers in particular) the users under which Apache is running (usually "www" or "apache") must have permission to access the files that are to be downloaded. Sometimes Apache's access is limited to the "www" or "public_html" folder and additional permissions must be configured.
To enable the workaround, please follow these steps:
- Open "/path-to-WebFileShare/customizables/config.php" in a text editor
- Copy the following three lines of PHP code at the end of the file:
$config['enable_download_trick'] = true;
$config['download_trick_minimum_filesize'] = 20971520;//in bytes, recommened value: 20971520 (20MB)
$config['download_trick_links_life'] = 10; //in seconds, recommended value 10
- If the code already exists in the file, you can simply replace "false" with "true".
- Make sure a file named ".htaccess" is availabe inside the folder "/path-to-WebFileShare/download". If a file "htaccess.txt" exists in the folder, please rename it to ".htaccess".
Troubleshooting
If you are getting a "500 Internal Server Error" when trying to download files, most probably "mod_rewrite" is not available on your server.
If you are getting a "404 File Not Found" error, please make sure the file ".htaccess" is located in the folder "/path-to-WebFileShare/download", it is not empty and has proper permission settings. If you are accessing the Web File Share installation using a subdomain, you should add "RewriteBase /download/", right after "RewriteEngine On", inside the ".htaccess" file.
Large files (>2GB)
Linux: Files larger than 2GB do not show up in the list.
On Linux servers, PHP needs to be configured with LFS (Large File Support) in order to be able to manage files larger than 2GB. Please read here more about it: http://www.php.net/manual/en/intro.filesystem.php
Zipping files and folders
Creating zip files from larger files, or folders containing many files, it might take a longer time than allowed by the default PHP configuration. You can allow WebFileShare/PHP more time, to be able to complete the task. This can be done by increasing the value of the "max_execution_time" PHP configuration directive, which has a default value of "60" (seconds).
Metadata
Metadata is information that a file can have attached to it. You can attach information like: comments, title, author, tags, etc.
By default Quick File Share provides ways of attaching comments to files using the "Comment" contextual menu option. For any other type of metadata you need to use the "Metadata" contextual menu option.
Metadata information is stored in "metadata fields". You manage the fields from inside the "Control Panel » System configuration » Metadata" administrative section.
When setting up a metadata field, you can define a list of options. The user will be presented with the predefined list to choose from. If you do not define a list of values, the user will be free to type in any value he wishes.
Every metadata field needs to be part of a "metadata fieldset". Fieldsets can be used to group more fields.
To display certain fieldsets for certain files, you define "metadata filetypes". You can choose for each filetype what fieldsets to be displayed. By defining a fieldset as "generic", its fields will be automatically displayed inside the metadata window, no matter what "file type" the user selects for the file.
Metadata information can be displayed in the list of files as new columns, by clicking the arrow icon that appears while holding the cursor over a column's header and selecting the metadata fields from the list of possible columns.
Metadata fields, filedsets and filetypes created by independent admin user are available only to these users and the user accounts he creates.
To add fields to the field set
1) Open the Field set in the "Edit" mode.
2) Click "Add" button under the "Fields" section.
3) Define the field and click "Add Field" button.
4) When you click on "Field sets" again, you'll see that the number under "Fields" column has been incremented. This indicates that a new field has been successfully added to the Field set.
How to define Metadata Filetypes
To display certain field sets according to the file types like PDF, PNG, docx etc., you can define "Metadata Filetypes"
1) Select "File Types" under Metadata from the control panel.
2) Define the "File type" by giving an appropriate name and selecting the field set that should display for that particular file type. Click on "Add File Type" button to save file type.
Configuring users’ file access
Basics
Each user has a home folder, which is an actual folder on the server's file system. Users do not have more than one home folder. This folder is assigned using the “Home folder” field available under the “Permissions” tab, when adding or editing the user accounts. It must be a path to an existing file system folder.
The user is able to browse all the subfolders available in his home folder.
Two users with the exact same “home folder” path will access the same files. To prevent the users from seeing each other's files, make sure the users have different “home folder” paths.
Important: make sure the users home folders are located outside the public area of your web server. In other words, files that users upload to their home folders should not be accessible directly by accessing your website's address like this: http://www.your-site.com/webfileshare/users-folder/private-file.txt So, make sure the home folder paths do not contain any of the words “public_html”, “html”, “www” or “your-domain.com”.
Providing admin user with access to all users files
The most common setup keeps the users access separate while allowing the admin users or superuser to access everything. To achieve that, make sure you create the users home folders inside the same root folder and assign the root folder as home folder for the admin users. Here's an example:
User A's home folder: /storage/files/users/user_a/
User B's home folder: /storage/files/users/user_b/
Admin's home folder: /storage/files/users/ (The admin can access all the users files)
Superuser's home folder: /storage/files/ (The superuser can access even folders one level higher - to store files which other admin users cannot access)
Accessing more than one folder
To allow the user to access files located outside his home folder, you need to use the folder sharing system. Logged in with a user account which has access to another location (usually an admin account), right-click the desired folder and select "Share.." -> "with users".