User Guide
- Accessing your Archived Mail
- Exporting Email
- MailStore Outlook Add-in Deployment
- Monitoring
- Using the MS Outlook Add-in
- Installing the MS Outlook Add-In
- Using the Windows Desktop Client
- Installing the Windows Desktop Client
- Using Web Access from your Desktop
- Using Mobile Web Access
- Using Integrated IMAP Server
- Accessing the Archive with iPhone and iPod touch
- Accessing the Archive from Android Based Devices
- Accessing the Archive from Symbian Based Devices
Accessing your Archived Mail
|
|
|
|
Using the Microsoft Outlook Client |
|
|
With a Outlook Client add-in, users can access their email archive directly from within Microsoft Outlook.
|
|
|
Using the Windows Desktop Client |
|
|
MailStore Client is a Windows application that can be installed on any number of user computers (depending on the license purchased). Of all the options for accessing the archive, MailStore Client provides the largest range of functions: Not only can users browse and view their emails but, depending on the privileges assigned to them, set up and execute archiving and exporting tasks.
|
|
|
Using Web Access from your Desktop Browser |
|
|
Web Access provides access to the archive using an internet browser. This has the advantage that no additional software needs to be installed on the user machines. In addition to browsing and viewing emails, web access also offers access through the folder structure and functions for restoring emails from the archive.
|
|
|
Using Web Access from your Mobile Browser |
|
| With Mobile Web Access you can access the MailStore archive regardless of your location using a smart phone. In addition to browsing the folder structure and viewing archived email, the mobile web access also allows you to search the archive.
|
|
|
Using Other Email Clients |
|
|
With an included integrated IMAP server, that offers you read-only access to the archive for any IMAP capable email client. Especially for alternative email clients (Mozilla Thunderbird) or operating systems (e.g. MacOS or Linux), as well as for mobile platforms such as Android, IPhone or Symbian, this is a very convenient way of accessing the archive.
|
|


Exporting Email
Messages archived into MailStore Home can be exported out again in order to access them in your favourite mail client. You can export messages via a number of different methods, each described below. Setting up message exporting is similar to setting up archive profiles in that you will have to tell MailStore Home where to save messages, and you will have to choose what messages to export.
You can export from a previously created Saved Search Folder, so if you want to export very specific messages, first create a Search Folder then creating an Export Email profile to export those messages to the appropriate destination.
Exchange Mailbox and IMAP Mailbox
These options will allow you to export messages to an Exchange mail server or an IMAP mail server respectively. MailStore Home will create a folder structure on the server and export messages into the MailStore Home folder structure.
Note that after exporting messages, you may need to refresh the folder list in your mail client, or you may need to subscribe to the newly created folders. Please refer to your mail client's documentation for specific instructions on how to see the new folders.
Email Address via SMTP
This feature will allow you to send archived messages (via SMTP) to an email address. This is essentially like forwarding archived messages from your mail client, and is the only way of restoring messages to a POP3 server.
Email Clients
MailStore Home can export messages into several types of mail clients. Note that you must already have the appropriate mail client installed and configured before starting the export process.
Directory (File System)
This feature will export archived messages to a directory on your computer. You can export messages into EML files which can be read by many mail clients and even some mail servers, or you can export into Microsoft Outlook MSG files for use with Microsoft Outlook.
MailStore Outlook Add-in Deployment
Using a software distribution system, MailStore Outlook Add-in can be distributed among the users' computers automatically. To be able to do so, the distribution system must be able to execute MailStore Outlook Add-in's setup program without requiring any input or confirmations.
Using Group Policies
Installation
In addition to being installed manually, MailStore Outlook Add-in can also be distributed to all user computers using Active Directory. Once the distribution process is set up successfully, MailStore Outlook Add-in will be installed automatically when the user logs on. This process runs in the background and requires no action on part of the user. Immediately after the distribution, the user can use the MailStore Outlook Add-in as usual.
Example: Setting up distribution in Windows Server 2003
- The MailStore Outlook Add-in MSI setup file is bundled with the MailStore Server installation. You can either find it via the link on your desktop Install MailStore Client on other Computers or in the Setup- subfolder of your MailStore Server program folder.
- Save the download in a directory on the server that is shared and accessible to all users of the domain.
- Open the Group Policy Management Console. If this is not available, download the installation routine under http://www.quikbox.com/?gpmc.
- Install the console.
- Open the group policy management console of the Windows server
- Right-click on the administrative folder Group Policy Objects, select New and create a new group policy object called MailStore Outlook Add-in Deployment.
- Highlight the new object and click on Edit. Expand User Configuration and Software Settings and right-click on Software installation. Select New and Package...
- Select an MSI package. Please keep in mind that the path for the file must be entered in UNC notation (e.g. ServerSetupMailStoreOutlookAddinSetup...) and that the users of the domain need to have read-access to this directory share.
- In the following dialog window, select Advanced and click OK.
- On the next screen, please select the settings as shown below:
- Click on OK to confirm all settings. The group policy should look similar to the one shown below:
- Close the group policy editor. The group policy is now configured and can be linked to the corresponding user objects. Linking is done using organizational units (OU).
- Highlight the organizational unit (OU) which contains the desired user objects, right-click on the OU (DE_Viersen in the example below) and select the option Link an existing GPO. In the dialog window Select GPO, highlight MailStore Outlook Add-in Deployment and click on OK.
- The group policy is now available and becomes active the next time users log on to the Windows client.
Updating
With group policies, the MailStore Outlook Add-in software on the user machines can be updated automatically. To edit an existing MailStore Outlook Add-in deployment group policy so that an automatic update of the clients can be performed, please proceed as follows:
- Open the existing group policy MailStore Outlook Add-in Deployment. Create a new package and select the updated MailStore Outlook Add-in MSI file. In the following dialog window, select Advanced and click on OK. Please select the settings as shown below:
- In the Updates-tab, click on Add and select the software to be updated. Choose the settings as shown below and click on OK and confirm by clicking on OK again.
- The group policy should look similar to the one in the following graphic:
MailStore Outlook Add-in will be updated the next time users log on to their Windows workstations.
To avoid complications when installing software using group policies, the following settings for the MailStore Outlook Add-in Deployment group policy should be adjusted as well:
- Activate Computer Configuration/Administrative Templates/System/ScriptsRun logon scripts synchronously
- Activate Configuration/Administrative Templates/System/LogonAlways wait for the network at computer startup and logon
Configuration
If Mailstore is used within an Active Directory infrastucture, MailStore Client or the MailStore Outlook add-in (starting with MailStore Server 5.x) can be configured using group policies.
For this purpose, group policy templates are available: For domains in Windows 2003 mode or older, there is an ADM-template, for domains in Windows 2008 mode or newer, an ADMX-template. The configuration of MailStore Client and the MailStore Outlook add-in is the same for both templates.
Installing the ADM Template
The ADM-template is used for managing group policies on machines running Windows 2003 Server or older. To install the ADM template, please open the group policy management console. (If the group policy management console is not yet installed on your system, you can download it under http://www.quikbox.com/?gpmc.)
Please proceed as follows:
- Download and save the ADM-template.
- Open the group policy management console
- Right-click on the Group Policy Objects folder
- Click on New and create a new group policy object named MailStore Client Settings
- Right-click on the new object and select Edit
- In the user configuration, right-click on Administrative Templates and select Add/remove templates...
- Click on Add and enter the path for the ADM file
- Click on Open and then close the dialog window
- The installation of the ADM template is now complete
Installing the ADMX Template
The ADMX-template is used for managing group policies on machines running Windows 2008 Server or newer. To install the template, please open the group policy management console.
Please proceed as follows:
- Download and save the ADMX-template
- In Windows Explorer, navigate to the folder %systemroot%sysvoldomainpoliciesPolicyDefinitions
- Copy the ADMX Template into this directory
- Copy the ADML Templates from the subfolders (de-DE, en-US) into the corresponding directories
- Close Windows Explorer
- Open the group policy management console
- Right-click on the Group Policy Objects folder
- Click on New and create a new group policy object called MailStore Client Settings
- Right-click on the new object and select Edit
- In the user configuration, click on Policies and Administrative Templates and select the MailStore template
- The installation of the ADMX Template is now complete
Configuring MailStore Outlook Add-In
With the new MailStore Outlook Add-in, you can configure the way the add-in contacts the MailStore Server.
- Show MailStore Toolbar in Outlook
Here you define, whether the MailStore Outlook Add-in is shown or hidden by default. Possible values are activate or deactivate.
- Choose authentication method
Here you define, which authentication method should be used for logins.
Possible values are users choice, Default Authentication or Windows Authentication. Windows Authentication is only available in Active Directory environments.
- Address of MailStore Server
Here you set up the hostname or IP-address of your MailStore Server to which the clients should connect. Should MailStore Web Access configured to listen on other than the default ports (8461/8462), you need to add the port information to the hostname or IP-Address in the format :port.
- Use SSL secured connection
If you activate this option, the communication between the MailStore Outlook Add-in and your MailStore Server is SSL encrypted. Possible values are activated or deactivated.
If you activate this option, no unencrypted communication is possible with you MailStore Server. You need to make sure, that encrypted communication to you MailStore Server is configured properly.
Uninstalling
For Each Installation Distributed Using Group Policies
Like the distribution, the uninstalling of the software packages can be done using group policies. Please proceed as follows:
- Open the group policy management console of your Windows server.
- Expand the folder Group Policy Objects.
- Right-click on the group policy object which was created for the software distribution of MailStore and select Edit.
- Expand User Configuration | Software Settings | Software Installation.
- Right-click on the packet to be uninstalled and select All Tasks -> Delete...
- In the following dialog window, select Software sofort von Benutzern und Computern deinstallieren and click OK.
- Close all open windows and exit the group policy
- The software will be uninstalled the next time the user logs on to the server.
Without using Group Policies
Please refer to this Microsoft's TechNet article to find more information about the Windows installer and msiexec's command line parameters.
Monitoring
MailStore only provides limited notification or monitoring features, but the status of the archiving processes can be monitored using external components.
Using External Monitoring Software
MailStore Nagios/Icinga-Plugin
The scripting package includes the check_mailstore.py plugin. The plugin checks the number of jobs or the number of archived emails in a given period of time. At least MailStore Server 8 is required.
Installation
The directory mailstoreapi from the package should be copied below the site-packages directory of your Python installation. The location of the site-packages directory can be found with the following command
python -c "from distutils.sysconfig import get_python_lib; print(get_python_lib())"Depending on your distribution, you might have to install the python-argparse package.
The plugin connects to the MailStore Server Administration API. Therefore it must be enabled in the MailStore Server Service Configuration.
Usage
A check that monitors the successful execution of profiles could be defined in Nagios/Icinga as follows:
define command {

       command_name check_mailstore

       command_line /usr/local/lib/nagios/plugins/check_mailstore.py --host $ARG1$ --password $ARG2$ -s since:$ARG3$ --status $ARG4$ -c $ARG5$ -w $ARG6$ --search $ARG7$

       }
The appropriate service definition might look like this:
define service {

       host_name                       mailstoreserver

       service_description             MailStore Succeeded Jobs

       check_command                   check_mailstore!mailstoreserver!sUp3rs3CcR6ET3!1H!succeeded!8!10!jobs

       use                             generic-service

       }
This test checks whether there were more then 10 tasks executed successfully (--status succeeded) during the last hour (-s since:1H).
Parameters
The plugin supports the following parameters.
--help|--hDisplays the help page.
--host HOSTHostname or IP address of the MailStore Server. The default is localhost.
--port PORTTCP port on which the MailStore Administration API accepts connections. Default is 8463.
--username USERNAMEUsername to log on to MailStore Server. This must be a MailStore administrator. By default, admin is used.
--password PASSWORDThe user's password.
--start STARTTIME|-s STARTTIMESpecifies the start time of the check period. The start time has to be given in the format YYYY-mm-ddTHH:MM:SS (eg 2013-01-01T00:00:00). The -end parameter has to be given. As alternative a time period can be given with the format since:XY, where X is a number and Y is one of the following letters: Y (year), m (month), d (day), H (hour), M (minute) S (second). Example -s since: 90M (last 90 minutes).
--end ENDTIME|-e ENDTIMESpecifies the end time of the period. The format is YYYY-mm-ddTHH:MM:SS (eg 2013-02-28T23:59:59). When using since in --start, this parameter is not required.
--timezone TIMEZONEMailStore Server stores dates in UTC time. The output of the plugin can be adjusted with this parameter. By default, $local is used. This corresponds to the time zone setting of the operating system of MailStore Server. Using the API command GetTimeZones the possible values can be shown. In most cases, this parameter is not required.
--machinename MACHINENAME|-m MACHINENAMEFilters the results by MACHINENAME. This is useful when the results of local jobs of different computers are monitored.
--profile PROFILE|-p PROFILEFilters the results by archiving profile. The ID or the name of an archiving profile can be given.
--status STATUSFilters the results by STATUS. Possible values are succeeded, failed, cancelled, disconnected, threadAbort and completedWithErrors. The status can be negated by prepending a #. Default is succeeded.
--search [jobs|emails]Specifies whether to check on the number of returned jobs or the number of mails archived. Default is jobs.
--warning WARNING|-w WARNINGThe warning threshold.
--critical CRITICAL|-c CRITICALThe critical threshold.
--compare COMPARESpecifies how the values of WARNING and CRITICAL will be compared with the amount of results. Possible values are lt, le, eq, ge, gt (lesser than, lesser than or equal, equal, greater than or equal, greater than). Default is le (lesser than or equal).
--DEBUGIf given, the matching results will be printed to standard output. This is only useful for debugging purpose.
Other examples
check_mailstore.py --host 192.168.0.1 --password sUp3rs3CcR6ET3 -s "since:1d" -c 5 -w 2 --search jobs --status="#succeeded" --compare gt
Status is critical if more than (--compare gt) 5 (-c 5) jobs (--search jobs) have NOT ended succesfully (--status "#succeeded") within the last day (-s "since:1d"). A warning is issued when more than 2 unsuccessful jobs have been found.
check_mailstore.py --host 192.168.0.1 --password sUp3rs3CcR6ET3 -s "since:1d" -c 5 -w 20 --search emails --profile "MailStore Proxy"
Status is critical if less than 5 (-c 5) emails (--search emails) were archived within a day by the the profile "MailStore proxy" (--profile "MailStore proxy"). A warning is issued when less than 20 emails were archived.
Monitoring of licenced users
The check_mailstorelicence-script from the scripting-pakage, can be used to monitor the existing users in MailStore with Nagios/Icinga. No external arguments can be used, all configuration has to be done inside the file. If you synchronize your users from an external source, and more users than free licences should be created in one step, this monitoring will not holler, because it checks the existing users only and not the users that shall be created.
Command-Definition:
define command {

       command_name check_mailstorelicence

       command_line /usr/local/lib/nagios/plugins/check_mailstorelicence.py

       }
Nagios/Icinga with NSClient++
If you are already using monitoring software, such as Nagios/Icinga, Zabbix or HP OpenView, in your network, we recommend monitoring the results of the Windows task scheduler.
This example requires that in section [NRPE] of the file NSC.ini the parameter allow_arguments=1 is set. An alternative, and safer in public environments, is to define an alias under section [External Alias]].
Under Nagios/Icinga the corresponding service check looks like this:
define service {

        use                             generic-service

        host_name                       mailstore.mydomain.tld

        service_description             Scheduled Tasks

        check_command                   check_nrpe!CheckTaskSched!filter="exit_code ne 0" "syntax=%title%: %exit_code%" "crit=>0"

}
The service check puts out a list of all scheduled tasks in the Windows task scheduler whose exit code is unequal to zero. If there is more than one event, the check status Critical is set. The return contains a list of all tasks with exit codes unequal to zero and their exit codes.
Notifications for Failed Archiving Processes
At this time, MailStore Server's email notification feature only sends an email if the automatic creation of a new standard archive store fails.
This article provides some helpful hints to administrators who would like to receive additional notifications regarding events on their MailStore server.
Notifications for Audit Events
One way for monitoring is the use of the MailStore auditing feature combined with the Windows task planner.
Please keep in mind that this procedure negates the actual purpose of MailStore's auditing feature. Therefore, verify if the trigger parameters are still configured correctly after each update of the MailStore Server.
To be able to configure activation triggers in Windows, Windows Vista/7/2008/2008 R2 is needed. They are not available in Windows 2000/XP/2003.
Activating Auditing Features
- Open MailStore Client as administrator.
- Click on Administrative Tools > Compliance > Auditing.
- Activate the user activity ProfileRunArc.
Now, after archiving profiles have been executed, corresponding entries are made in the event log.
Checking the Windows Event Logs Manually
- Open the Event Viewer of your Windows system.
- Click on Event Viewer (local) > Windows Protocols > Applications.
- Search for events of source MailStore Server Auditing.
If errors occurred while executing the profile, the event level is Error, if execution was successful, the level is Information.
Creating Notifications
The Windows task scheduler can link tasks to an event. This is used to send an email at the event Archiving Failed.
- Open the Task Scheduler of your Windows system.
- Create a new folder, e.g. MailStore Auditing in the Task Scheduler Library.
- Create a task via Actions > Create Task. Please note that you will not Create a Simple Task.
- Enter a meaningful name.
- Select the option Run whether user is logged on or not.
- Under Configure for, select at least Windows Vista or Windows Server 2008. Otherwise the trigger On Event is not available.
- Click on the Triggers tab.
- Click on New.
- Under Start Task select the value On Event.
- Under Settings activate the option User Defined and click on New Event Filter.
- Under Event Level place a checkmark next to Error.
- Select Via Source and under Sources place a checkmark next to MailStore Server Auditing.
- Click on OK to save the settings.
The criteria for user-defined settings are stored as XML data. Unfortunately, the Edit Trigger dialog is unable to convert these XML data back into GUI elements. Subsequent manipulation of the trigger is only possible in XML. If this is not desired, the trigger must be deleted and recreated.
- Change to the Actions tab.
- Click on New....
E-Mail message via Powershell script
- Create a file with the extension .ps1 with the following content. Adjust the values according to your environment.
$EmailFrom = “mailstore@domain.eu”

$EmailTo = “administrator@domain.eu”

$Subject = “MailStore Error”

$Body = “Please check MailStore Server logs”

$SMTPServer = “smtp.domain.eu”

$SMTPPort = 25

$SMTPClient = New-Object Net.Mail.SmtpClient($SMTPServer, $SMTPPort)

$SMTPClient.EnableSsl = $false

$SMTPClient.Credentials = New-Object System.Net.NetworkCredential(“username”, “password”);

$SMTPClient.Send($EmailFrom, $EmailTo, $Subject, $Body)- In the Action field select Start a program.
- As Program/script enter powershell.exe. As argument enter the path to the Powershell script
- The execution of scripts has to be enabled via Set-ExecutionPolicy RemoteSigned
- If the scripts fails, you may add -noexit to the arguments, to keep the powershell window open
Network message
- is no SMTP server available the msg program can be used instead, which sends messages over the network.
- In the Action field select Start a program.
- As Program/script enter msg. As argument enter /server:ip-address username message, example: /server:192.168.2.100 administrator "One archiving job has failed or completed with errors"
- all options of msg are documented here http://technet.microsoft.com/en-us/library/cc755358.aspx
- the user administrator of machine 192.168.2.100 gets a windows with the notification
- the registry-key HKEY_LOCAL_MACHINESYSTEMCurrentControlSetControlTerminal ServerAllowRemoteRPC (REG_DWORD) has to be set to 1 on the receiving machine
Using the MS Outlook Add-in
|
Search Outlook Email more effectively |
|
Part I |
Part II |
MailStore users can access their archives using a convenient add-in for Microsoft Outlook. A list of supported Microsoft Outlook version can be found under System Requirements.
Requirements
MailStore Server should be in use and the add-in for Microsoft Outlook should be installed on the appropriate machine. In this case, a toolbar (up to 2007) or a tab (in Outook 2010) labeled "MailStore" will be visible in Microsoft Outlook.

Image: MailStore toolbar in Microsoft Outlook 2007

Image: MailStore tab in Microsoft Outlook 2010
Login to MailStore Server
If the MailStore Outlook Add-in is not pre-configured, you will be asked to log in to MailStore Server as soon as you click any button in the MailStore Outlook Add-in. Please refer to your system administrator for the server name and your access data.

Deleting Saved Access Data
If you would like to log in to a different server or use different access data, you may have to delete the existing access information saved in Microsoft Outlook. Please proceed as follows:
- Click on Settings in the MailStore Outlook Add-in
- Click on Clear Cached Credentials.
- Click on OK.
- Click on any button in the add-in to go back to the login window.
Technical Considerations
- The MailStore Outlook Add-in uses the HTTP server integrated in MailStore Server to access the archive.
- If a valid SSL certificate was selected within the MailStore Server Service Configuration, you can mark the checkboxSecure Connection in the Outlook Add-in settings to use HTTPS instead of HTTP.
- If you have changed the configuration of the HTTP/HTTPS ports within the MailStore Server Service Configuration (the default HTTP port is 8461, the default HTTPS port is 8462), you must include the port number when logging in. Simply append the port number to the server name, separated by a colon (for example:
mailstore:443)
Search by Archive Folder
Display of the Archive Folder

In the MailStore Outlook Add-in, click on Browse Archive to display the part of the archive that is visible to you.
User Archives
The folder My Archive contains all emails that were archived from your mailboxes. If you have read-access to the archives of additional users, their emails are located in the folders labeled Archive of .
Display of Emails in a Folder
To view the emails of a specific folder, simply click on the folder name. The emails are listed below the tree structure.
Quick Search
With quick search you can browse all emails located in the archives you have access to. This feature is especially suitable for simple queries; alternatively, the extended search can be used (see below).
Using Quick Search
The input field is located in the MailStore Outlook Add-in. Simply enter one or more keywords and press ENTER. The search results are displayed. Keywords which appear in the header or the subject line are highlighted.
Searching for Word Fragments
To display all emails containing a word beginning with a particular fragment, use the wildcard character (*). For example:
auto*will return auto, automatic, automobile etc.
Searching for Phrases
To search for words appearing consecutively and in a specific order, use quotation marks (""). For example:
"Microsoft Windows"
will return the text Microsoft Windows but not Microsoft Works or Windows 95.
Narrowing by Fields
A search for keywords or phrases can be limited to specific fields. For example:
subject:News                  only in Subject
from:john@mailstore.com       only in From
to:michael@mailstore.com      only in To
cc:lisa@mailstore.com         only in Cc
bcc:customers@mailstore.com   only in Bcc
Excluding Words
To narrow a search, you may want to specify words which must not be present in the emails. To exclude words from the search results, prepend the word with the minus character (-). For example:
ZDNet -download-tip
returns all emails from ZDNet which do not contain download-tip.
Combining Search Options
Any of the search options described above can be combined. For example:
ZDNET -"Daily Update"
returns all emails from ZDNet which do not contain the consecutive words Daily Update.
Advanced Search
With MailStore's integrated extended search, complex queries can be executed which may not only refer to the email content but also parameters such as the date or the email size.
Using the Advanced Search
In the MailStore Outlook Add-in, click on Advanced Search and enter the search parameters. The criteria are AND-connected, i.e. the search returns only those emails satisfying all criteria. Click on Search to start the search.

Search Criteria under "Extended Search"
Enter a keyword or phrase into the text field, and specify where MailStore is to direct the search.The following options are available:
- Subject - The subject line of the email is searched.
- Sender/Recipient - The fields "From", "To", "Cc", and "Bcc" are searched.
- Message body - The text-only or HTML sections of the email are searched (depending on availability).
- Attachments File Names - The file names of the email attachments are searched.
- Attachment Contents - The contents of the email attachments are searched. If and to what extent attachments can be searched depends on the indexing options specified (under Administrative Tools).
In the textfield Search for, all options described in section Quick Search, such as phrases and wildcards, are available here as well.
Search Criteria under "General"
Under General, the following options are available:
- Folder - The folder to be searched by MailStore can be selected here. By default, this is the main folder of the current user. By clicking the button to the right of the text field, folders can also be selected using the folder structure. As administrator, the folders of all users can be searched.
- Include subfolder - If selected, MailStore not only searches the selected folder (e.g. Inbox), but all subfolders created therein (e.g. Inbox / Projects 2008 / Profit Optimization) as well.
- From - Any keywords or email addresses entered here are searched for only within the email's sender field.
- To/Cc/Bcc - Any keywords or email addresses entered here are searched for only within the email's recipient fields.
- Date - The timeframe the search is to cover can be selected here. Either a predefined range, such as Yesterday orThis year, can be selected or, by choosing Custom, a specific period can be specified manually. In this case, the start and end dates will be included.
In the fields From and To/Cc/Bcc, all options, such as phrases and wildcards, described in section Quick Search are available.
Search Criteria under "Extended"
Under Advanced, the following options are available:
- Messages with/without attachments - By default, all messages are searched, regardless of whether or not they have any file attachments. Clear one of the check boxes to remove certain emails, such as those without attachments, from the results.
- Important: These searches can be imprecise at times because items like background pictures could be regarded as attachments.
- Size - By default, all messages are searched regardless of their size. Use the appropriate fields provided to limit the search according to the size of the emails, e.g. at least 5 MB or between 400 and 600 KB.
- Priority - Emails are searched according to the priority level of the email as assigned by the sender. When choosingLow, all emails with a priority level lower than Normal are returned, when choosing High, all emails with a priority level higher than Normal are returned. Emails not containing any information regarding priority are assumed to have a priority level of Normal.
Starting a Search
Click on Search to start the search. The results are displayed in a list.
Refining the Search Results
To narrow the results after a search has been executed, click on Advanced Search again, enter additional search criteria and click on Search.
Starting a New Search
To start a new search, click on New Query. All search criteria will be reset to their default values (i.e. no restrictions; the search covers all folders of the current user).
Saving a Search
Search criteria that are used repeatedly (such as "all receipts from the last month") can be saved and reused at any time. Click on Save As... and choose a meaningful name for the search. Click on Open to access, edit or restart the search.
Email Display
To view an email which was returned by one of the search functions described above, simply click on it. A preview of the email is displayed on the right side of the screen.
Please keep in mind that images and any formatting will not be displayed in the preview for security reasons. Emails cannot be forwarded or replied to within the preview, either.
For a comprehensive view of an archived email and the ability to use all the Microsoft Outlook features such as printing, forwarding and replying, click on Open Email in the MailStore Outlook Add-in. The email will be loaded from the archive and displayed, either immediately or after a few seconds depending on size.
Restoring Emails to the Application

To restore an archived email which is no longer in your mailbox to Outlook, please proceed as follows:
- Locate the email within the archive and open it.
- In the MailStore Outlook Add-in, click on Restore Message.
- Drag and drop the envelope icon into an Outlook email folder or a Windows Explorer file system folder.
- The email is restored immediately or after a few seconds, depending on its size.
Changing Regional Settings
By default the MailStore Outlook Add-in uses the same regional settings as Microsoft Outlook. The regional settings can also be set manually in the MailStore Outlook Add-in settings dialog.
Installing the MS Outlook Add-In
The Mailstore Outlook Client setup file that matches your eMail Archive Server version is stored on your QuikBox appliance or you can download the latest version here. Follow the Install Mailstore Outlook Client on other Computers link on your desktop and copy the corresponding setup file to the client computer.
Outlook Add-in Requirements
- Microsoft Outlook XP
- Microsoft Outlook 2003
- Microsoft Outlook 2007
- Microsoft Outlook 2010 (32-bit and 64-bit versions, Click-to-Run is not supported)
- Microsoft Outlook 2013 (32-bit and 64-bit versions)
- Microsoft Outlook 2013 as component for Office 365 (Click-to-Run)
Other Software
Installation Steps
It is a regular Windows setup program, that can by executed on the appropriate client computer by double-clicking on the setup file. Just follow on-screen instructions.
Please follow the steps below to install add-in for Microsoft Outlook for accessing your archive via Outlook.
1) Double click on the set up file and tick the checkbox. Click Next.
2) Select the destination folder where you want the Outlook Client to be installed. Click Next.
3) Click Install to start the installation process. Click next.
4) Click finish.
Using the Windows Desktop Client
The eMail Archive Client is a Windows application that can be installed on any number of user computers (depending on the license purchased). Of all the options for accessing the archive, eMail Archive Client provides the largest range of functions: Not only can users browse and view their emails but, depending on the privileges assigned to them, set up and execute archiving and exporting tasks.
Installation of the eMail Archive Client
The eMail Archive Client setup file that matches your eMail Archive Server version is stored on your QuikBox appliance or you can download the latest version here. Follow theInstall eMail Archive Client on other Computers link on your desktop and copy the corresponding setup file to the client computer.
It is a regular Windows setup program, that can by executed on the appropriate client computer by double-clicking on the setup file. Just follow on-screen instructions.
Notice: Alternatively to installing the eMail Archive Client application manually, you can also deploy it to the client computer though the Active Directories Group Policy feature. More information on that can be found in the article eMail Archive Client Deployment
Starting and Logging In
Start eMail Archive Client by using the appropriate link on the desktop. The login window appears.

Put the IP address or hostname of the eMail Archive Server machine into Server Name. Be aware, that the pre-filled entrylocalhost only works if the eMail Archive Client is run from the same machine where eMail Archive Server is installed.
Enter the username and password of a eMail Archive administrator (admin) or a normal eMail Archive user into the User Name andPassword fields and click OK. You may be asked to trust the eMail Archive Server; click OK here.
Important notice: As long as you have not changed the default administrator password (admin), you will not be able to login from any other machine with the username admin.
Searching by Folder Structure

eMail Archive stores all archived emails in a eMail Archive-specific folder structure, in which emails are displayed using the same structure as their corresponding source application. This means that folders created in the source application (e.g. Microsoft Outlook) are not changed during the archiving process and can be found easily in eMail Archive as well.
User Archives
For every user, eMail Archive creates a folder called My Archive on the highest level of the folder structure. Each folder corresponds to the user archive of the respective user and contains all his or her emails.
If the user has access to the archives of other users, their folders are listed as Archive of under the top level folder Other Archives.

Viewing the Emails in a Folder
To view the emails in a folder, simply click on the folder name. The emails will be listed below the folder structure.
Click on the text Sorted by: to change the order in which emails are displayed. Emails can be sorted according to:
- Date
- From/To (sender/recipient of the email)
- Subject
Click on the Field to the right of Sorted by ("New to Old" in the screenshot) to reverse the order in which emails are arranged. By default, the latest email is displayed first.
Refreshing the View
To refresh the list of folders, click on a folder and press F5 on your keyboard.
Click on the folder again to refresh the list of emails.
Creating, Renaming and Deleting Folders
Information about how to create, rename and delete folders is available in the chapter The eMail Archive Folder Structure.
Quick Search
With eMail Archive's integrated quick search feature, users can browse through all emails in all user archives they have access to. Quick search is especially suitable for simple queries. Alternatively, an Extended Search can be used.

Using Quick Search
Quick search is located in the upper left area of the application window. Simply enter one or more keywords into the search field and click on Search or press Enter. Search results are displayed in the column right of the folder list. If a keyword appears in the header or the subject line, it is highlighted.
Searching for Word Fragments
To view all emails containing a particular word fragment, use the wildcard character ( * ). For example:
auto*
would locate "auto", "automatic", "automobile" and others.
Searching for Phrases
To search for words appearing consecutively and in a certain order, use quotation marks ( "" ). For example:
"Microsoft Windows"
would only locate Microsoft Windows, not Microsoft Works or Windows 95.
Narrowing by Fields
A search for keywords or phrases can be limited to particular fields. For example:
subject:News                  only in Subject
from:john@eMail Archive.com       only in From
to:michael@eMail Archive.com      only in To
cc:lisa@eMail Archive.com         only in Cc
bcc:customers@eMail Archive.com   only in Bcc
Excluding Words
To narrow a search, it may be desired to specify words that must NOT be present in the emails. To exclude keywords from the search results, simply place a minus ( - ) sign in front of them. For example:
ZDNet -download-hint
would locate all emails from ZDNet, but not download-hint.
Combining Search Options
The search options described above can also be combined. For example:
ZDNET -"Daily Update"
would locate all emails from ZDNet which do not contain the consecutive words Daily Update.
Extended Search
With eMail Archive's integrated extended search, complex search processes can be carried out. Not only can the email content be searched but also parameters such as date and email size.
Using the Extended Search
In the eMail Archive application window, click on Search Email. Specify the search criteria for the emails that are to be included in the results. The criteria are AND-connected, meaning that the search results include only those emails that satisfy all criteria specified. Click on Search to start the search.

Search Criteria under "Search"
Enter a keyword or phrase into the text field, and specify where eMail Archive is to direct the search.The following options are available:
- Subject - The subject line of the email is searched.
- Sender/Recipient - The fields "From", "To", "Cc", and "Bcc" are searched.
- Message body - The text-only or HTML sections of the email are searched (depending on availability).
- Attachments File Names - The file names of the email attachments are searched.
- Attachment Contents - The contents of the email attachments are searched. If and to what extent attachments can be searched depends on the indexing options specified (under Administrative Tools).
In the textfield Search for, all options described in section Quick Search, such as phrases and wildcards, are available here as well.
Search Criteria under "General"
Under General, the following options are available:
- Folder - The folder to be searched by eMail Archive can be selected here. By default, this is the main folder of the current user. By clicking the button to the right of the text field, folders can also be selected using the folder structure. As administrator, the folders of all users can be searched.
- Include subfolder - If selected, eMail Archive not only searches the selected folder (e.g. Inbox), but all subfolders created therein (e.g. Inbox / Projects 2008 / Profit Optimization) as well.
- From - Any keywords or email addresses entered here are searched for only within the email's sender field.
- To/Cc/Bcc - Any keywords or email addresses entered here are searched for only within the email's recipient fields.
- Date - The timeframe the search is to cover can be selected here. Either a predefined range, such as Yesterday orThis year, can be selected or, by choosing Custom, a specific period can be specified manually. In this case, the start and end dates will be included.
In the fields From and To/Cc/Bcc, all options, such as phrases and wildcards, described in section Quick Search are available.
Search Criteria under "Advanced"
Under Advanced, the following options are available:
- File Group - If the archive consists of more than one file group, the search can be limited to just one of the. By default all file groups are searched.
- Messages with/without attachments - By default, all messages are searched, regardless of whether or not they have any file attachments. Clear one of the check boxes to remove certain emails, such as those without attachments, from the results.
- Important: These searches can be imprecise at times because items like background pictures could be regarded as attachments.
- Size - By default, all messages are searched regardless of their size. Use the appropriate fields provided to limit the search according to the size of the emails, e.g. at least 5 MB or between 400 and 600 KB.
- Priority - Emails are searched according to the priority level of the email as assigned by the sender. When choosingLow, all emails with a priority level lower than Normal are returned, when choosing High, all emails with a priority level higher than Normal are returned. Emails not containing any information regarding priority are assumed to have a priority level of Normal.
Starting the Search
Click on Search to start the search. Results are displayed in a list in the left section of the main window.
Refining the Search Results
Click on Search Email again to further narrow the results after a search has been executed. Specify any additional search criteria and click on Search once more.
Starting a New Search
Click on New Query to start a new search. All search criteria will be reset to their default values (i.e. an unrestricted search of the folders of the current user).
Saving Search Criteria for Reuse
Search criteria that are used repeatedly (such as "all receipts from last month") can be saved and reused at a later time: Click on Create Search Folder... and provide a meaningful name for the search.
The new search folder will be available under the Search Email folder on the left side of the application window.
To modify a search folder, right click on the corresponding folder under Search Email on the left side of the application window and select New Search Query. After modifying the search criteria, click on Create Search Folder... and save it under the same name again.
To rename or delete a search folder, right click on on the corresponding folder under Search Email on the left side of the application window and click on the appropriate entry.
Email Preview
eMail Archive offers an integrated email preview displaying emails the same way as standard email applications. To activate the preview, simply click on an email or use the arrow keys to highlight the desired email in the list.

Save as...
Click on Save as... to save the current email in any Windows folder. Emails can be saved in the following file formats:
- RFC822 EML - These files can be opened independently from eMail Archive by double-clicking and can be moved to applications such as Outlook Express by drag & drop.
- Outlook MSG - These files can be opened with or imported to all versions of Microsoft Outlook (not Outlook Express) directly.
Using the print function, the email currently displayed will be printed including header information such as Date and Subject.
Find in Email
Click on Find in Email... to search the message body of the current email.
Internet Headers...
Click on Internet Headers to view the header of the current email, including all MIME parts.
Message Source
Click on Message Source to show the full source of the current message including all MIME-parts.
Delete (only with the appropriate privilege)
Click on Delete to delete the current email from the archive. Please keep in mind that, in order to use this function, the appropriate privilege has to be in place.
Reopening Emails in an Email Application
Emails previewed in eMail Archive can be reopened in any email application to reply to or forward them. Select an email client you want to open email messages in first, by clicking on Email Client:. eMail Archive only lists email clients that are supported and that are installed on the computer from which eMail Archive Client is executed.

Depending on the selected email client, additional button may be visible:
- Open in - Open the current message to the selected email client. Please note, that emails are simply opened, not stored, in the application. To restore emails to an email application, please use eMail Archive's Export Feature.
- Restore to ... - Restore the current message to the selected email client. If further settings are required an additional button Settings.. will be shown.
Installing the Windows Desktop Client
The eMail Archive Client setup file that matches your eMail Archive Server version is stored on your QuikBox appliance or you can download the latest version here. Follow theInstall eMail Archive Client on other Computers link on your desktop and copy the corresponding setup file to the client computer.
Windows Desktop Client Requirements
Operating Systems (Windows 32-bit and 64-bit Versions)
- Microsoft Windows XP Service Pack 2 or higher
- Microsoft Windows Vista
- Microsoft Windows 7
- Microsoft Windows 8
- Microsoft Windows Server 2003 (incl. SBS, R2)
- Microsoft Windows Server 2008 (incl. Foundation, SBS and R2)
- Microsoft Windows Small Business Server 2011
- Microsoft Windows Server 2012
- Microsoft Windows Server 2012 Essentials
- Microsoft Windows Server 2012 Foundation
- Microsoft Windows Home Server Power Pack 2 or higher
Other Software
- Microsoft Internet Explorer 8 or higher
- Microsoft .NET Framework Version 3.5 SP1
Installation Steps
It is a regular Windows setup program, that can by executed on the appropriate client computer by double-clicking on the setup file. Just follow on-screen instructions.
Notice: Alternatively to installing the eMail Archive Client application manually, you can also deploy it to the client computer though the Active Directories Group Policy feature. More information on that can be found in the article eMail Archive Client Deployment
Using Web Access from your Desktop
MailStore Web Access provides access to the archive using an internet browser. This has the advantage that no additional software needs to be installed on the user machines. In addition to browsing and viewing emails, web access also offers access through the folder structure and functions for restoring emails from the archive.
MailStore Web Access Requirements
The following web browsers are officially supported by MailStore Web Access:
- Apple Safari 3 or higher
- Google Chrome
- Microsoft Internet Explorer 8 or higher
- Mozilla Firefox 3 or higher
- Opera 9 or higher
Requirements for Using MailStore Web Access
Activation and configuration of MailStore Web Access is done in the MailStore Server Service Configuration. A list of supported internet browsers can be found in the System Requirements.
In order to use the Restore to Mailbox feature, a MailStore administrator needs to configure the SMTP settings underAdministrative Tools > Miscellaneous > SMTP Settings first.
Accessing MailStore Web Access
Unless MailStore Server was configured differently, users can use the following internet addresses to access MailStore Web Access:
http://:8461
https://:8462
Please replace with the actual name of the server on which MailStore Server is installed.

To login to MailStore Web Access, fill out the User Name and Password fields and click Log on. Please note, that the username must match the MailStore username of the appropriate user.
Notice: If you are using Active Directory integration with MailStore Server, the Microsoft Internet Explorer may be able to authenticate users via Single-Sign-On (Login without username and password).
Search by Archive Folder
User Archives
The folder My Archive contains all emails that were archived from your mailboxes. If you have read-access to the archives of additional users, their emails are located in the folders labeled Archive of .
Display of Emails in a Folder
To view the emails of a specific folder, simply click on the folder name. The emails are listed below the tree structure.
Quick Search
With quick search you can browse all emails located in the archives you have access to. This feature is especially suitable for simple queries; alternatively, the extended search can be used (see below).
Using Quick Search
The input field is located in the upper part of MailStore Web Access. Simply enter one or more keywords and press ENTER. The search results are displayed. Keywords which appear in the header or the subject line are highlighted.
Searching for Word Fragments
To display all emails containing a word beginning with a particular fragment, use the wildcard character (*). For example:
auto*
will return auto, automatic, automobile etc.
Searching for Phrases
To search for words appearing consecutively and in a specific order, use quotation marks (""). For example:
"Microsoft Windows"
will return the text Microsoft Windows but not Microsoft Works or Windows 95.
Narrowing by Fields
A search for keywords or phrases can be limited to specific fields. For example:
subject:News                  only in Subject
from:john@mailstore.com       only in From
to:michael@mailstore.com      only in To
cc:lisa@mailstore.com         only in Cc
bcc:customers@mailstore.com   only in Bcc
Excluding Words
To narrow a search, you may want to specify words which must not be present in the emails. To exclude words from the search results, prepend the word with the minus character (-). For example:
ZDNet -download-tip
returns all emails from ZDNet which do not contain download-tip.
Combining Search Options
Any of the search options described above can be combined. For example:
ZDNET -"Daily Update"
returns all emails from ZDNet which do not contain the consecutive words Daily Update.
Advanced Search
With MailStore's integrated extended search, complex queries can be executed which may not only refer to the email content but also parameters such as the date or the email size.
Using the Advanced Search
In the upper part of the MailStore Web Access, click on Advanced Search and enter the search parameters. The criteria areAND-connected, i.e. the search returns only those emails satisfying all criteria. Click on Search to start the search.
Search Criteria under "Extended Search"
Enter a keyword or phrase into the text field, and specify where MailStore is to direct the search.The following options are available:
- Subject - The subject line of the email is searched.
- Sender/Recipient - The fields "From", "To", "Cc", and "Bcc" are searched.
- Message body - The text-only or HTML sections of the email are searched (depending on availability).
- Attachments File Names - The file names of the email attachments are searched.
- Attachment Contents - The contents of the email attachments are searched. If and to what extent attachments can be searched depends on the indexing options specified (under Administrative Tools).
In the textfield Search for, all options described in section Quick Search, such as phrases and wildcards, are available here as well.
Search Criteria under "General"
Under General, the following options are available:
- Folder - The folder to be searched by MailStore can be selected here. By default, this is the main folder of the current user. By clicking the button to the right of the text field, folders can also be selected using the folder structure. As administrator, the folders of all users can be searched.
- Include subfolder - If selected, MailStore not only searches the selected folder (e.g. Inbox), but all subfolders created therein (e.g. Inbox / Projects 2008 / Profit Optimization) as well.
- From - Any keywords or email addresses entered here are searched for only within the email's sender field.
- To/Cc/Bcc - Any keywords or email addresses entered here are searched for only within the email's recipient fields.
- Date - The timeframe the search is to cover can be selected here. Either a predefined range, such as Yesterday orThis year, can be selected or, by choosing Custom, a specific period can be specified manually. In this case, the start and end dates will be included.
In the fields From and To/Cc/Bcc, all options, such as phrases and wildcards, described in section Quick Search are available.
Search Criteria under "Extended"
Under Advanced, the following options are available:
- Messages with/without attachments - By default, all messages are searched, regardless of whether or not they have any file attachments. Clear one of the check boxes to remove certain emails, such as those without attachments, from the results.
- Important: These searches can be imprecise at times because items like background pictures could be regarded as attachments.
- Size - By default, all messages are searched regardless of their size. Use the appropriate fields provided to limit the search according to the size of the emails, e.g. at least 5 MB or between 400 and 600 KB.
- Priority - Emails are searched according to the priority level of the email as assigned by the sender. When choosingLow, all emails with a priority level lower than Normal are returned, when choosing High, all emails with a priority level higher than Normal are returned. Emails not containing any information regarding priority are assumed to have a priority level of Normal.
Starting a Search
Click on Search to start the search. The results are displayed in a list.
Refining the Search Results
To narrow the results after a search has been executed, click on Advanced Search again, enter additional search criteria and click on Search.
Starting a New Search
To start a new search, click on New Query. All search criteria will be reset to their default values (i.e. no restrictions; the search covers all folders of the current user).
Saving a Search
Search criteria that are used repeatedly (such as "all receipts from the last month") can be saved and reused at any time. Click on Save As... and choose a meaningful name for the search. Click on Open to access, edit or restart the search.
Email Display
To view an email which was returned by one of the search functions described above, simply click on it. A preview of the email is displayed on the right side of the screen.
Please keep in mind that images and any formatting will not be displayed in the preview for security reasons. Emails cannot be forwarded or replied to within the preview, either.
Opening Email in Email Application
In the toolbar above the email preview, two buttons are available: Open in Microsoft Outlook (MSG) and Open in Email Client (EML). These may be used for instance to answer or forward archived emails. Additionally styles and graphics of HTML emails can be displayed this way.
Restoring Email
In the toolbar above the email preview you can find the function Restore to Mailbox. By using that function, you can send the currently displayed message to an arbitrary email address in order to restore the message from the archive. Before you can use that function, preparations have to be done by a MailStore administrator. Please see MailStore Server Service Configuration for more information.
Printing the Displayed Email
In the toolbar above the email preview you can find the function Print. By using that function, you can print the displayed message including the message headers.
Internet Headers
In the toolbar above the email preview click on Internet Headers... to display the internet headers of the current message as well as all MIME parts.
Changing Regional Settings
Be default the MailStore Web Access uses the same regional settings as your web browser. The regional settings can also be set manually in the MailStore Web Access settings dialog.
Using Mobile Web Access
With MailStore Mobile Web Access you can access the MailStore archive regardless of your location using a smart phone. In addition to browsing the folder structure and viewing archived email, the mobile web access also allows you to search the archive.
MailStore Mobile Web Access
Stock web browsers on the following platforms are officially supported:
- Apple iOS 3.2 or higher
- Android 2.3 or higher
- Windows Phone 7.5 or higher
- Blackberry 7 or higher
Other 3rd party web browsers on those or other mobile platforms may also work, but are not officially supported.
Requirements for Using MailStore Mobile Web Access
Activation and configuration of MailStore Mobile Web Access are done using the MailStore Server Service Configuration. A list of supported internet browsers is available under System Requirements.
Accessing MailStore Mobile Web Access
Unless MailStore Server is configured otherwise, users can access MailStore Mobile Web Access using the following internet addresses:
http://:8461/m
https://:8462/m
Please replace with the actual name or the IP address of the computer on which MailStore Server is installed.
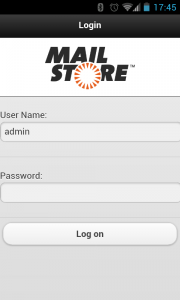
To log in to MailStore Mobile Web Access, please fill out the fields User Name and Password and click on Log on. Please keep in mind that the user name must always match the user's MailStore name.
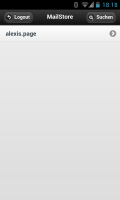
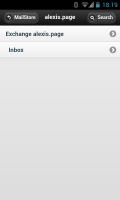
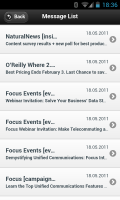
Search by Folder Structure
- After login, a list of all readable user archives appears.
- To open a user archive or a folder, simply tap on it.
- To return to the previous screen, tap on the Back button in the upper left corner.
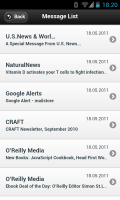
- To view the emails in a folder, tap on emails in the folder.
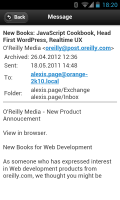
- To view an email, simply tap on it.
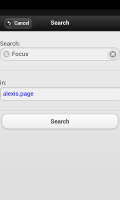
Full Text Search
- To search for a specific keyword, first go to the archive to be searched. (Subfolders are included in the search).
- Tap on Search.
- Enter the keyword and tap on Search again.
- The search results are displayed.
- To view an email, simply tap on it.
Using Integrated IMAP Server
With MailStore's integrated IMAP server you can access the MailStore archive in read-only mode with any IMAP-enabled email client. This provides a convenient way to access the email archive using not only many alternative email clients running on any operating system (e.g. MacOS or Linux) but also through mobile platforms such as Android, IPhone or Symbian. Installing MailStore Client on the user machines is not required.
With MailStore's integrated IMAP server you can access the MailStore archive in read-only mode with any IMAP-enabled email client. This provides a convenient way to access the email archive using not only many alternative email clients running on any operating system (e.g. MacOS or Linux) but also through mobile platforms such as Android, IPhone or Symbian. Installing MailStore Client on the user machines is not required.
Prerequisite for Using the MailStore-Integrated IMAP Server
Activation and configuration of the integrated IMAP server are done using the MailStore Server Service Configuration. All IMAP-enabled email clients are supported.
Accessing the Integrated IMAP Server
Unless the integrated IMAP server is configured otherwise, users can access MailStore Server using the following settings:
- Incoming Mail Server - Host name or IP address of the MailStore server
- Port - For unencrypted or TLS-encrypted connections standard IMAP port 143 is used. For SSL-encrypted connections standard IMAP port 993 is used.
- User Name - Name of the MailStore user.
- Password - Password which is required for accessing the MailStore server.
In addition to configuring the incoming mail server, email clients often require configuring the outgoing mail server as well. In this case, using the same data as for an existing email account will facilitate further processing emails from the email archive.
Configuring Mobile Devices
In addition to providing access for alternative email clients or for non-Windows operating systems, using the integrated IMAP server is especially useful for mobile devices. The following articles provide detailed information on how to configure an email account for accessing the integrated IMAP server:
Accessing the Archive with iPhone and iPod touch
In addition to the MailStore Client software and MailStore Web Access, MailStore Server also provides access to the archive using an iPhone or iPod touch (software version 2.0 or later).
There are two ways to access the MailStore archive with your iPhone or iPod touch:
- Using an Email Client - By adding an additional email account you can access your MailStore archive just like any other email account.
- Using a Web Browser - Using a web browser, navigate to MailStore Mobile Web Access to access your MailStore archive. No further configuration of your iPhone or iPod touch is needed.
Using the Email Client
Prerequisites
To allow access to the MailStore archive using the email client of the iPhone or iPod touch, the MailStore Server-integrated IMAP server must be activated and configured. This procedure is described in chapter MailStore Server Service Configuration.
Opening an Email Account
- On the start screen of your iPhone or iPod touch select Settings.
- Select Mail, contacts, calender and then Add account.
- Select Other.
- Select Add mail account.
- Fill out the fields Name, Email address, Password and Description and select Next.
- Select IMAP.
- Fill out the fields under Server for incoming emails:
- Host Name: Host name or IP address of your MailStore Server
- User Name: Your MailStore Server user name
- Password: Your MailStore Server password
- Fill out the fields under Server for outgoing emails:
- Host Name: Host name or IP address of your regular SMTP server
- User Name: Your email server user name
- Password: Your email server password
- Select Next.
- Select Save.
Using a Web Browser
Accessing MailStore Mobile Web Access is not much different from accessing other websites using the web browser of your iPhone or iPod touch.
General use and procedure are described in chapter Accessing the Archive with MailStore Mobile Web Access of the MailStore Server manual.
Accessing the Archive from Android Based Devices
In addition to the MailStore Client software and MailStore Web Access, MailStore Server also provides access to the archive using an Android based device.
There are two ways to access the MailStore archive with your Android based device:
- Using an Email Client - By adding an additional email account you can access your MailStore archive just like any other email account.
- Using a Web Browser - Using a web browser, navigate to MailStore Mobile Web Access to access your MailStore archive. No further configuration of your Android based device is needed.
Using the Email Client
Prerequisites
To allow access to the MailStore archive using the email client of the Android based device, the MailStore Server-integrated IMAP server must be activated and configured. This procedure is described in chapter MailStore Server Service Configuration.
Adding an Email Account
Due to many manufacturer modified Android versions, adding an email account differs from Android based device to another. Therefore you only find a short overview of the required parameters here.
Settings for Incoming Email
- Type: IMAP
- Username: Your MailStore user name.
- Password: Your MailStore password.
- IMAP server: IP address or DNS host name of your MailStore Server
- Port: By default, MailStore uses port 143. If you have changed this setting in the MailStore Server Service Configuration, please enter the appropriate port instead. For Security Type: SSL (Accept all certificates) the default port is 993.
- Security type: Choose between None and TLS (Accept all certificates). Depending on the configuration of the MailStore IMAP server, you can also choose SSL (Accept all certificates).
Settings for Outgoing Email
For the outgoing mail server, enter the same settings as when sending mail using your regular email account. MailStore Server does not provide its own SMTP server and cannot serve as outgoing mail server
Using a Web Browser
Accessing MailStore Mobile Web Access is not much different from accessing other websites using the web browser of your Android based device.
General use and procedure are described in chapter Accessing the Archive with MailStore Mobile Web Access of the MailStore Server manual.
Accessing the Archive from Symbian Based Devices
In addition to the MailStore Client software and MailStore Web Access, MailStore Server also provides access to the archive using a Symbian based mobile device.
There are two ways to access the MailStore archive with your Symbian device:
- Using an Email Client - By adding an additional email account you can access your MailStore archive just like any other email account.
- Using a Web Browser - Using a web browser, navigate to MailStore Mobile Web Access to access your MailStore archive. No further configuration of your Symbian device is needed.
Using the Email Client
Prerequisites
To allow access to the MailStore archive using the email client of your Symbian based device, the MailStore Server-integrated IMAP server must be activated and configured. This procedure is described in chapter MailStore Server Service Configuration.
Setup of the IMAP Account on the Device
Depending on the update status the setup procedures for email accounts differs even within the same Symbian version. Due to that only general information is provided here. For details on how to create a new email account on your device, please refer to the device's manual.
- Please enter the following settings for the incoming mail server:
- User name: Your MailStore user name
- Password: Your MailStore password
- Incoming mail server: IP address or DNS hostname of your MailStore server
- Access point in use: Select the access point which is to be used by default for accessing the archive. Please keep in mind that, depending on the rate, additional data transfer fees may apply when transferring data via mobile communications.
- Mailbox name: Enter any name such as MailStore, for example.
- Mailbox type: IMAP4
- Port: Usually, the setting Default is sufficient. By default, MailStore uses port 143. If you have changed this setting in the MailStore Service Configuration, please enter the corresponding port. For the setting Security:SSL/TLS the default is port 993.
- Security: Choose between StartTLS, SSL/TLS and Off.
- For the outgoing mail server, enter the same settings as when sending mail using your regular email account. MailStore Server does not provide its own SMTP server and cannot serve as outgoing mail server.
- Before you are able to view the archive folders in the new email account, you have to select the desired folders in the settings for retrieval under Folder subscriptions.
Access to the Archive
After the successful setup, an additional email account with the name entered as Mailbox name can be found in the application Messaging.
Once you open the new email account, you will see an empty folder called Inbox as well as the selected archive folders which generally correspond to the name of the users. Now you can navigate the folder structure and open emails as usual.
Please keep in mind that, depending on the setting, you will only see a certain amount of emails in your device. The setting can be specified under Retrieval settings | Retrieval amount in your mailbox settings.
Using a Web Browser
Accessing MailStore Mobile Web Access is not much different from accessing other websites using the web browser of your Symbian device.
General use and procedure are described in chapter Accessing the Archive with MailStore Mobile Web Access of the MailStore Server manual.