Admin Guide
- MailStore Outlook Add-in Deployment
- MailStore Server Administration API Commands
- Using Advanced Archive Stores
- MailStore Client Deployment
- MailStore Web Access Integration in Outlook Web App
- Monitoring
- Archiving IMAP and POP3 Multidrop Mailboxes
- Bulk Import of Email Files
- Quick Start Guide
- Archiving Email from Outlook, Thunderbird and others
- Batch-archiving IMAP Mailboxes
- Choosing the Right Storage Strategy
- Archiving Server Mailboxes
- Archiving Emails from External Systems (File Import)
- Archiving Outlook PST Files Directly
- Choosing the Right Archiving Strategy
- Using Network Attached Storage (NAS)
- Using a NAS
- Moving the Archive
- Generic LDAP Integration
- Deploying a Self-signed SSL Certificate
- Maintenance and Repair
- Notes on Antivirus Software
- Using Your Own SSL Certificate
- Active Directory Integration Basics
- Login with Active Directory Credentials
- Synchronizing User Accounts with Active Directory
- MailStore Client Single Sign-On
- Choose Version
- Archiving Emails from Microsoft Office 365
- Archiving Emails from Microsoft Exchange 2013
- Archiving Emails from Microsoft Exchange 2010
- Archiving Emails from Microsoft Exchange 2003
- Compliance General
- Auditing
- Implementation Guide Overview
- Archiving Emails from IceWarp Mail Server
- Archiving Emails from Kerio Connect
- Archiving Emails from MDaemon
- Archiving Emails from Google Apps for Business
- MDaemon Integration
MailStore Outlook Add-in Deployment
Using a software distribution system, MailStore Outlook Add-in can be distributed among the users' computers automatically. To be able to do so, the distribution system must be able to execute MailStore Outlook Add-in's setup program without requiring any input or confirmations.
Using Group Policies
Installation
In addition to being installed manually, MailStore Outlook Add-in can also be distributed to all user computers using Active Directory. Once the distribution process is set up successfully, MailStore Outlook Add-in will be installed automatically when the user logs on. This process runs in the background and requires no action on part of the user. Immediately after the distribution, the user can use the MailStore Outlook Add-in as usual.
Example: Setting up distribution in Windows Server 2003
- The MailStore Outlook Add-in MSI setup file is bundled with the MailStore Server installation. You can either find it via the link on your desktop Install MailStore Client on other Computers or in the Setup- subfolder of your MailStore Server program folder.
- Save the download in a directory on the server that is shared and accessible to all users of the domain.
- Open the Group Policy Management Console. If this is not available, download the installation routine under http://www.quikbox.com/?gpmc.
- Install the console.
- Open the group policy management console of the Windows server
- Right-click on the administrative folder Group Policy Objects, select New and create a new group policy object called MailStore Outlook Add-in Deployment.
- Highlight the new object and click on Edit. Expand User Configuration and Software Settings and right-click on Software installation. Select New and Package...
- Select an MSI package. Please keep in mind that the path for the file must be entered in UNC notation (e.g. ServerSetupMailStoreOutlookAddinSetup...) and that the users of the domain need to have read-access to this directory share.
- In the following dialog window, select Advanced and click OK.
- On the next screen, please select the settings as shown below:
- Click on OK to confirm all settings. The group policy should look similar to the one shown below:
- Close the group policy editor. The group policy is now configured and can be linked to the corresponding user objects. Linking is done using organizational units (OU).
- Highlight the organizational unit (OU) which contains the desired user objects, right-click on the OU (DE_Viersen in the example below) and select the option Link an existing GPO. In the dialog window Select GPO, highlight MailStore Outlook Add-in Deployment and click on OK.
- The group policy is now available and becomes active the next time users log on to the Windows client.
Updating
With group policies, the MailStore Outlook Add-in software on the user machines can be updated automatically. To edit an existing MailStore Outlook Add-in deployment group policy so that an automatic update of the clients can be performed, please proceed as follows:
- Open the existing group policy MailStore Outlook Add-in Deployment. Create a new package and select the updated MailStore Outlook Add-in MSI file. In the following dialog window, select Advanced and click on OK. Please select the settings as shown below:
- In the Updates-tab, click on Add and select the software to be updated. Choose the settings as shown below and click on OK and confirm by clicking on OK again.
- The group policy should look similar to the one in the following graphic:
MailStore Outlook Add-in will be updated the next time users log on to their Windows workstations.
To avoid complications when installing software using group policies, the following settings for the MailStore Outlook Add-in Deployment group policy should be adjusted as well:
- Activate Computer Configuration/Administrative Templates/System/ScriptsRun logon scripts synchronously
- Activate Configuration/Administrative Templates/System/LogonAlways wait for the network at computer startup and logon
Configuration
If Mailstore is used within an Active Directory infrastucture, MailStore Client or the MailStore Outlook add-in (starting with MailStore Server 5.x) can be configured using group policies.
For this purpose, group policy templates are available: For domains in Windows 2003 mode or older, there is an ADM-template, for domains in Windows 2008 mode or newer, an ADMX-template. The configuration of MailStore Client and the MailStore Outlook add-in is the same for both templates.
Installing the ADM Template
The ADM-template is used for managing group policies on machines running Windows 2003 Server or older. To install the ADM template, please open the group policy management console. (If the group policy management console is not yet installed on your system, you can download it under http://www.quikbox.com/?gpmc.)
Please proceed as follows:
- Download and save the ADM-template.
- Open the group policy management console
- Right-click on the Group Policy Objects folder
- Click on New and create a new group policy object named MailStore Client Settings
- Right-click on the new object and select Edit
- In the user configuration, right-click on Administrative Templates and select Add/remove templates...
- Click on Add and enter the path for the ADM file
- Click on Open and then close the dialog window
- The installation of the ADM template is now complete
Installing the ADMX Template
The ADMX-template is used for managing group policies on machines running Windows 2008 Server or newer. To install the template, please open the group policy management console.
Please proceed as follows:
- Download and save the ADMX-template
- In Windows Explorer, navigate to the folder %systemroot%sysvoldomainpoliciesPolicyDefinitions
- Copy the ADMX Template into this directory
- Copy the ADML Templates from the subfolders (de-DE, en-US) into the corresponding directories
- Close Windows Explorer
- Open the group policy management console
- Right-click on the Group Policy Objects folder
- Click on New and create a new group policy object called MailStore Client Settings
- Right-click on the new object and select Edit
- In the user configuration, click on Policies and Administrative Templates and select the MailStore template
- The installation of the ADMX Template is now complete
Configuring MailStore Outlook Add-In
With the new MailStore Outlook Add-in, you can configure the way the add-in contacts the MailStore Server.
- Show MailStore Toolbar in Outlook
Here you define, whether the MailStore Outlook Add-in is shown or hidden by default. Possible values are activate or deactivate.
- Choose authentication method
Here you define, which authentication method should be used for logins.
Possible values are users choice, Default Authentication or Windows Authentication. Windows Authentication is only available in Active Directory environments.
- Address of MailStore Server
Here you set up the hostname or IP-address of your MailStore Server to which the clients should connect. Should MailStore Web Access configured to listen on other than the default ports (8461/8462), you need to add the port information to the hostname or IP-Address in the format :port.
- Use SSL secured connection
If you activate this option, the communication between the MailStore Outlook Add-in and your MailStore Server is SSL encrypted. Possible values are activated or deactivated.
If you activate this option, no unencrypted communication is possible with you MailStore Server. You need to make sure, that encrypted communication to you MailStore Server is configured properly.
Uninstalling
For Each Installation Distributed Using Group Policies
Like the distribution, the uninstalling of the software packages can be done using group policies. Please proceed as follows:
- Open the group policy management console of your Windows server.
- Expand the folder Group Policy Objects.
- Right-click on the group policy object which was created for the software distribution of MailStore and select Edit.
- Expand User Configuration | Software Settings | Software Installation.
- Right-click on the packet to be uninstalled and select All Tasks -> Delete...
- In the following dialog window, select Software sofort von Benutzern und Computern deinstallieren and click OK.
- Close all open windows and exit the group policy
- The software will be uninstalled the next time the user logs on to the server.
Without using Group Policies
Please refer to this Microsoft's TechNet article to find more information about the Windows installer and msiexec's command line parameters.
MailStore Server Administration API Commands
AttachStore
Attaches an archive store that has previously been detached.
AttachStore --name [--type] [--databaseName] [--databasePath] [--contentPath]

    [--indexPath] [--serverName] [--userName] [--password] [--requestedState]
Arguments
name
The name of the archive store to be attached. This does not necessarily have to match the name that the archive store originally had before detaching.
type (optional)
databaseName (optional)
databasePath (optional)
contentPath (optional)
indexPath (optional)
serverName (optional)
userName (optional)
password (optional)
For more information about these arguments, please refer to the documentation of the CreateStore method.
requestedState (optional)
The requested state to be set. The default value when attaching stores is normal. For a list of possible values, please refer to the documentation of the CreateStore method.
ClearUserPrivilegesOnFolders
Removes all privileges that a user has on archive folders.
ClearUserPrivilegesOnFolders --userNameArguments
userName
The user name of the user whose privileges on archive folders should be removed.
CompactMasterDatabase
Compacts the master database.
CompactMasterDatabaseCompactStore
Compacts an archive store.
CompactStore --idArguments
id
The identifier of the archive store to be compacted.
CreateStore
Creates a new archive store and attaches it afterwards.
CreateStore --name [--type] [--databaseName] [--databasePath] [--contentPath]

    [--indexPath] [--serverName] [--userName] [--password] [--requestedState]
Arguments
name
A meaningful name for the archive store. Examples: "Messages 2012" or "2012-01".
type (optional)
The archive store type. Possible values:
FileSystemStandard
Standard archive store. Recommended for most environments. This is the default value.
FileSystemAdvanced
Advanced file system-based archive store. The archive store will entirely be stored in the file system (local hard disk or network share).
SQLServer
The archive store will be stored in an external Microsoft SQL Server database. E-mail messages can either be stored in the database or in the file system.
PostgreSQL
The archive store will be stored in an external PostgreSQL database. E-mail messages can either be stored in the database or in the file system.
databasePath (optional)
Only valid for types FileSystemStandard and FileSystemAdvanced. The directory in which both folder information and e-mail metadata are stored.
serverName (optional)
Only valid for types PostgreSQL and SQLServer. The server name of the database server.
userName (optional)
Only valid for types PostgreSQL and SQLServer. The user name which will be used to connect to the database server.
password (optional)
Only valid for types PostgreSQL and SQLServer. The password which will be used to connect to the database server.
databaseName (optional)
Only valid for types PostgreSQL and SQLServer. The database on the database server in which both folder information and e-mail metadata are stored.
contentPath (optional)
The directory in which e-mail headers and contents are stored. If the archive store type is PostgreSQL or SQLServer, you don't need to specify this argument - in this case, e-mail headers and contents are stored in the database.
indexPath (optional)
The directory in which the full-text index is stored.
requestedState (optional)
The requested state. The default value when creating stores is current. List of possible values:
disabled
The archive store should be disabled. This causes the archive store to be closed if it is currently open.
writeProtected
The archive store should be write-protected.
normal
The archive store should be opened normally. Write access is possible, but new e-mail messages are not archived into this store.
current
New e-mail messages should be archived into this store.
CreateUser
Adds a new user to MailStore Server.
CreateUser --userName --privileges [--fullName] [--distinguishedName]

    [--authentication] [--password]
Arguments
userName
The name of the user to be created.
privileges
A comma-separated list of global privileges that the user should be granted. Possible values are:
none
The user is granted no global privileges. If specified, this value has to be the only value in the list.
admin
The user is granted administrator privileges. If specified, this value has to be the only value in the list.
login
The user can log on to MailStore Server.
changePassword
The user can change his own MailStore Server password. This only makes sense if the authentication is set to integrated.
archive
The user can run archiving profiles.
modifyArchiveProfiles
The user can create, modify and delete archiving profiles.
export
The user can run export profiles.
modifyExportProfiles
The user can create, modify and delete export profiles.
delete
The user can delete messages. Please note that a non-admin user can only delete messages in folders where he has been granted delete access. In addition, compliance settings may be in effect, keeping administrators and users from deleting messages even when they have been granted the privilege to do so.
fullName (optional)
The full name (display name) of the user, e.g. "John Doe".
distinguishedName (optional)
The LDAP distinguished name of the user. This is typically automatically specified when synchronizing with Active Directory or other LDAP servers.
authentication (optional)
The authentication mode. Possible values are:
integrated
Specifies MailStore-integrated authentication. This is the default value.
directoryServices
Specified Directory Services authentication. If this value is specified, the password is stored, but is ignored when the user logs on to MailStore Server.
password (optional)
The password that the user can use to log on to MailStore Server. This is only meaningful when authentication is set to integrated.
DeleteEmptyFolders
Deletes archive folders which don't contain any messages.
DeleteEmptyFolders [--folder]
Arguments
folder (optional)
If specified, only this folder and its subfolders are deleted if empty.
DeleteUser
Deletes a user from MailStore Server. Neither the user's archive nor the user's archived e-mail is deleted when deleting users.
DeleteUser --userNameArguments
userName
The user name of the user to be deleted.
DetachStore
Detaches an archive store from MailStore Server.
DetachStore --idArguments
id
This identifier of the archive store to be detached.
GetActiveSessions
Retrieves a list of active logon sessions.
GetActiveSessionsGetChildFolders
Retrieves a list of child folders of a specific folder.
GetChildFolders [--folder] [--maxLevels]Arguments
folder (optional)
The folder of which the child folders are to be retrieved. If you don't specify this parameter, the method returns the child folders of the root level (user archives).
maxLevels (optional)
If maxLevels is not specified, this method returns the child folders recursively, which means that you get the whole folder hierarchy starting at the folder specified. Set maxLevels to a value equal to or greater than 1 to limit the levels returned.
GetMethodList
Retrieves a list of API methods.
GetMethodListGetServerInfo
Retrieves a list of server information.
GetServerInfoGetStoreIndexList
Retrieves a list of full-text indexes that are stored within an archive store.
GetStoreIndexList --idArguments
id
The identifier of the archive store whose full-text indexes are to be returned.
GetStoreList
Retrieves a list of archive stores currently attached to MailStore Server.
GetStoreListGetUserInfo
Retrieves a detailled user information object about a specific user.
GetUserInfo --userNameArguments
userName
The user name of the user whose information object should be returned.
GetTimeZones
Retrieves a list of all available time zones. This is useful for GetWorkerResults
GetTimeZonesGetUserList
Retrieves a list of all users in MailStore Server.
GetUserListGetWorkerResults
Retrieves a list of ended archiving jobs.
GetWorkerResults --fromIncluding --toExcluding --timZoneIdArguments
fromIncluding
The date which indicates the beginning time, e.g. "2013-01-01T00:00:00".
toExcluding
The date which indicates the ending time, e.g. "2013-02-28T23:59:59".
timeZoneId
The time zone the date should be converted to, e.g. "$Local", which represents the time zone of the operating system
MaintainFileSystemDatabases
Runs maintenance on all file system-based databases (Firebird Embedded .fdb files). Each database file will be rebuilt by this operation by creating a backup file and restoring from that backup file.
MaintainFileSystemDatabasesMoveFolder
Moves or renames an archive folder.
MoveFolder --fromFolder --toFolderArguments
fromFolder
The folder which should be moved or renamed, e.g. "johndoe/Outlook/Inbox".
toFolder
The target folder name, e.g. "johndoe/Outlook/Inbox-new".
Example 1: Rename a user archive
The following example renames the user archive "johndoe" to "john.doe".
MoveFolder --fromFolder="johndoe" --toFolder="john.doe"Example 2: Rename a folder within the user archive
The following example renames the folder "Outlook" within the user archive "johndoe" to "Microsoft Outlook".
MoveFolder --fromFolder="johndoe/Outlook" --toFolder="johndoe/Microsoft Outlook"Example 3: Move a folder within a user archive
The following example moves the folder "Project A" into the folder "Projects".
MoveFolder --fromFolder="johndoe/Outlook/Project A" --toFolder="johndoe/Outlook/Projects/Project A"RebuildStoreIndex
Rebuilds a full-text index contained within an archive store.
RebuildStoreIndex --id --folderArguments
id
The identifier of the archive store that contains the full-text index to be rebuilt.
folder
The full-text index to be rebuilt, e.g. "johndoe".
RefreshAllStoreStatistics
Refreshes the statistics of all currently open archive stores.
RefreshAllStoreStatisticsRenameStore
This method is not documented.
RenameStore --id --nameArguments
id
The identifier of the archive store to be renamed.
name
The new archive store name.
RenameUser
Renames a user. The user's archive will not be renamed by this method.
RenameUser --oldUserName --newUserNameArguments
oldUserName
The user name of the user to be renamed.
newUserName
The new user name.
RetryOpenStores
Retries opening stores that could not be opened the last time.
RetryOpenStoresSetStoreProperties
Sets the properties of a store.
SetStoreProperties --id [--type] [--databaseName] [--databasePath] [--contentPath]

    [--indexPath] [--serverName] [--userName] [--password]
Arguments
id
This argument is not documented.
type (optional)
databaseName (optional)
databasePath (optional)
contentPath (optional)
indexPath (optional)
serverName (optional)
userName (optional)
password (optional)
Please refer to the FileGroupCreate method documentation for information about these parameters.
SetStoreRequestedState
Sets the requested state of a store.
SetStoreRequestedState --id --requestedStateArguments
id
The identifier of the archive store whose requested state should be set.
requestedState
The requested state to be set. For a list of possible values, please refer to the documentation of the CreateStore method.
SetUserAuthentication
Sets the authentication mode of a user.
SetUserAuthentication --userName --authenticationArguments
userName
The user name of the user whose authentication mode should be set.
authentication
The authentication mode that should be set. For a list of possible values, please refer to the documentation of the CreateUser method.
SetUserDistinguishedName
Sets the distinguished name (DN) of a user.
SetUserDistinguishedName --userName [--distinguishedName]Arguments
userName
The user name of the user whose distinguished name should be set (or removed).
distinguishedName (optional)
The distinguished name to be set. If this argument is not specified, the distinguished name of the specified user is removed.
SetUserEmailAddresses
Sets the e-mail addresses of a user.
SetUserEmailAddresses --userName [--emailAddresses]Arguments
userName
The user name of the user whose e-mail addresses are to be set.
emailAddresses (optional)
A comma-separated list of e-mail addresses. The first e-mail address in the list must be the user's primary e-mail address.
SetUserFullName
Sets the full name (display name) of a user.
SetUserFullName --userName [--fullName]Arguments
userName
The user name of the user whose full name (display name) should be set (or removed).
fullName (optional)
The full name to be set. If this argument is not specified, the full name of the specified user is removed.
SetUserPassword
Sets the password of a user.
SetUserPassword --userName --passwordArguments
userName
The user name of the user whose MailStore Server should be set.
password
The new password.
SetUserPop3UserNames
Sets the POP3 user names of a user (used for MailStore Proxy).
SetUserPop3UserNames --userName [--pop3UserNames]Arguments
userName
The user name of the user whose POP3 user names should be set.
pop3UserNames (optional)
A comma-separated list of POP3 user names that should be set.
SetUserPrivileges
Sets the privileges of a user.
SetUserPrivileges --userName --privilegesArguments
userName
The user name of the user whose global privileges should be set.
privileges
A comma-separated list of global privileges. For a list of possible values, please refer to the documentation of the CreateUser method.
SetUserPrivilegesOnFolder
Sets a user's privileges on a specific folder.
SetUserPrivilegesOnFolder --userName --folder --privilegesArguments
userName
The user name of the user who should be granted or denied privileges.
folder
The folder on which the user should be granted or denied privileges. In the current version, this can only be a top-level folder (user archive).
privileges
A comma-separated list of privileges that the specified user should be granted on the specified folder. Possible values are:
none
The user is denied access to the specified folder. If specified, this value has to be the only value in the list.
read
The user is granted read access to the specified folder.
write
The user is granted write access to the specified folder.
delete
The user is granted delete access to the specified folder.
SyncUsersWithDirectoryServices
Synchronizes with Active Directory or another directory service according to MailStore Server's configuration.
SyncUsersWithDirectoryServices [--dryRun]Arguments
dryRun
if set (--dryRun=true) retrieves the user data from the directory service according to MailStore Server's configuration but does not sync the data.
UpgradeStore
Upgrades an archive store created in MailStore Server 5.x or earlier.
UpgradeStore --idArguments
id
The identifier of the archive store to be upgraded.
VerifyStore
Verifies the contents of an archive store.
VerifyStore --idArguments
id
The identifier of the archive store to be verified.
Using Advanced Archive Stores
MailStore distinguishes between two types of archive stores: Standard archive store and advanced archive store.
When using standard archive stores, folder information, meta data, email headers and contents, and the full text index are all stored within a directory structure in the file system, while advanced archive stores allow you to store these components in different locations, such as SQL databases, for example. The 500,000 emails per archive store limit also applies to advances archive stores.
For most environments, using standard archive stores is recommended, which is described in detail in chapter Storage Locations.
If advanced archive stores use SQL databases to store data, the appropriate database server needs to be running before the MailStore Server service is started. Manual configuration of a service dependency may be required.
Structure of an Archive Store
In MailStore, both standard an advanced archive stores always consist of the following three components:
Folder Information and Meta Data
Contains all data needed for the construction of the directory structure and the email list, which in some cases is also used in search requests.
Email Headers and Contents
Contains the actual payload of the archive.
Full Text Index
Contains all data needed for browsing emails and attachments.
While there is a direct relationship between folder information and meta data and email headers and contents, the full text index is derived from both and can be reconstructed at any time.
Because of its special data structure and for performant access, the full text index must always be stored in the file system. Using MailStore's local file system is recommended. Additional information about full text indexes is available in chapter Search Indexes.
Please notice, that the 500,000 emails per archive store limit also applies to advances archive stores.
Creating an Advanced Archive Store
To create an advanced archive store, please proceed as follows:
- Start MailStore Client and log on as MailStore administrator (admin).
- Click on Administrative Tools > Storage and then on Storage Locations.
- In the menu bar at the bottom of the window click on Create....
- The dialog Create New Archive Store opens.
Enter a name for the new advanced archive store into the Name field, e.g. 2012-05.
If you don't want MailStore to archive new emails in the new archive store, remove the checkmark from the box titled Archive new messages here.
- Select Advanced Archive Store and click on Next.
- Select the type of advanced archive store:
Directory (File System)
The entire archive store is stored in the file system (local hard drive or network share).
External Microsoft SQL Server Database
The archive store is stored in an external Microsoft SQL Server Database. Emails can be stored in the database or in the file system.
External PostgreSQL Database
The archive store is stored in an external PostgreSQL Database. E-Mails can be stored in the database or in the file system.
- Click on Next.
Depending on the type selected, different input is required. How each archive store type is configured is described in the following sections.
Advanced Archive Store Type: Directory (File System)
Using an advanced archive store of type Directory (File System) requires you to specify directories for the Folder Information and Meta Data, the Email Headers and Contents and the Full Text Index.
Based on the name entered at the beginning of the wizard and the path of the master database MailStore recommends directories for the new advanced archive store. To change a proposed path, click on the respective button next to the Directory field or enter a path manually.
The directories are created automatically. If they already exist, they must not contain any files of subfolders.
Please note that distributing the individual components of an advanced archive store among local drives or network shares significantly increases the complexity of Backup and Restore.
Advanced Archive Store Type: External Microsoft SQL Server Database
Before you can set up the database connection in MailStore, an empty database has to be created on the database server. The MailStore user who is used for the connection should be the owner of the database. Please see the documentation of the database server for details.
Folder information and meta data are always stored in the SQL database, while storing email headers and contents therein is optional.
MailStore supports all editions of Microsoft SQL Server Version 2005, 2008 and 2012. Please keep their respective size limits in mind and verify their suitability for managing the expected volume of data in your environment.
Once an empty database has been created, please proceed as follows:
- Specify the connection parameters for the Microsoft SQL Server Database Connection:
Server Name: Enter the server name or the IP address of the SQL server on which a database has been created for MailStore. If you click on the arrow to the right of the input field, MailStore will return a list of all Microsoft SQL servers located on the network.
User Name: Name of the user with access to the database.
Password: Password of the user listed under User Name.
Database: Name of the database to be used by MailStore. Click on the arrow to the right of the input field to obtain a list of all available databases on the server.
Under email headers and contents select the appropriate storage location.
Microsoft SQL Server Database is the default suggestion. When choosing Directory (File System), the input field Directory is activated. MailStore recommends a directory based on the name entered at the beginning of the wizard and the path of the master database. To choose a different directory, click on the button next to the Directory field or enter a path manually.
The specified directory is created automatically. If it already exists, it must not contain any fields of subfolders.
- A directory for the full text index is also recommended based on the name entered at the beginning and the path of the master database.
- Click on Finish.
Please note that distributing the individual components of an advanced archive store among different local drives or network shares significantly increases the complexity of Backup and Restore.
Advanced Archive Store Type: External PostgreSQL Database
Before you can set up the database connection in MailStore, an empty database has to be created on the database server. The MailStore user who is used for the connection should be the owner of the database. Please see the documentation of the database server for details.
Folder information and meta data are always stored in the SQL database, while storing email headers and contents therein is optional.
MailStore supports PostgreSQL version 8.4.8 or newer.
Once an empty database has been created, please proceed as follows:
- Specify the connection parameters for the PostgresSQL Database Connection:
Server Name: Enter the server name or the IP address of the SQL server on which a database has been created for MailStore.
User Name: Name of a user with access to the database.
Password: Password of the user specified under User Name.
Database: Name of the database to be used by MailStore. To obtain a list of all available databases on the server, click on the arrow to the right of the input field.
Under Email Headers and Contents select the appropriate storage location.
PostgresSQL Database is the default suggestion. Selecting Directory (File System) activates the input field Directory. MailStore proposes a directory based on the name entered at the beginning of the wizard and the path of the master database. To choose a different directory, click on the button next to the Directory field or enter a path manually.
The specified directory is created automatically. If it already exists, it must not contain any files or subfolders.
- MailStore also recommends a directory for the full text index based on the name entered at the beginning and the path of the master database.
- Click on Finish.
Please note that distributing the individual components of an advanced archive store among different local drives or network shares significantly increases the complexity of Backup and Restore.
MailStore Client Deployment
Using a software distribution system, MailStore Client can be distributed among the users' computers automatically. To be able to do so, the distribution system must be able to execute MailStore Client's setup program without requiring any input or confirmations.
Using Group Policies
Installation
In addition to being installed manually, MailStore Client can also be distributed to all user computers using Active Directory. Once the distribution process is set up successfully, MailStore Client will be installed automatically when the user logs on. This process runs in the background and requires no action on part of the user. Immediately after the distribution, the user can start and use MailStore Client as usual. A shortcut icon on the desktop is created automatically.
Example: Setting up distribution in Windows Server 2003
- The MailStore Client MSI setup file is bundled with the MailStore Server installation. You can either find it via the link on your desktop Install MailStore Client on other Computers or in the Setup- subfolder of your MailStore Server program folder.
- Copy the MailStore Client MSI setup file in a directory on the server that is released and accessible to all users of the domain.
- Open the Group Policy Management Console. If this is not available, download the installation routine under http://www.quikbox.com/?gpmc.
- Install the console.
- Open the group policy management console of the Windows server
- Right-click on the administrative folder Group Policy Objects, select New and create a new group policy object calledMailStore Deployment.
-
- Highlight the new object and click on Edit. Expand User Configuration and Software Settings and right-click onSoftware installation. Select New and Package...
-
- Select an MSI package. Please keep in mind that the path for the file must be entered in UNC notation (e.g. ServerSetupMailStoreClientsetup...) and that the users of the domain have to have read-access to this directory share.
- In the following dialog window, select Advanced and click OK.
-
- On the next screen, please select the settings as shown below:
-
- Click on OK to confirm all settings. The group policy should look similar to the one shown below:
-
- Close the group policy editor. The group policy is now configured and can be linked to the corresponding user objects. Linking is done using organizational units (OU).
- Highlight the organizational unit (OU) which contains the desired user objects, right-click on the OU (DE_Viersen in the example below) and select the option Link an Existing GPO. In the dialog window Select GPO, highlight MailStore Deployment and click on OK.
-
- The group policy is now available and becomes active the next time users log on to the Windows client.


Updating
With group policies, the MailStore Client software on the user machines can be updated automatically. This becomes necessary if MailStore Server is updated because the server can only be accessed by clients with the same software version. To edit an existing MailStore deployment group policy so that an automatic update of the clients can be performed, please proceed as follows:
- Open the existing group policy MailStore Deployment. Create a new package and select the updated MailStore Client MSI file. In the following dialog window, select Advanced and click on OK. Please select the settings as shown below:
-
- In the Updates tab, click on Add and select the software to be updated. Choose the settings as shown below and click on OK and confirm by clicking on OK again.
-
- The group policy should look similar to the one in the following graphic:
-


MailStore Client will be updated the next time users log on to their Windows workstations.
To avoid complications when installing software using group policies, the following settings for the MailStore Deployment group policy should be adjusted as well:
- Activate Computer Configuration/Administrative Templates/System/ScriptsRun logon scripts synchronously
- Activate Configuration/Administrative Templates/System/LogonAlways wait for the network at computer startup and logon
Configuration
If Mailstore is used within an Active Directory infrastucture, MailStore Client or the MailStore Outlook add-in (starting with MailStore Server 5.x) can be configured using group policies.
For this purpose, group policy templates are available: For domains in Windows 2003 mode or older, there is an ADM-template, for domains in Windows 2008 mode or newer, an ADMX-template. The configuration of MailStore Client and the MailStore Outlook add-in is the same for both templates.
Installing the ADM Template
The ADM-template is used for managing group policies on machines running Windows 2003 Server or older. To install the ADM template, please open the group policy management console. (If the group policy management console is not yet installed on your system, you can download it under http://www.quikbox.com/?gpmc.)
Please proceed as follows:
- Download and save the ADM-template.
- Open the group policy management console
- Right-click on the Group Policy Objects folder
- Click on New and create a new group policy object named MailStore Client Settings
- Right-click on the new object and select Edit
- In the user configuration, right-click on Administrative Templates and select Add/remove templates...
- Click on Add and enter the path for the ADM file
- Click on Open and then close the dialog window
- The installation of the ADM template is now complete
Installing the ADMX Template
The ADMX-template is used for managing group policies on machines running Windows 2008 Server or newer. To install the template, please open the group policy management console.
Please proceed as follows:
- Download and save the ADMX-template
- In Windows Explorer, navigate to the folder %systemroot%sysvoldomainpoliciesPolicyDefinitions
- Copy the ADMX Template into this directory
- Copy the ADML Templates from the subfolders (de-DE, en-US) into the corresponding directories
- Close Windows Explorer
- Open the group policy management console
- Right-click on the Group Policy Objects folder
- Click on New and create a new group policy object called MailStore Client Settings
- Right-click on the new object and select Edit

- In the user configuration, click on Policies and Administrative Templates and select the MailStore template

- The installation of the ADMX Template is now complete
Configuring MailStore Client
It is possible to set up the hostname or IP-Address of your MailStore Server and whether the MailStore Client should automatically login to your MailStore Server.

- Use Autologon to MailStore Server
- Enables or disables the AutoLogon function
- Server Name:
- In case AutoLogon is enabled, you should also tell the MailStore Client to which server it should connect. The format can either be the hostname or an IP-Address. If MailStore Server is listening on other that the default ports, it is required to add the port information to the hostname or IP-Address in the format :port.
Uninstalling
Group Policy distributed installations
Just like the distribution, the uninstalling of the software packages can be done using group policies. Please proceed as follows:
- Open the group policy management console of your Windows server.
- Expand the folder Group Policy Objects.
- Right-click on the group policy object which was created for the software distribution of MailStore and select Edit.
- Expand User Configuration | Software Settings | Software Installation
- Right-click on the packet to be uninstalled and select All Tasks -> Delete...

- In the following dialog window, select Software sofort von Benutzern und Computern deinstallieren and click OK.

- Close all open windows and exit the group policy editor.
- The software will be uninstalled the next time the user logs on to the server.
Manually or not via GPO distributed installations
For un-installing a MailStore Client application that was not deployed via Group policy, please follow the steps below:
- First determine the setup path and parameters. Therefore open the Registry Editor on one of the client PCs and search / open the following key:
"HKEY_LOCAL_MACHINESOFTWAREMicrosoftWindowsCurrentVersionUninstallMailStore Client_is1".

- Copy the key value "QuitUninstallString" (e.g. "C:Program FilesdeepinventMailStore Clientunins000.exe" /SILENT) to a new editor window and save the file as mailstore_uninst.bat.
- Paste the mailstore_uninst.bat file to the NETLOGON Share of your server
- Open the Group Policy Management console
- Create a new GPO and name it "MailStore Client Uninstall", then link it either to the domain or to the OUs that contain the user objects that have the MailStore Client installed.
- Right click the new GPO and choose "edit.."
- Expand the tree Computerconfiguration | Windows Settings | Scripts
- Right click "Startup" and choose Properties
- Click "Add..." and then "Browse..."
- Pick up the mailstore_uninst.bat from the NETLOGON-Share and choose "open"
- Save all settings and close the GPO Editor Windows
- Finally open a command prompt and enter "gpupdate /force" to update the group policy setting
During the next startup of a client machine the GPO will take affect and the MailStore Client will be un-installed unattended.
Now you can create a new GPO for deploying the new MailStore Client MSI. For further information please take a look at MailStore Client Deployment - Installation.
Without using Group Policies
Please refer to this Microsoft's TechNet article to find more information about the Windows installer and msiexec's command line parameters.
MailStore Web Access Integration in Outlook Web App
To offer users of Outlook Web App (formerly known as Outlook Web Access) the best possible integration of MailStore Web Access, you have the possibility to add a MailStore Web Access button side-by-side to the Email, Calendar, Contacts, etc. buttons. If a user clicks on the MailStore Web Access button, it opens inside a new browser window.
The following instructions refer to Exchange Server 2007 and 2010 only.
To add the MailStore Web Access button to your Outlook Web App, follow these steps:
- First download Owa-uiextensions.zip from the MailStore web site.
- Decompress its contents to the Outlook Web App customization folder. Depending on your Exchange Server installation, this might be one of the following folders:Important
If you already have customized anything in OWA, make sure that you don't overwrite the UIExtensions.xml file. Merge both files instead.
Exchange 2007
C:Program FilesMicrosoftExchange ServerClientAccessOwaformsCustomization
Exchange 2010
C:Program FilesMicrosoftExchange ServerV14ClientAccessOwaformsCustomization
- Open the file UIExtensions.xml with your favourite text editor (e.g. notepad.exe)
- Replace the MailStore Web Access URL with the correct URL of your MailStore Server (e.g. http://quikbox.com/mailstoreserver/)
Hint: If you are using Windows authentication, add the /n/ to the URL (e.g. http://quikbox.com/mailstoreserver/n/) to bypass the login screen. - Save the changes and close the editor.
- Execute the following command to restart the Internet Information Server (IIS):
iisreset /noforce- Now you should see a MailStore Icon in the Outlook Web App navigation bar.
Monitoring
MailStore only provides limited notification or monitoring features, but the status of the archiving processes can be monitored using external components.
Using External Monitoring Software
MailStore Nagios/Icinga-Plugin
The scripting package includes the check_mailstore.py plugin. The plugin checks the number of jobs or the number of archived emails in a given period of time. At least MailStore Server 8 is required.
Installation
The directory mailstoreapi from the package should be copied below the site-packages directory of your Python installation. The location of the site-packages directory can be found with the following command
python -c "from distutils.sysconfig import get_python_lib; print(get_python_lib())"Depending on your distribution, you might have to install the python-argparse package.
The plugin connects to the MailStore Server Administration API. Therefore it must be enabled in the MailStore Server Service Configuration.
Usage
A check that monitors the successful execution of profiles could be defined in Nagios/Icinga as follows:
define command {

       command_name check_mailstore

       command_line /usr/local/lib/nagios/plugins/check_mailstore.py --host $ARG1$ --password $ARG2$ -s since:$ARG3$ --status $ARG4$ -c $ARG5$ -w $ARG6$ --search $ARG7$

       }
The appropriate service definition might look like this:
define service {

       host_name                       mailstoreserver

       service_description             MailStore Succeeded Jobs

       check_command                   check_mailstore!mailstoreserver!sUp3rs3CcR6ET3!1H!succeeded!8!10!jobs

       use                             generic-service

       }
This test checks whether there were more then 10 tasks executed successfully (--status succeeded) during the last hour (-s since:1H).
Parameters
The plugin supports the following parameters.
--help|--hDisplays the help page.
--host HOSTHostname or IP address of the MailStore Server. The default is localhost.
--port PORTTCP port on which the MailStore Administration API accepts connections. Default is 8463.
--username USERNAMEUsername to log on to MailStore Server. This must be a MailStore administrator. By default, admin is used.
--password PASSWORDThe user's password.
--start STARTTIME|-s STARTTIMESpecifies the start time of the check period. The start time has to be given in the format YYYY-mm-ddTHH:MM:SS (eg 2013-01-01T00:00:00). The -end parameter has to be given. As alternative a time period can be given with the format since:XY, where X is a number and Y is one of the following letters: Y (year), m (month), d (day), H (hour), M (minute) S (second). Example -s since: 90M (last 90 minutes).
--end ENDTIME|-e ENDTIMESpecifies the end time of the period. The format is YYYY-mm-ddTHH:MM:SS (eg 2013-02-28T23:59:59). When using since in --start, this parameter is not required.
--timezone TIMEZONEMailStore Server stores dates in UTC time. The output of the plugin can be adjusted with this parameter. By default, $local is used. This corresponds to the time zone setting of the operating system of MailStore Server. Using the API command GetTimeZones the possible values can be shown. In most cases, this parameter is not required.
--machinename MACHINENAME|-m MACHINENAMEFilters the results by MACHINENAME. This is useful when the results of local jobs of different computers are monitored.
--profile PROFILE|-p PROFILEFilters the results by archiving profile. The ID or the name of an archiving profile can be given.
--status STATUSFilters the results by STATUS. Possible values are succeeded, failed, cancelled, disconnected, threadAbort and completedWithErrors. The status can be negated by prepending a #. Default is succeeded.
--search [jobs|emails]Specifies whether to check on the number of returned jobs or the number of mails archived. Default is jobs.
--warning WARNING|-w WARNINGThe warning threshold.
--critical CRITICAL|-c CRITICALThe critical threshold.
--compare COMPARESpecifies how the values of WARNING and CRITICAL will be compared with the amount of results. Possible values are lt, le, eq, ge, gt (lesser than, lesser than or equal, equal, greater than or equal, greater than). Default is le (lesser than or equal).
--DEBUGIf given, the matching results will be printed to standard output. This is only useful for debugging purpose.
Other examples
check_mailstore.py --host 192.168.0.1 --password sUp3rs3CcR6ET3 -s "since:1d" -c 5 -w 2 --search jobs --status="#succeeded" --compare gt
Status is critical if more than (--compare gt) 5 (-c 5) jobs (--search jobs) have NOT ended succesfully (--status "#succeeded") within the last day (-s "since:1d"). A warning is issued when more than 2 unsuccessful jobs have been found.
check_mailstore.py --host 192.168.0.1 --password sUp3rs3CcR6ET3 -s "since:1d" -c 5 -w 20 --search emails --profile "MailStore Proxy"
Status is critical if less than 5 (-c 5) emails (--search emails) were archived within a day by the the profile "MailStore proxy" (--profile "MailStore proxy"). A warning is issued when less than 20 emails were archived.
Monitoring of licenced users
The check_mailstorelicence-script from the scripting-pakage, can be used to monitor the existing users in MailStore with Nagios/Icinga. No external arguments can be used, all configuration has to be done inside the file. If you synchronize your users from an external source, and more users than free licences should be created in one step, this monitoring will not holler, because it checks the existing users only and not the users that shall be created.
Command-Definition:
define command {

       command_name check_mailstorelicence

       command_line /usr/local/lib/nagios/plugins/check_mailstorelicence.py

       }
Nagios/Icinga with NSClient++
If you are already using monitoring software, such as Nagios/Icinga, Zabbix or HP OpenView, in your network, we recommend monitoring the results of the Windows task scheduler.
This example requires that in section [NRPE] of the file NSC.ini the parameter allow_arguments=1 is set. An alternative, and safer in public environments, is to define an alias under section [External Alias]].
Under Nagios/Icinga the corresponding service check looks like this:
define service {

        use                             generic-service

        host_name                       mailstore.mydomain.tld

        service_description             Scheduled Tasks

        check_command                   check_nrpe!CheckTaskSched!filter="exit_code ne 0" "syntax=%title%: %exit_code%" "crit=>0"

}
The service check puts out a list of all scheduled tasks in the Windows task scheduler whose exit code is unequal to zero. If there is more than one event, the check status Critical is set. The return contains a list of all tasks with exit codes unequal to zero and their exit codes.
Notifications for Failed Archiving Processes
At this time, MailStore Server's email notification feature only sends an email if the automatic creation of a new standard archive store fails.
This article provides some helpful hints to administrators who would like to receive additional notifications regarding events on their MailStore server.
Notifications for Audit Events
One way for monitoring is the use of the MailStore auditing feature combined with the Windows task planner.
Please keep in mind that this procedure negates the actual purpose of MailStore's auditing feature. Therefore, verify if the trigger parameters are still configured correctly after each update of the MailStore Server.
To be able to configure activation triggers in Windows, Windows Vista/7/2008/2008 R2 is needed. They are not available in Windows 2000/XP/2003.
Activating Auditing Features
- Open MailStore Client as administrator.
- Click on Administrative Tools > Compliance > Auditing.
- Activate the user activity ProfileRunArc.
Now, after archiving profiles have been executed, corresponding entries are made in the event log.
Checking the Windows Event Logs Manually
- Open the Event Viewer of your Windows system.
- Click on Event Viewer (local) > Windows Protocols > Applications.
- Search for events of source MailStore Server Auditing.
If errors occurred while executing the profile, the event level is Error, if execution was successful, the level is Information.
Creating Notifications
The Windows task scheduler can link tasks to an event. This is used to send an email at the event Archiving Failed.
- Open the Task Scheduler of your Windows system.
- Create a new folder, e.g. MailStore Auditing in the Task Scheduler Library.
- Create a task via Actions > Create Task. Please note that you will not Create a Simple Task.
- Enter a meaningful name.
- Select the option Run whether user is logged on or not.
- Under Configure for, select at least Windows Vista or Windows Server 2008. Otherwise the trigger On Event is not available.
- Click on the Triggers tab.
- Click on New.
- Under Start Task select the value On Event.
- Under Settings activate the option User Defined and click on New Event Filter.
- Under Event Level place a checkmark next to Error.
- Select Via Source and under Sources place a checkmark next to MailStore Server Auditing.
- Click on OK to save the settings.
The criteria for user-defined settings are stored as XML data. Unfortunately, the Edit Trigger dialog is unable to convert these XML data back into GUI elements. Subsequent manipulation of the trigger is only possible in XML. If this is not desired, the trigger must be deleted and recreated.
- Change to the Actions tab.
- Click on New....
E-Mail message via Powershell script
- Create a file with the extension .ps1 with the following content. Adjust the values according to your environment.
$EmailFrom = “mailstore@domain.eu”

$EmailTo = “administrator@domain.eu”

$Subject = “MailStore Error”

$Body = “Please check MailStore Server logs”

$SMTPServer = “smtp.domain.eu”

$SMTPPort = 25

$SMTPClient = New-Object Net.Mail.SmtpClient($SMTPServer, $SMTPPort)

$SMTPClient.EnableSsl = $false

$SMTPClient.Credentials = New-Object System.Net.NetworkCredential(“username”, “password”);

$SMTPClient.Send($EmailFrom, $EmailTo, $Subject, $Body)- In the Action field select Start a program.
- As Program/script enter powershell.exe. As argument enter the path to the Powershell script
- The execution of scripts has to be enabled via Set-ExecutionPolicy RemoteSigned
- If the scripts fails, you may add -noexit to the arguments, to keep the powershell window open
Network message
- is no SMTP server available the msg program can be used instead, which sends messages over the network.
- In the Action field select Start a program.
- As Program/script enter msg. As argument enter /server:ip-address username message, example: /server:192.168.2.100 administrator "One archiving job has failed or completed with errors"
- all options of msg are documented here http://technet.microsoft.com/en-us/library/cc755358.aspx
- the user administrator of machine 192.168.2.100 gets a windows with the notification
- the registry-key HKEY_LOCAL_MACHINESYSTEMCurrentControlSetControlTerminal ServerAllowRemoteRPC (REG_DWORD) has to be set to 1 on the receiving machine
Archiving IMAP and POP3 Multidrop Mailboxes
In this chapter, learn how to archive multidrop mailboxes. Multidrop mailboxes, also called catchall mailboxes, contain emails for more than one person. Generally, all emails for a certain domain are collected therein to be retrieved by an internal email server; the server then distributes the emails among the appropriate user mailboxes. Multidrop mailboxes are also used when sending a copy of all emails to a single mailbox on the email server; MailStore extracts the sender and recipient information from the email headers to assign them to the appropriate users. By using this type of mailboxes it is possible to archive all incoming and outgoing emails.
This article describes the general procedure independent from the e-mail server used. Please find e-mail server specific information in our Implementation Guide.
Setting up the Archiving Process
Setting up archiving processes for multidrop mailboxes is done using archiving profiles. General information about archiving profiles is available in chapter Working with Archiving Profiles.
Please proceed as follows:
- Log on as MailStore administrator using MailStore Client.
- In MailStore, click on Archive Email.
- To create a new archiving profile, select Other Server via IMAP/POP3 from the Email Server list in the Create Profile area of the application window.
- A wizard opens guiding you through the setup process.
- Select Multidrop Mailbox and click OK.
- Fill out the fields Access via, Host, Username and Password. Click on Test to verify the data entered.
For the TLS and SSL protocols only: You have the option to ignore SSL warnings. Generally, these warnings appear if an unofficial certificate is used on the server.
- Adjust any further settings such as how to handle emails with unknown addresses or asking MailStore to delete emails after they have been archived. The latter option is especially sensible when dealing with mailboxes that are exclusively used for archiving.
- Click on Next.
- The timeout value only has to be adjusted on a case-by-case basis (e.g. with very slow servers).
- Click on Next.
- At the last step, select a name for the new archiving profile. After clicking on Finish, the archiving profile will be listed under Saved Profiles and can be run immediately, if desired.
Starting the Archiving Process
Starting the Archiving Process Manually
On the start page of MailStore Client, click on Archive Email and from the list under Saved Profiles, select the appropriate archiving profile. Click on Run. After the archiving process has been executed, a protocol appears. It contains information about the volume of emails that have been archived as well as any errors that may have occurred.
This process can be repeated by the user any number of times. MailStore only archives those emails that are not yet stored in the corresponding user archive. In addition, MailStore detects if emails within the source application (e.g. Microsoft Outlook) were moved to a different folder and repeats such moves in MailStore accordingly.
Automating the Archiving Process
In addition to being executed manually, archiving tasks can also be executed automatically according to a schedule. Simply right-click on an existing profile and select Schedule.... Additional information about this topic is available in chapter Automating the Archiving Process.
As long as no deletion rules were specified upon creating the archiving profile, MailStore Server will never delete or otherwise modify emails in the source application (e.g. Microsoft Outlook).
Bulk Import of Email Files
When archiving email files, MailStore only allows archiving of individual email files (PST, MBOX) or directories which contain email files of one user (EML, MSG).
The following describes how to archive all PST-, MBOX-, EML- or MSG-files of all users in a few steps, using a bulk import script written in Python.
The bulk import script expects the email files in folders that are named after the corresponding MailStore users. Such a folder structure can easily be created by another script included in the scripting package.
If you want to archive PST- or MBOX-files of one user only, you can use the bulkImportPST.bat- and bulkImportMBOX.bat-scripts from the scripting package; the installation of Python is not required in that case.
Preparing Python
The provided scripts are written in Python. Python 3.2 or 3.3 is required as well as the scripting package. Python can be downloaded from the Python website www.python.org. The mailstoreapi directory from the scripting package must be moved into the site-packages directory of your Python installation; in Python 3.3 for Windows its default location is C:Python33Libsite-packages. The scripts themselves can be stored in any other location such as "My Documents".
Preparing the Folder Structure
The scripting package contains the createUserFolders.py script which prepares the folders by fetching a list of existing MailStore Server users and creating folders with the same names in the filesystem. The actual bulk archiving script uses these folder names to assign the enclosed files to the corresponding users in MailStore.
The MailStore Server Administration API must be enabled in the MailStore Server Service Configuration.
After installing Python, the script can be modified by right-clicking on it, then selecting IDLE, the supplied Python editor. Adapt the values of USER, PASSWORD, HOST and PORT to your installation.
The rootpath variable contains the path where the folders will be created.
Press F5 to run the script. A security question follows.
Preparing the Archiving Profile
Before executing the bulk import script, a new archiving profile that corresponds to the email files (PST, MBOX, EML/MSG) to be archived must be created manually in MailStore Server.
The settings in this archiving profile apply to all read files. For instance, if your exclude or include folders or define filters, they will be applied to all files you archive from.
The path you specify in the profile to the PST or MBOX file, or the folder containing EML/MSG files, is irrelevant, as it gets overwritten by the bulk import script. Additionally, sub folders are recognized when archiving EML/MSG files, whereas MailStore headers are always ignored.
If you want to archive PST files, Microsoft Outlook must be installed on the machine where the archiving profile is run.
Depending on the file type to be archived, the created profiles must be named templateBulkImportEMLMSG, templateBulkImportPST or templateBulkImportMBOX.
Filling the Folders
For each user, put the email files to be archived into the corresponding folders under the rootpath. A simultaneous import of different file types is not supported. If you want to archive PST and MBOX files, a separate run is necessary for each.
Archiving
Archiving is done by the bulkImport.py script. Before running it must be adapted to your MailStore Server installation by using IDLE. Since this script uses the MailStore Client to connect to the server, rather than connecting to the MailStore Server Administration API you have to use slightly other values.
To retrieve the correct parameter values for your installation, open the properties of an existing scheduled task of a MailStore archiving profile and copy the Run command line into a text editor of your choice.
Alternatively you may pretend creating a new archiving profile for an existing archiving profile, by clicking on Schedule and then Copy CMD. Now open a text editor and paste the command line to see all parameter values. It is now safe to cancel the creation of the new scheduled task.
For the MAILSTORECMD variable, MailStoreCmdSilent.exe can be used instead of MailStoreCmd.exe. This prevents MailStore Server from displaying empty command line windows while archiving.
The bulk import script requires the encrypted version of the password. This corresponds to the value of the --pc= parameter.
Similar to the createUserFolders.py script, rootpath points to the folder that contains the actual user folders. The filetype variable can have one of the following values according to the file type to archive: pst, mbox or emlmsg.
In IDLE, press the F5 key to run the script.
Logging
While the archiving process runs, its progress can be monitored in the status window. The message exitcode: 0 means that the file or folder has been archived successfully. A different output would show the error. The task logs of the procedures are stored in the rootpath folder and are named as follows:
Date-Time-User-File.log (PST,MBOX)or
Date-Time-User.log (EML/MSG)The table Recent Results in MailStore Client gives you an overview of all run archiving profiles. Failed runs can by easily identified by their start time as the file names of the log files begin with the same value.
Quick Start Guide
Logging on as Administrator
- Start the MailStore Client application.
- The access credentials required for a newly-installed MailStore
- Server show up automatically in the login window.
- Click OK to log on.
- When you log on for the first time, you need to confirm that MailStore Server is a trusted source. Again, click OK here.
Install Test License
You are required to enter a product key after you have logged on for the first time. You now have the
choice of installing either the test license you were emailed after downloading the free trial version or
a license you have purchased. MailStore then restarts, and again you need to log on as admin.
Change Password
For security reasons, make sure to change the admin user's password after launching MailStore for
the first time. To do this, proceed as follows:
- Click Administrative Tools > Users and Privileges > Users.
- Double-click admin for user.
- Click Password....
- Enter your new password and click OK.
- Exit the User Properties by clicking OK.
Note: If you leave the password set to admin, you will not be able to log on remotely to MailStore as
an admin user. This setting is for security reasons.
Create Users
It may be more economical to synchronize users with a directory service rather than creating them
manually, depending on your system environment. In addition to Active Directory and generic LDAP
support, MailStore Server also enables you to synchronize users from a mail server. If your initial
archiving needs only encompass a single mailbox or email files (such as a PST file), manual user
creation is entirely adequate.
Option 1: Synchronize Users
To set up synchronization with a directory service in MailStore Server, proceed as follows:
- Click Administrative Tools > Users and Privileges > Directory Services.
- Change the Directory Services Type to the directory service that matches your environment. * Next, enter the required settings for the selected Directory Services Type. In-depth descriptions of these settings are provided in the MailStore Server help section.
- Optional: Click Default Privileges... to view and specify privileges for new users provided from a directory service.
- To test your entries, click Test Settings and check the results.
- To synchronize, and thereby create the users, click Synchronize Now.
Option 2: Create Users Manually
To create users manually, proceed as follows:
- Click Administrative
- Tools > Users and Privileges > Users.
- Click Create New....
- Enter a user name for the new user and confirm with OK.
- In the next window, enter the full user name and click the Password... button to specify a MailStore password for the new user.
- Click OK to apply the settings and exit the User Properties.
Note: Manually-created users are permitted to archive email by default.
Archiving Management based on Profiles
Overall Concept
In MailStore Server, email archiving is controlled using archiving profiles. An archiving profile
contains the following data:
- What is archived (for example, a specific mail server)
- How much is archived (for example, specified mailboxes or a specific folder within a mailbox)
- Additional settings such as deletion rules (these settings are disabled by default, enabling
- you to safely test MailStore in live operating environments)
Note: Archiving profiles can either be run manually or according to a schedule, and they can be
modified or deleted at any time. This has no effect on previously-archived emails.
Note: In MailStore Server, archived emails are always associated with specific users and stored in the
corresponding user archives.
Archiving Your First Email
MailStore users who are assigned the required privileges by the MailStore Administrator are able to archive individual mailboxes, local email client profiles, and email files. Administrators are additionally able to centrally archive email for several or all users. Archiving profiles such as Multiple Mailboxes can be used for this purpose. To get to know MailStore, we recommend first archiving a single mailbox or a local email client profile. To do this, proceed as follows:
- Click Archive Email.
- In the Create Profile area, select the source for archiving your email.
- You can then specify the properties of the archiving profile using the Setup Wizard provided.
- The last page in the Setup Wizard dialog box provides a Finish button, which you need to click in order to run the archiving profile.
- After archiving is complete, you can immediately access the archived emails using the folder structure provided on the left of the window. The archiving profile you have just created is now displayed in the Saved Profiles list. From here, you can run it whenever it is required.
Note: If you are logged on as the MailStore Administrator while setting up the archiving profile, you can also specify the user archive in which the emails are stored. If you are logged on as a regular user, this is always your own user archive.
User Access to the Archive
Users can access their individual user archives in a variety of ways. Click the Install MailStore Client
on other Computers link on the desktop to access the installers for MailStore Client and the MailStore
Outlook add-in.
Via MailStore Client
With MailStore Client, users can access MailStore Server from any computer in the network. With this
option, users can search and view emails that have been archived specifically for them. Additionally,
users with the corresponding privileges can use MailStore Client to archive emails themselves.
Via the MailStore Outlook Add-In
The MailStore Outlook add-in provides an additional toolbar in Microsoft Outlook that permits easy
access to the archive.
Via Other Email Clients
MailStore Server includes an integrated IMAP server for users who need to access the archive
independently of the operating system. This way, the archive can be accessed from Mac OS and
Linux workstations as well as from most mobile devices. In this case, the archive is accessed like a
regular mailbox (read-only).
Via an Internet Browser (MailStore Web Access)
MailStore Web Access provides users with access to the archive via any Internet browser. No
additional software needs to be installed on the user computers. Simply enter http:/ /
servername:8461 in your browser (for an encrypted connection, enter https:/ / servername:8462).
Make sure to replace servername with the actual name of the computer where MailStore Server is
installed.
Via Smartphone (iPhone, Android, Windows Phone, etc.)
MailStore Mobile Web Access lets users access the archive from any location via their smartphone.
Mobile Web Access also provides a search function, as well as allowing users to access the folder
structure and view the archived emails
Archiving Email from Outlook, Thunderbird and others
As opposed to all other archiving features, it is imperative that the MailStore Client software is installed on the user computer when archiving emails from Outlook, Thunderbird and other email applications.
Once the archiving task is set up, it can be started manually by the user or executed automatically according to a schedule any number of times. During this process, the emails are transferred by the MailStore Client of the user to the central MailStore Server for archiving.
If the user emails are accessible (e.g. on a network drive) to the MailStore administrator in form of individual PST files, they can be archived directly by the administrator. As opposed to archiving from Outlook, this can be done completely independently from the user and the user computer. Additional information about this topic is available in the chapter Archiving Outlook PST Files Directly.
Supported Email Applications
MailStore supports archiving emails from various email applications, including:
- Microsoft Outlook XP, 2003, 2007, 2010, 2013
- Microsoft Outlook Express 6.0
- Microsoft Windows Mail (integrated in Windows Vista)
- Microsoft Windows Live Mail
- Mozilla Thunderbird
- Mozilla SeaMonkey
Even email applications not listed here can often be archived using the file system (EML) and MBOX import. Additional information is available in the chapter Archiving Emails from External Systems (File Import).
MailStore does not support archiving of Microsoft Outlook profiles that use third-party components to access mailboxes on an email server. Please archive those mailboxes directly.
Procedure
Setting up archiving processes for Outlook, Thunderbird and other email applications is done using archiving profiles. General information about archiving profiles is available in the chapter Working with Archiving Profiles.
- Create a MailStore user account (if one does not already exist) for each user whose emails are to be archived and grant them the privileges to archive emails and to create, edit and delete archiving profiles. Additional information is available in the chapter User Management.
- Install the MailStore Client software on the corresponding user computers.
- Ask each user to log on to MailStore Server using their MailStore Client. Under Archive Email, a new archiving profile can be created for each user. In the Create Profile area of the application window, select the source from which the emails are to be archived (e.g. Microsoft Outlook).
- A wizard opens. At the first steps of the wizard, several settings can be specified for the archiving profile. These include the selection of the folders (e.g. "Inbox") and deletion rules (by default, no emails are deleted). An explanation of these settings can be found later on in this chapter under Archiving Email from Outlook, Thunderbird and others.
- If logged on to MailStore Server as administrator, the target archive can be specified at the next step of the wizard. Select the archive of the user whose computer is currently being used.
- At the last step, a name for the archiving profile can be specified. After clicking Finish, the archiving profile will be listed under Saved Profiles and can be run immediately, if desired.
Settings for Archiving Profiles
Upon creating or editing an archiving profile, different settings can be specified for the archiving task. Settings vary depending on the type of the email client selected (e.g. Microsoft Outlook or Mozilla Thunderbird).
Folders - Specify here, which folders (e.g. "Inbox") are to be archived. Additional information is available in chapter Archiving Specific Folders.
Filter - Also archive unread messages: By default, MailStore archives both read and unread emails. Clear the checkbox next to this text to exclude unread emails from the archiving process.
Delete - If desired, MailStore can automatically delete emails from the source application (e.g. Microsoft Outlook), after they have been archived successfully. Additional information is available in chapter Deleting Emails after Archiving.
Settings Available for Outlook Only
Archive Email Stored in your Local Outlook
If multiple Outlook profiles exist, to which the user can log on to, the Outlook profile to be archived can be selected here.
Archive Email Stored in a PST File
Select this option if MailStore is to access the PST file directly. This option is described in the chapter Archiving Outlook PST Files Directly.
Setings Available for Mozilla Thunderbird Only
Profile: If multiple Thunderbird profiles exist, to which the user can log on to, the profile to be archived can be selected here. Alternatively, by using the Browse button, any directory containing Thunderbird data (e.g. from the portable version) not listed under Profile can be specified. Select the directory containing the file prefs.js.
Settings Available for Mozilla SeaMonkey Only
Profile: If multiple SeaMonkey profiles exist, to which the user can log on to, the profile to be archived can be selected here. Alternatively, by using the Browse button, any directory containing SeaMonkey data not listed under Profile can be specified. Select the directory containing the file prefs.js.
Starting the Archiving Process
Starting the Archiving Process Manually
On the start page of MailStore Client, click on Archive Email and from the list under Saved Profiles, select the appropriate archiving profile. Click on Run. After the archiving process has been executed, a protocol appears. It contains information about the volume of emails that have been archived as well as any errors that may have occurred.
This process can be repeated by the user any number of times. MailStore only archives those emails that are not yet stored in the corresponding user archive. In addition, MailStore detects if emails within the source application (e.g. Microsoft Outlook) were moved to a different folder and repeats such moves in MailStore accordingly.
Automating the Archiving Process
In addition to being executed manually, archiving tasks can also be executed automatically according to a schedule. Simply right-click on an existing profile and select Schedule.... Additional information about this topic is available in chapter Automating the Archiving Process.
As long as no deletion rules were specified upon creating the archiving profile, MailStore Server will never delete or otherwise modify emails in the source application (e.g. Microsoft Outlook).
Batch-archiving IMAP Mailboxes
This chapter describes how multiple IMAP mailboxes can be archived in one step.
This article describes the general procedure independent from the e-mail server used. Please find e-mail server specific information in our Implementation Guides.
Multiple IMAP Mailboxes (Master Password)
MailStore supports archiving multiple IMAP mailboxes by means of a privileged user and the procedure to log in to an IMAP server as specified in RFC 4616 - The PLAIN SASL Mechanism. In addition to the privileged user's user name and password, the primary email address (as mailbox name) of the user whose emails are to be archived is passed on in the process as well.
You can learn from your email server's manufacturer if your email server supports this type of login and what the prerequisites are.
Setting up the Archiving Process
Archiving processes for IMAP or POP3 mailboxes are set up using archiving profiles. General information about archiving profiles is available in chapter Working with Archiving Profiles.
Please proceed as follows:
- Log on as MailStore administrator using MailStore Client.
- In MailStore, click on Archive Email.
- From the list of email servers under Create Profile, select Other Server via IMAP/POP3.
- A wizard opens to assist in specifying the archiving settings.
Hint: The Online Help gives you direct access to the respective Implementation Guides.
- Select Multiple IMAP Mailboxes (Master Password) and click on OK.
- Fill out the fields Host and Access via and enter the login data of the privileged user under User Name and Password.
Only with IMAP-TLS and IMAP-SSL: If you are using an unofficial certificate on the email server, select the option to Ignore SSL Security Warnings .
- In the Sent Items field you can enter the name of the folder containing sent emails.
- Click on Next.
- If needed, customize the list of folders to be archived, the deletion rules, the filters, the timeout value in seconds and the maximum number of archiving jobs to be executed simultaneously. The timeout value only has to be adjusted if needed (e.g. when using a very slow server).
- Click on Next.
- Now you can choose the users whose mailboxes are to be archived. The following options are available:
All users with a configured email address
Choose this option to archive the mailboxes of all users who are set up in MailStore's user management along with an email address.
All users except the following
With this feature, individual users (and their Exchange mailboxes) can be excluded from the archiving process using the list of users below.
Only the following users
With this feature, individual users (and their Exchange mailboxes) can be included in the archiving process using the list of users below. Only the mailboxes of users explicitly specified are archived.
Synchronize with directory services before archiving
If this option is activated, the list of MailStore users is synchronized with the configured directory service before each archiving process. This has the advantage that a new coworker, for example, is set up as MailStore user automatically so that MailStore archives his or her mailbox automatically as well. This option is especially recommended if mailboxes are archived regularly according to a schedule.
- Finally, you can choose a name for the archiving profile. When you click on Finish, the archiving profile is listed under Saved Profiles and can be executed, if desired.
Multiple IMAP Mailboxes (CSV File)
Archiving multiple IMAP mailboxes based on a CSV file is described below. Use this procedure if your IMAP server does not support any of the authentication methods described under Multiple IMAP Mailboxes (Master Password)
Preparation: Creating a CSV File
In order to set up batch archiving of multiple IMAP mailboxes, first, a CSV file needs to be created. For this, a Microsoft Excel spreadsheet can be used, for example:
Set up the columns as shown above. Please keep in mind that the headings (e.g."IMAP user name") must be in place but their notation may differ. Beneath the headings, enter a row for each mailbox to be archived:
IMAP user name and IMAP password
These entries are mandatory for MailStore to be able to access the mailbox.
Email address (optional)
If entered, MailStore will label the folder for the respective mailbox in the tree structure of the archive with the email address specified.
MailStore user name (optional)
If entered, MailStore will archive the respective mailbox for each MailStore user specified (store the emails in the appropriate user archive). If the user does not yet exist, a user will be created automatically. If this field is left blank, a new MailStore user is created automatically and labeled with the IMAP user name specified.
This way, any number of mailboxes of an email server may be entered. When finished, save the file in .csv format (if Microsoft Excel is used via the Save As function).
Setting Up the Archiving Process
Setting up archiving processes for IMAP or POP3 mailboxes is done using archiving profiles. General information about archiving profiles is available in chapter Working with Archiving Profiles.
Please proceed as follows:
- Log on as MailStore administrator using MailStore Client.
- In MailStore, click on Archive Email.
- To create a new archiving profile, select Other Server via IMAP/POP3 from the Email Servers list in Create Profile area of the application window.
- A wizard opens guiding you through the setup process.
- Select Multiple Mailboxes (CSV File) and click on OK.
- Fill out the fields Host and Access via, and under CSV File enter the path of the new CSV file (created as described above). This file contains the access information for the mailboxes to be archived. Under Special Folder (optional) you may enter the name of the IMAP folder containing sent messages.
For the IMAP-TLS and IMAP-SSL protocols only: You have the option to Ignore SSL Security Warnings. Generally, these warnings appear if an unofficial certificate is used on the server.
- Click on Next.
- If needed, adjust the list of folders to be archived, the deletion rules, the filter, the timeout value in seconds and the maximum number of archiving jobs to be executed simultaneously. The timeout value only has to be adjusted if needed (e.g. when using a very slow server).
- Click on Next.
- At the last step, a name for the new archiving profile can be specified. After clicking on Finish, the archiving profile will be listed under Saved Settings (Profiles) and can be run immediately, if desired.
Starting the Archiving Process
Starting the Archiving Process Manually
On the start page of MailStore Client, click on Archive Email and from the list under Saved Profiles, select the appropriate archiving profile. Click on Run. After the archiving process has been executed, a protocol appears. It contains information about the volume of emails that have been archived as well as any errors that may have occurred.
This process can be repeated by the user any number of times. MailStore only archives those emails that are not yet stored in the corresponding user archive. In addition, MailStore detects if emails within the source application (e.g. Microsoft Outlook) were moved to a different folder and repeats such moves in MailStore accordingly.
Automating the Archiving Process
In addition to being executed manually, archiving tasks can also be executed automatically according to a schedule. Simply right-click on an existing profile and select Schedule.... Additional information about this topic is available in chapter Automating the Archiving Process.
Please note: As long as no deletion rules were specified upon creating the archiving profile, MailStore Server will never delete or otherwise modify emails in the source application (e.g. Microsoft Outlook).
Choosing the Right Storage Strategy
Mailstore Server can archive any number of emails for any number of users permanently and securely. However, to ensure consistently high access speeds and to simplify administrative tasks when dealing with large amounts of data, the following scaling strategies are recommended:
Setting Up MailStore User Accounts for Each Real User
For each user, MailStore Server sets up storage structures and indexes. It is therefore not advisable to archive the emails of multiple real users using a collective user account. Please see chapter User Management for more information.
Adding New Archive Stores Regularly
MailStore Server's storage system is infinitely scalable and can store any amount of data. Emails are not stored in one single database which will eventually reach its limit of performance. Instead, the MailStore archive can be composed of individual archive units (archive stores), each having their own databases and search indexes. Any number of archive stores can be added by the administrator (or automatically according to a schedule) at runtime. By adding new archive stores regularly, a permanent scaling effect is achieved.
In practice, it has proven itself to add new archive stores once they contain more than 500,000 to 1,000,000 emails. That for MailStore Server automatically creates a archive stores at around 500.000 emails and activates it to immediately store newly archived emails in it. To users the archive always presents itself in its entirety, even when it is distributed among several different archive stores.
Information about creating and managing archive stores is available in the chapter Managing Storage Locations.
Simplification of Backups and Flexible Management of Storage Locations
Not only does creating new archive stores lead to consistently high access speeds, (as described above), it also simplifies backups significantly. Old archive stores can be write-protected; after they have been backed up once, they can be taken out of the regular backup procedure. These archive stores can then safely be kept on cost-efficient storage media.
Distributing the archive among multiple archive stores also makes managing storage locations flexible: Individual archive stores, for example, can be detached, moved to another storage medium and then be reattached at runtime.
Information about creating and managing archive stores is available in the chapter Managing Storage Locations.
Indexing File Attachments
Enter only those file types for which indexing is sensible: A specification that is too broad may negatively influence both searching and indexing performance. Please refer to the chapter Search Indexes for more information.
Archiving Server Mailboxes
This chapter describes how a single mailbox located on any email server can be archived using the IMAP or POP3 protocols. To archive multiple mailboxes in one step, Batch-archiving IMAP Mailboxes can be used. If the mailbox is a multidrop mailboxes, also called catchall mailboxes, that contains emails for more than one person please read the chapter Archiving IMAP and POP3 Multidrop Mailboxes
This article describes the general procedure independent from the e-mail server used. Please find e-mail server specific information in our Implementation Guides.
Required Information
In order to archive a server mailbox, MailStore requires the following data:
- The server name (e.g. imap.myserver.com).
- The protocol used (e.g. IMAP-TLS).
- The user name. Often times, the full email address or the local part (left of the @ character) is used.
- The password.
IMAP or POP3?
When choosing between IMAP and POP3, we strongly recommend using IMAP. With IMAP, all or specific folders of the mailbox can be archived. POP3 does not "recognize" any folders; because of this it is likely that, with most service providers, only the inbox will be archived.
Setting Up the Archiving Process
Setting up archiving processes for IMAP or POP3 mailboxes is done using archiving profiles. General information about archiving profiles is available in chapter Working with Archiving Profiles.
For each mailbox, please proceed as follows:
- Users can only archive their own mailboxes to their personal user archive. To archive the emails of other users, you have to be logged on to MailStore Client as MailStore administrator. Only MailStore administrators can archive the emails of other users.
- In MailStore, click on Archive Email.
- To create a new archiving profile, select Other Server via IMAP/POP3 from the Email Servers list in the Create Profile area of the application window.
- A wizard opens guiding you through the setup process.
Hint: Click on an entry in the Online Help area to open the corresponding Implementation Guide.
- Select Single Mailbox and click on OK.
- Fill out the fields Email Address, Host, Access via, User Name and Password. Click on Test to verify the data entered.
For the IMAP-TLS and IMAP-SSL protocols only: You have the option to ignore SSL security warnings. Generally, these warnings appear if an unofficial certificate is used on the server.
- Click on Next.
- If needed, adjust the list of folders to be archived (only available with IMAP), the deletion rules (only available with IMAP), the filter (also only available with IMAP) and the timeout value in seconds. The timeout value only has to be adjusted in specific cases (e.g. with very slow servers).

- Click on Next.
- If logged on to MailStore Server as administrator, the target archive can be specified at the next step. Select the archive of the user for whom the mailbox is to be archived.
- At the last step, a name for the new archiving profile can be specified. After clicking on Finish, the archiving profile will be listed under Saved Profiles and can be run immediately, if desired.
Starting the Archiving Process
Starting the Archiving Process Manually
On the start page of MailStore Client, click on Archive Email and from the list under Saved Profiles, select the appropriate archiving profile. Click on Run. After the archiving process has been executed, a protocol appears. It contains information about the volume of emails that have been archived as well as any errors that may have occurred.
This process can be repeated by the user any number of times. MailStore only archives those emails that are not yet stored in the corresponding user archive. In addition, MailStore detects if emails within the source application (e.g. Microsoft Outlook) were moved to a different folder and repeats such moves in MailStore accordingly.
Automating the Archiving Process
In addition to being executed manually, archiving tasks can also be executed automatically according to a schedule. Simply right-click on an existing profile and select Schedule.... Additional information about this topic is available in chapter Automating the Archiving Process.
As long as no deletion rules were specified upon creating the archiving profile, MailStore Server will never delete or otherwise modify emails in the source application (e.g. Microsoft Outlook).
Archiving Emails from External Systems (File Import)
MailStore Server can also archive the emails from applications that are not directly supported if they are available in a standardized format. With most applications it is necessary to export the emails to one of those formats first.
Using file import, MailStore Server can archive the following formats:
- EML - One file per email. Often called RFC 822 or MIME format.
- MSG - One file per email. Microsoft Outlook email files.
- PST - Microsoft Outlook personal folder files.
- MBOX - This file format is used by Mozilla Thunderbird, for example, although in this case the file ending is omitted. The MBOX file format is also used by many Unix mail servers.
Procedure for Archiving PST Files
Archiving PST files is described separately in chapter Archiving Outlook PST Files Directly.
Procedure for Archiving EML and MSG Files
Setting up archiving processes for files from the file system is done using archiving profiles. General information about archiving profiles is available in chapter Working with Archiving Profiles.
Archiving Emails of a Single User
If you do not want to archive email files in your personal user archive only, you'll have to be logged on to MailStore Client as a MailStore Server administrator. Only a MailStore Server administrator can archive emails for other users.
Please proceed as follows:
- In MailStore Server, click on Archive Email.
- From the E-mail Files category in the Create Profile section select EML and MSG files.
- A wizard opens, guiding you through the setup process.
Select Single User and click on OK.
- The dialog window Archive EML and MSG files appears.
- Select the folder to be archived. All email files in this folder will be archived.
- If desired, adjust the advanced settings or simply click Next.
-
Include Subfolders:
In addition to the emails in the selected folder also those located in any subfolders will be archived. - Read MailStore Headers:
RFC 822 files created by the MailStore Server-specific export process contain additional information such as the source folder. Set the checkmark if this information should be taken into account. - Custom File Extensions:
Here you can make appropriate entries if the files to be archived are in EML or MSG format but have a different file extension. - If needed, adjust the settings for the List of Folders to be Archived, the filter and the Deletion Rules.
- If logged on to MailStore Server as a MailStore Server-administrator, the target archive can be specified in the next step of the wizard. Select the archive of the user for whom the selected files are to be archived.
- In the final step you can specify a name for the new archiving profile. After clicking on Finish, the archiving profile will be listed under Saved Profiles and can be run immediately, if desired.
Archiving Emails of Multiple Users
In order to be able to select this archiving method, you'll have to be logged on to MailStore Client as a MailStore Server administrator. Only a MailStore Server administrator can archive emails for other users.
In addition to archiving email files of a single user, MailStore Server can archive email files of multiple users from a single directory; such emails may have been exported from a multidrop mailbox.
To archive such emails please proceed as follows:
- In MailStore Server, click on Archive Email.
- From the E-mail Files category in the Create Profile section select EML and MSG files.
- A wizard opens, guiding you through the setup process.
- Select Multiple Users and click on OK.
- The dialog window Archive Multidrop Mailbox (Filesystem) appears.
- Select the folder with the email files to be archived.
- Adjust any further settings such as how to handle emails with unknown addresses or asking MailStore Server to delete email files after they have been archived.
- Click on Next.
- In the final step you can specify a name for the new archiving profile. After clicking on Finish, the archiving profile will be listed under Saved Profiles and can be run immediately, if desired.
Archiving Emails from a MailStore Export
In order to be able to select this archiving method, you'll have to be logged on to MailStore Client as a MailStore Server administrator. Only a MailStore Server administrator can archive emails for other users.
To archive EML files which have been created by a MailStore Export, the correct options have been pre-selected. This provides an easy way to file emails exported from MailStore Server into the correct user archives and folders again.
Please proceed as follows:
- In MailStore Server, click on Archive Email.
- From the E-mail Files category in the Create Profile section select EML and MSG files.
- A wizard opens, guiding you through the setup process.
- Select MailStore Export and click on OK.
- The dialog window Archive EML and MSG files appears.
- Select the folder to be archived. All email files in this folder will be archived.
- If desired, adjust the advanced settings or simply click Next.
- Include Subfolders:
In addition to the emails in the selected folder also those located in any subfolders will be archived. - Read MailStore Headers:
RFC 822 (EML) files created by the MailStore Server-specific export process contain additional information about the source archives and folders. This information allows to file emails exported from MailStore Server into the correct user archives and folders when being rearchived. Non-existent archives and folders will be created automatically. - Custom File Extensions:
Here you can make appropriate entries if the files to be archived are in EML or MSG format but have a different file extension. - If needed, adjust the settings for the List of Folders to be Archived, the filter and the Deletion Rules.
- You can specify the target archive in the next step of the wizard. Select the archive of the user for whom the selected files are to be archived. The target archive will be ignored if the option Read MailStore Headers has been selected and the email to be archived contains such headers.
- In the final step you can specify a name for the new archiving profile. After clicking on Finish, the archiving profile will be listed under Saved Profiles and can be run immediately, if desired.
Procedure for Archiving MBOX Files
Setting up the archiving process for files from the file system is done using archiving profiles. General information about archiving profiles is available in chapter Working with Archiving ProfilesWorking with Archiving Profiles.
If you do not want to archive email files in your personal user archive only, you'll have to be logged on to MailStore Client as a MailStore Server administrator. Only a MailStore Server administrator can archive emails for other users.
Please proceed as follows:
- In MailStore Server, click on Archive Email.
- From the Email Files list in the Create Profile area of the application window select MBOX File.
- A wizard opens, guiding you through the setup process.
- Select the MBOX file to be archived.
- If logged on to MailStore Server as administrator, the target archive can be specified. Select the archive of the user for whom the selected file is to be archived.
- In the final step you can specify a name for the new archiving profile. After clicking on Finish, the archiving profile will be listed under Saved Profiles and can be run immediately, if desired.
Archiving with Drag & Drop
Files can also be archived using Drag & Drop: Simply drag the appropriate folder containing EML files or the appropriate MBOX file into the list of saved settings to create an archiving profile for this process directly.
Starting the Archiving Process
Starting the Archiving Process Manually
On the start page of MailStore Client, click on Archive Email and from the list under Saved Profiles, select the appropriate archiving profile. Click on Run. After the archiving process has been executed, a protocol appears. It contains information about the volume of emails that have been archived as well as any errors that may have occurred.
This process can be repeated by the user any number of times. MailStore only archives those emails that are not yet stored in the corresponding user archive. In addition, MailStore detects if emails within the source application (e.g. Microsoft Outlook) were moved to a different folder and repeats such moves in MailStore accordingly.
Automating the Archiving Process
In addition to being executed manually, archiving tasks can also be executed automatically according to a schedule. Simply right-click on an existing profile and select Schedule.... Additional information about this topic is available in chapter Automating the Archiving Process.
As long as no deletion rules were specified upon creating the archiving profile, MailStore Server will never delete or otherwise modify emails in the source application (e.g. Microsoft Outlook).
Archiving Outlook PST Files Directly
With MailStore Server, PST files can be archived directly. Contrary to archiving emails from Outlook, here you can create and execute archiving tasks independently from users and user computers. The users' individual PST files should be made available centrally, e.g. through a network share.
The computer used for archiving PST files through the MailStore Client must have a version of Outlook installed that is compatible with the PST files selected. For example, to archive an Outlook 2007 PST file, the corresponding version of Outlook needs to be installed.
Setting up archiving processes for PST files is done using archiving profiles. General information about archiving profiles is available in the chapter Working with Archiving Profiles.
Archiving a PST file that contains emails of a single user
If you don't want to archive PST files in your personal user archive only, you'll have to be logged on to MailStore Client as a MailStore Server administrator. Only a MailStore Server administrator can archive emails for other users.
For each PST file, please proceed as follows:
- In MailStore Server, click on Archive Email.
- From the E-mail Files category in the Create Profile section select Microsoft Outlook PST files.
- A wizard opens, guiding you through the setup process.
- Select Single User and click on OK.
- The dialog window Archive Microsoft Outlook appears.
- Select Archive Email Stored in a PST File as source and specify the PST file to be archived. Click on Next.
If you work with an Outlook/Exchange environment, you get better results by first opening the existing PST file in Outlook and then using the Archive Email Stored in your Local Outlook option. This way you can ensure that all existing sender and recipient addresses are correctly archived.
- If needed, adjust the settings for the List of Folders to be Archived, the filter and the Deletion Rules.
- If logged on to MailStore Server as a MailStore Server-administrator, the target archive can be specified in the next step of the wizard. Select the archive of the user for whom the selected PST file is to be archived.
- In the final step you can specify a name for the new archiving profile. After clicking on Finish, the archiving profile will be listed under Saved Profiles and can be run immediately, if desired.
Archiving a PST file that contains emails of multiple users
In order to be able to select this archiving method, you'll have to be logged on to MailStore Client as a MailStore Server administrator. Only a MailStore Server administrator can archive emails for other users.
In addition to archiving PST files that contain emails of a single user, MailStore Server can archive PST files that contain emails of multiple users, e.g. from a multidrop mailbox export.
To archive such emails please proceed as follows:
- In MailStore Server, click on Archive Email.
- From the E-mail Files category in the Create Profile section select Microsoft Outlook PST files.
- A wizard opens, guiding you through the setup process.
- Select Multiple Users and click on OK.
- The dialog window Archive Multidrop Mailbox (Filesystem) appears.
- Select the PST file to be archived.
- Adjust any further settings such as how to handle emails with unknown addresses or asking MailStore Server to delete email files after they have been archived.
- Click on Next.
- In the final step you can specify a name for the new archiving profile. After clicking on Finish, the archiving profile will be listed under Saved Profiles and can be run immediately, if desired.
Starting the Archiving Process
Starting the Archiving Process Manually
On the start page of MailStore Client, click on Archive Email and from the list under Saved Profiles, select the appropriate archiving profile. Click on Run. After the archiving process has been executed, a protocol appears. It contains information about the volume of emails that have been archived as well as any errors that may have occurred.
This process can be repeated by the user any number of times. MailStore only archives those emails that are not yet stored in the corresponding user archive. In addition, MailStore detects if emails within the source application (e.g. Microsoft Outlook) were moved to a different folder and repeats such moves in MailStore accordingly.
Automating the Archiving Process
In addition to being executed manually, archiving tasks can also be executed automatically according to a schedule. Simply right-click on an existing profile and select Schedule.... Additional information about this topic is available in chapter Automating the Archiving Process.
As long as no deletion rules were specified upon creating the archiving profile, MailStore Server will never delete or otherwise modify emails in the source application (e.g. Microsoft Outlook).
Choosing the Right Archiving Strategy
MailStore Server offers several options for archiving emails. Choosing the right archiving strategy depends on the email infrastucture (e.g. email server and email clients) on one hand, and company objectives on the other.
Archiving All Incoming and Outgoing Emails Automatically
With this archiving method, all emails are archived before they are delivered to the user mailboxes.
Advantages
- Completeness of the archive is guaranteed
- Emails cannot be manipulated before archiving
- Meeting legal requirements is made possible or greatly facilitated
Disadvantages
- If private emails are allowed in the company, this archiving method may cause difficulties regarding the privacy laws of some countries. In this case, a company-wide ban of all private email communication, a contractual agreement with the employees or approval of an employee organization would be required
- The workload of the email server and the amount of data is not reduced because all emails are still delivered and stored in the mailboxes
- Emails can only be allocated to users as sent or received object; a reproduction of the mailbox folder structure is not possible
Implementation
- With Microsoft Exchange by archiving the Journal mailbox
- With IMAP-compatible email servers such as Novell GroupWise, Kerio MailServer or MDaemon by archiving multipdrop mailboxes (also called catchall mailboxes)
- In all other cases and in companies without their own email server by using the MailStore Proxy Server free of charge
Appendix: One-time Archiving of Existing Emails
In addition to archiving future emails, preexisting emails should also be archived and made available permanently to your company. This one-time process should include emails in decentralized storage (e.g. PST files or the users' email clients). At the same time, older emails (e.g. more than two years old) can be deleted from the mailboxes automatically after archiving. This frees up storage space on the email server and simplifies backup procedures. All emails remain accessible to users via the MailStore archive.
Time-controlled Execution of Archiving Tasks
Every archiving task can be executed according to a schedule. For example, an archiving task can be configured to search certain mailboxes and archive all new or modified emails daily at 11pm.
Advantages
- The folder structure of the archived mailboxes, email clients or PST files is applied to the archive facilitating access to the archived emails
- The archived emails can be deleted from the mailboxes according to pre-defined rules permanently reducing the workload of the email server
Disadvantages
- Emails can be deleted or manipulated before archiving, even if the archiving intervals are very short
- Meeting legal requirements cannot, or only with difficulty, be implemented
Using Network Attached Storage (NAS)
NAS systems provide disk space in the local network by using special networking file systems. In Microsoft Windows environments, this is the SMB or CIFS filesystem. A NAS can be either a usual Windows machine with a network share or a special NAS appliance with its own operating system and management interface.
To ensure successful operation, the NAS should meet the following prerequisites:
- The NAS must not be turned off or put into standby mode at any time, as long as there is a MailStore Server service accessing the database on the NAS. Otherwise database corruption may occur, which can lead to loss of data.
- The read/write capacity should not fall below 5MB/sec.
- When moving an existing MailStore database, the available disk space should be twice the size of the current archive.
Please note: A storage system attached via FibreChannel or iSCSI is called Storage Area Network (SAN) storage. SAN storage is used like a local disk, so that no further configuration is needed to run MailStore Server on it.
In addition to a description of how to install MailStore Server onto an NAS system, as described in the following, you can find information on how to move an existing archive onto an NAS system in the article Moving the Archive.
Contents
|
Installing MailStore on an NAS Directory Share
Install MailStore on the chosen computer, and open the MailStore Server Service Configuration.
- Stop the MailStore Server service either by using the MailStore Server Service Configuration interface or by entering the command 'net stop "MailStore Server"' in a command line.
- Create a directory share on the NAS system.
- There are two ways to enable MailStore to access the directory share:
- Grant the computer object full control over the directory share. This enables the local system account of the computer on which MailStore is installed to access the network. If file system permissions are required on the share, grant the computer object full control here as well.
-
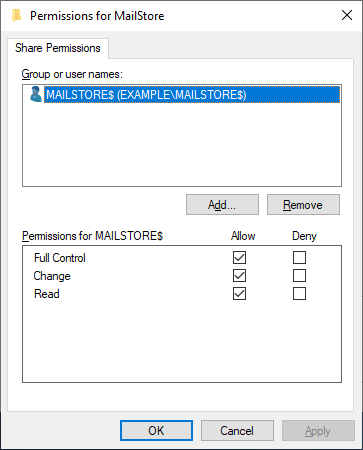

- Create a user object either on the NAS system or in a directory service (e.g. Active Directory).
- Grant the user object full control over the directory share. If file system permissions are required, grant the user object full control here as well.
-
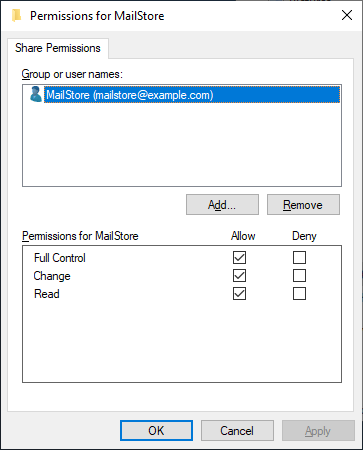
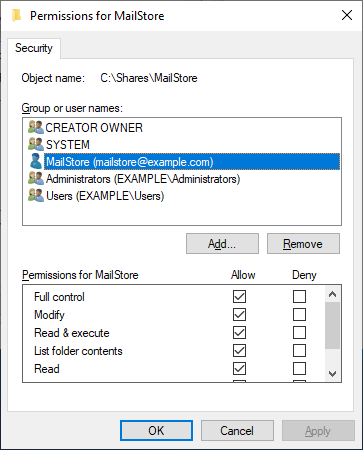
Configuration of MailStore Server
In the MailStore Server Service Configuration interface, enter the path for the directory share on the NAS system in UNC notation (computersharename). In the example below, the name of the NAS system is NAS01 and the name of the share is MailArchive.
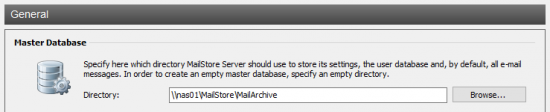
Once the computer object has the appropriate permissions for the directory share, the MailStore service can be restarted by clicking on Start in the MailStore Server Service Configuration interface or by entering 'net start "MailStore Server"' in a command line.
If a user object has been granted permissions for the share, MailStore server must establish a connection to the network share during the start using this user object. To set up the appropriate startup script, please proceed as follows:
- On the MailStore Server computer, open the MailStore Server Service Configuration.
- Click on Startup Script.
- In the text field on the right, enter the netcommands to be used to establish the connection to the necessary network shares, e.g.
net use nas01MailArchive /user:mailstoreserver SecretPassw0rd
to connect to the nas01MailArchive network share with the user mailstoreserver and the password SecretPassw0rd.
Important notice: Are the MailStore Server computer and the NAS in different Windows domains or workgroups, the computer name must be put in front of the username, e.g. nas01mailstoreserver. -
- Click on Save Changes.
- The MailStore Server service can now be restarted by clicking on Start in the MailStore Server Service Configuration interface or by entering the command 'net start "MailStore Server"' in a command line.
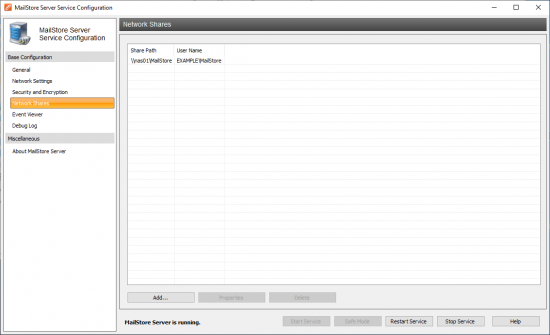
Using a NAS
NAS systems provide disk space in the local network by using special networking file systems. In Microsoft Windows environments, this is the SMB or CIFS filesystem. A NAS can be either a usual Windows machine with a network share or a special NAS appliance with its own operating system and management interface.
To ensure successful operation, the NAS should meet the following prerequisites:
- The NAS must not be turned off or put into standby mode at any time, as long as there is a MailStore Server service accessing the database on the NAS. Otherwise database corruption may occur, which can lead to loss of data.
- The read/write capacity should not fall below 5MB/sec.
- When moving an existing MailStore database, the available disk space should be twice the size of the current archive.
Please note: A storage system attached via FibreChannel or iSCSI is called Storage Area Network (SAN) storage. SAN storage is used like a local disk, so that no further configuration is needed to run MailStore Server on it.
In addition to a description of how to install MailStore Server onto an NAS system, as described in the following, you can find information on how to move an existing archive onto an NAS system in the article Moving the Archive.
Installing MailStore on an NAS Directory Share
Install MailStore on the chosen computer, and open the MailStore Server Service Configuration.
- Stop the MailStore Server service either by using the MailStore Server Service Configuration interface or by entering the command 'net stop "MailStore Server"' in a command line.
- Create a directory share on the NAS system.
- There are two ways to enable MailStore to access the directory share:
- Grant the computer object full control over the directory share. This enables the local system account of the computer on which MailStore is installed to access the network. If file system permissions are required on the share, grant the computer object full control here as well.
-


- Create a user object either on the NAS system or in a directory service (e.g. Active Directory).
- Grant the user object full control over the directory share. If file system permissions are required, grant the user object full control here as well.
-


Configuration of MailStore Server
In the MailStore Server Service Configuration interface, enter the path for the directory share on the NAS system in UNC notation (computersharename). In the example below, the name of the NAS system is NAS01 and the name of the share is MailArchive.

Once the computer object has the appropriate permissions for the directory share, the MailStore service can be restarted by clicking on Start in the MailStore Server Service Configuration interface or by entering 'net start "MailStore Server"' in a command line.
If a user object has been granted permissions for the share, MailStore server must establish a connection to the network share during the start using this user object. To set up the appropriate startup script, please proceed as follows:
- On the MailStore Server computer, open the MailStore Server Service Configuration.
- Click on Startup Script.
- In the text field on the right, enter the net commands to be used to establish the connection to the necessary network shares, e.g.
net use nas01MailArchive /user:mailstoreserver SecretPassw0rd
to connect to the nas01MailArchive network share with the user mailstoreserver and the passwordSecretPassw0rd.
Important notice: Are the MailStore Server computer and the NAS in different Windows domains or workgroups, the computer name must be put in front of the username, e.g. nas01mailstoreserver. -
- Click on Save Changes.
- The MailStore Server service can now be restarted by clicking on Start in the MailStore Server Service Configuration interface or by entering the command 'net start "MailStore Server"' in a command line.

Moving the Archive
It is possible to move an existing MailStore Server archive to a new hard-disk, machine or network-share at any time. What is required to successfully move an archive is described in the following sections.
Moving the Archive to an External Hard-Disk
To move the MailStore Server archive to a new location, proceed with these steps:
- Stop the MailStore Server service, either through the MailStore Server Service Configuration or the service control panel or by executing the command 'net stop "MailStore Server"' from the command-line.
- Copy the archive directory (default: C:MailArchive) and all subdirectories to the new location. Directory structure must be preserved.
- Run the MailStore Server Service Configuration utility and change the directory of the "Master Database" to the new location.
- Start the MailStore Server service again, either through the MailStore Server Service Configuration or the service control panel or by executing the command 'net start "MailStore Server"' from the command-line.
Please be aware, that the throughput of the external hard-disk may have a negative impact on the performance of MailStore Server.
Archive stores that are not stored in a relative path to the master database are to be re-attached or modified after moving the archive. Details about managing archive stores are available in chapter Storage Locations of the MailStore Server manual.
Moving the Archive to a New Machine
To move the MailStore Server archive to a new machine including all users, settings and emails follow these steps:
- Stop the MailStore Server service on the current machine, either trough the MailStore Server Service Configuration or the service control panel or by executing the command 'net stop "MailStore Server"' from the command-line.
- Copy the directory "MailArchive" and all archive stores that exist on the current machine to the new machine. Directory structure should be preserved.
- Uninstall MailStore Server on the current machine. Use Add/Remove Programs available in the control panel.
- Install MailStore Server on the new machine. Run the MailStore Server Service Configuration utility, stop the MailStore Server service and change the directory of the "Master Database" to the new location if it differs from the default path (C:MailArchive).
- If you have any client-sided scheduled tasks, export the SSL certificate and private key (usually packaged in a PKCS#12 file) with the common name "MailStore Server" from the machines certificate store and import it to the same location on the new machine.
- Start Mailstore Server and activate the installation by entering the 25-digit activation key when logging in as admin users with MailStore Client for the first time.
- Now set up the scheduled tasks again.
Archive stores that are not stored in a relative path to the master database are to be re-attached or modified after moving the archive. Details about managing archive stores are available in chapter Storage Locations of the MailStore Server manual.
Moving the Archive onto a NAS-share
When moving an already running Installation, only the archive stores are moved onto the NAS-share. The MailStore Server program itself remains at its original location.
The descriptions from the article Using Network Attached Storage (NAS) are analogical. The following steps are required to move the archive:
- Stop the MailStore Server service on the current machine, either trough the MailStore Server Service Configuration or the service control panel or by executing the command 'net stop "MailStore Server"' from the command-line.
- Create a backup of your MailStore Server archive.
- Create a new share on the NAS-system.
- Either grant the MailStore Server machine account or a user read-/write-permissions on that newly created share.
- If you granted the permissions to a user object, make sure you create an appropriate start-up script as described in Using Network Attached Storage (NAS).
- Move all files from the original archive folder to the share.
- Open the MailStore Server Service Configuration and set the path to the MailStore Server Master-Database to the UNC path of the share e.g. computermyshare...
- Start the MailStore Server service again, either through the MailStore Server Service Configuration or the service control panel or by executing the command 'net start "MailStore Server"' from the command-line.
Archive stores that are not stored in a relative path to the master database are to be re-attached or modified after moving the archive. Details about managing archive stores are available in chapter Storage Locations of the MailStore Server manual.
Generic LDAP Integration
Synchronizing User Accounts with a Generic LDAP Directory Service
In addition to adding users manually (which is described in chapter User Management), MailStore can synchronize its internal user database with your company's generic LDAP directory service (e.g. OpenLDAP, Novell eDirectory).
During synchronization user information such as user names and email addresses are read from the LDAP directory and recorded in MailStore Server's user database. MailStore Server makes no changes to the LDAP directory itself. The scope of the synchronization can be limited through filters.
Accessing Directory Service Integration
- Log on to MailStore Client as a MailStore Server administrator.
- Click on Administrative Tools > Users and Privileges and then on Directory Services.
- In the Integration section, change the directory service type to LDAP Generic.
Connection to the LDAP Directory Service
For synchronization MailStore Server requires information on how to connect to the LDAP directory service.
- Server Name
DNS name or IP address of the LDAP server. - Encryption
Configure whether the connection to the LDAP server is to be unencrypted or LDAP-TLS/LDAP-SSL encrypted. - Ignore SSL Security Warnings (only when using IMAP-TLS or IMAP-SSL)
Activate this option if a self-signed or non-public certificate is used on the LDAP server. - Administrative DN
Distinguished Name (DN) of a user with administrative privileges on the LDAP server. - Password
Password of that user.
LDAP Scope
After configuring the connection settings as described above, you can specify filter criteria for the LDAP directory service synchronization in this section.
- Base-DN
LDAP base DN, e.g. dc=mycompany,dc=local - Filter (optional)
RFC 4515 compliant LDAP filter, e.g. (&(objectclass=posixAccount)(mail=*))
LDAP-Attributes
Specify how LDAP user attributes should be mapped to the MailStore user attributes:
- User Name
LDAP attribute for the user name, e.g. cn or uid. - Full Name (optional)
LDAP attribute for the display name, e.g. displayName. - Email addresses (optional)
LDAP attribute for the SMTP address, e.g. mail. Multiple addresses can be specified, separated by comma.
Options
- Automatically delete users in MailStore Server
Here you can choose whether users whose accounts have been deleted in the directory service will also be deleted in MailStore Server's user database by the synchronization. If the archive folder of such a user already contains archived emails, only the user entry but not its archive folder will be deleted in MailStore Server. Additionally, only MailStore Server users that have their authentication method set to Directory Services will be deleted.
Assign Default Privileges
By default, users that have been synchronized to MailStore Server from a directory service have the privilege to log on to MailStore Server as well as read access to their own user archive.
You can configure those default privileges before synchronization, for example, to assign the privilege Archive E-mail to all new users. To do this, click on Default Privileges...
More information on managing user privileges and their effects is available in the chapter Users, Folders and Settings which also has details on editing existing privileges.
Run Directory Services Synchronization
Click on Test Settings to check synchronization configuration and the results returned by the directory service without any changes to the MailStore Server user database being actually committed.
To finally run the synchronization, click on Synchronize now. The results are shown with any changes committed to the MailStore Server user database.
Login with LDAP Credentials
By default, each user created in MailStore Server has a local password. The MailStore Server administrator can specify this password during creation of a new user account. The respective user can later change this password in MailStore Client's Quick Access section if he or she has ample privileges.
Alternatively, if an LDAP is available, you can configure MailStore Server to allow users to log on to MailStore Server using their LDAP credentials.
Procedure for Users Created by Synchronization with LDAP
If you have created MailStore Server users by LDAP synchronization as described in the previous section, no further action is required. In this case, MailStore Server has already configured all necessary settings automatically for you.
Procedure for Manually Created Users
If you have created MailStore Server users manually and want them to be able to log on using their LDAP credentials, please proceed as follows:
- Configure the LDAP integration as described in chapter Synchronizing User Accounts with a Generic LDAP Directory Service.
- Verify that the names of the MailStore Server users match those of the corresponding LDAP users.
- In the General Information section of the user properties select Directory Services for Authentication.
Deploying a Self-signed SSL Certificate
Background
During the installation of MailStore Server, an SSL certificate is generated which is used by all MailStore components if an encrypted connection is to be established. Because the certificate is issued to the server name MailStoreServer and does not originate from a trusted certification authority (CA), it is not trusted by the client side.
Because of this, the following warning message appears when calling up MailStore Web Access via HTTPS (SSL):
This article describes the option to deploy self-signed certificates using a group policy. An alternative is to use officially signed SSL certificates issued by your own company CA or a trusted external certificate authority, such as VeriSign or eTrust, which is described in chapter Using Your Own SSL Certificate.
To configure MailStore Server and your clients for using a self-signed certificate, please proceed as described in the following.
Creating a Self-Signed Certificate
The self-signed certificate created during the installation of MailStore Server is issued to the server name MailStoreServer.
If the DNS host name of the server does not correspond to MailStoreServer and if no corresponding A- or CNAME record exists on the DNS server, first a new self-signed certificate with the appropriate host name must be created. Please proceed as follows:
- Open the MailStore Server Service Configuration.
- Click on IP Addresses and Ports.
- Click on the button next to the field Server Certificate and select Create Self-Signed Certificate...
- As name for the new certificate, enter the server name with which the MailStore server can be reached, e.g. mailstore.mydomain.local, and click on OK.
- If necessary, replace all additional server certificates with the new certificate. To do so, click on the button next to the Server Certificate field and select Select from Certificate Store...
Deploying a Self-Signed Certificate
Before the self-signed certificate can be deployed, it must be exported from the current certificate store. Please proceed as follows:
- Open the MailStore Server Service Configuration.
- Click on IP-Adressen and Ports.
- Click on the certificate.
- Open the Details tab.
- Click on Copy to File.
- Follow the instructions of the certificate export wizard to export the certificate without the private key in DER encoded format into a file.
Once the certificate has been exported to a file, create a group policy as described in chapters MailStore Client Deployment or MailStore Outlook Add-in Deployment and to deploy the certificate customize it as follows:
- Open the group policy object using the Group Policy Management Editor of your Windows server.
- Expand the Computer Configuration > Policies > Windows Settings > Security Settings > Public Key Policies.
- Right-click on Trusted Root Certification Authorities and select Import....
- Follow the instructions of the certificate import wizard to import the certificate from the file.
- Under Public Key Policies open the properties of the Certificate Services Client - Auto-Enrollment
- Change the Configuration Model to Enabled and click on OK.
- Under Public Key Policies open the properties of the Certificate Path Validation Settings.
- Place a checkmark next to Define these policy settings and click OK.
The group policy will be enabled once the workstation is restarted.
Maintenance and Repair
MailStore products are developed to require minimal administrative work. Although it is advisable to execute some maintenance tasks from time to time in order to ensure data integrity of the archive.
Occasionally, however, errors do occur due to system crashes or accidental manipulation of the file structure, for example. This section will provide the information necessary to perform certain maintenance and repair works without having to contact MailStore Support (for example if some contents of the archive becomes inaccessible because of such an error).
The commands described below can be entered and executed by a MailStore administrator through the Management Shell. All commands are also available in the MailStore Client software under Administrative Tools > Storage > Storage Locations.
Logical Verification
Logical verification is used to determine if all emails located in MailStore are still complete and in their original state. For example, if a content file (.dat) was modified by hand, this will be censured by logical verification. Replace the number 1 with the actual number of the archive store to be verified:
VerifyStore --id=1Databases
Compacting of master database:
CompactMasterDatabaseCompacting of an archive store incl. databases, container and index files. Replace the number 1 with the number of the file group:
CompactStore --id=1Indexes
Generally, it is an indication that an index is defective if emails cannot be located through the tree structure or by executing a search. A defective index is not critical - it can be completely rebuilt at any time and without any loss of data. To rebuild an index, please proceed as follows:
- Using MailStore Client, log on to MailStore Server as administrator.
- Click on Administrative Tools and select Index Options.
- Select the file group and the user index and click on Rebuild Now.
- Repeat this process for all affected file groups and user indexes.
Notes on Antivirus Software
Due to the various methods of archiving email in MailStore Server and the storage of those using its own highly optimized storage technology, a few notes have to be followed when using anti-virus programs.
On-Access Scanner
To ensure best possible performance of the storage technology and to prevent disruption caused by antivirus software, it is recommended that you exclude all archive stores, and the location of the master database, from on-access scanning. All data in MailStore Server is stored encrypted and compressed and therefore cannot be reliably scanned by antivirus software. In case of false-positives, even corruption of an archive store may occur. The directory that is used by the MailStore Proxy, should be excluded from on-access scanning as well.
Web and Email Scanner
Depending on the email server, MailStore Server uses the HTTP, POP3 or IMAP protocol to access server mailboxes. Most recent antivirus software support scanning for viruses in those network protocols. Unfortunately they appear to be tested only with the most widespread email clients such as Microsoft Outlook and Mozilla Thunderbird. Compatibility with other email applications is often not guaranteed. In case of web scanners, which are optimized for scanning website visits by a normal web browser, issues like timeouts or connection resets may occur when accessing Microsoft Exchange Servers via "WebDAV over HTTP" or "Exchange Web Services" (uses HTTP as well).
Should archiving with MailStore Server be affected by one of the above problems and if there is an antivirus software with activated email or web scanner installed on the the computer that executes the archiving profiles, try to disable these component first. Should that not resolve the issue, it may be necessary to temporarily uninstall the antivirus software. We recommend to contact the vendor of if the problem can be resolved by either disabling or uninstalling the anti virus software.
Heuristic & Behavioral Analysis
MailStore Server uses multiple methods to access local applications, email servers or other resources for archiving. All these combined into one application seems to cause antivirus software to classify MailStore Server's executables or even the download link as a threat.
In that case please try to verify that classification with an online virus scanner like VirusTotal and contact the vendor of your anti virus software if applicable.
Using Your Own SSL Certificate
Background
During the installation of MailStore Server, an SSL certificate is generated which all MailStore Server components use when an encrypted connection is to be established. Since the certificate is issued to the server name MailStoreServer and does not come from a reliable certification authority (CA), it is not trusted by the client side.
Because of this, the following warning message is displayed when calling up MailStore Web Access via HTTPS (SSL):
One option for resolving this issue is to make the server on which MailStore Server is installed available under the host name MailStoreServer (e.g. by adding an A- or CNAME record in the DNS) and installing the certificate in the container of trusted root certification authorities on the clients. Because these installations involve a relatively high administrative overhead, MailStore Server provides the option to use signed certificates of your own company CA or certificates of a public certification provider (e.g. VeriSign, eTrust etc.).
To configure MailStore Server for the use of your own certificate, please proceed as follows:
Creating a Certificate Signing Request
Multiple tools are available to create a certificate signing request (CSR). Please understand that it does not fall under the scope of this article to explain their usage.
The most commonly used tools to manage SSL certificates are:
- Certificates MMC snap-in
- certreq.exe
- openssl.exe
Those programs create a private key is first, followed by the certificate signing request. The certificate signing request, but NEVER the private key, must be send to the certificate authority. After the certificate signing request was singed by the certificate authority, the actual certificate is send back to you.
Please notice, that the private key that was used to create the certificate signing request must reside in the same certificate store as the certificate. This usually is "Certificates (Local Computer) > Personal > Certificates" for services running under the local system account.
Installing the Certificate
- Log on to the server as administrator.
- Click on Start | Execute.
- Execute the command mmc.
- Select File | Add/Remove Snap-In | Add | Certificate.
- Select Local Computer Account and then Local Computer.
- Click on Finish and close any open dialog windows.
- In the management console, select My Certificates | Certificates.
- Right-click on the folder Certificates and select All Tasks | Import.
- Follow the instructions in the wizard and select the file containing the certificate and the private key, if applicable.
- On the page Certificate Store select the container My Certificates and finish the wizard.
- The certificate is now shown in the container My Certificates.
- To verify this and to make sure that the private key for the certificate is available, open the certificate with a double-click.
Using the Certificate with MailStore Server
- Open the MailStore Server Service Configuration.
- Select IP Addresses and Ports.
- In the section you want to change to certificate for, click on the button next to the Server Certificate field and select Select from Certificate Store...
- Choose the new certificate from the certificate store.
- Confirm your entries and restart the MailStore Server service.
Active Directory Integration Basics
- 1 Synchronizing User Accounts with Active Directory
- 1.1 Accessing Directoy Service Integration
- 1.2 Connection to Active Directory
- 1.3 User Database Synchronization
- 1.4 Options
- 1.5 Assign Default Privileges
- 1.6 Run Directory Services Synchronization
- 2 Login with Active Directory Credentials
- 2.1 Procedure for Users Created by Synchronization with Active Directory
- 2.2 Procedure for Manually Created Users
- 3 MailStore Client Single Sign-On
Login with Active Directory Credentials
By default, each user created in MailStore Server has a local password. The MailStore Server administrator can specify this password during creation of a new user account. The respective user can later change this password in MailStore Client's Quick Access section if he or she has ample privileges.
Alternatively, if an Active Directory is available, you can configure MailStore Server to allow users to log on to MailStore Server using their Active Directory credentials.
Procedure for Users Created by Synchronization with Active Directory
If you have created MailStore Server users by Active Directory synchronization as described in the previous section, no further action is required. In this case, MailStore Server has already configured all necessary settings automatically for you.
Procedure for Manually Created Users
If you have created MailStore Server users manually and want them to be able to log on using their Active Directory credentials, please proceed as follows:
- Configure the Active Directory integration as described in chapter Synchronizing User Accounts with Active Directory.
- Verify that the names of the MailStore Server users match those of the corresponding Active Directory users.
- In the General Information section of the user properties select Directory Services for Authentication.
Synchronizing User Accounts with Active Directory
In addition to adding users manually as described in chapter User Management, MailStore Server can synchronize its internal user database with the Active Directory of your company.
During synchronization user information such as user names and email addresses are read from Active Directory and recorded in MailStore Server's user database. No changes are made to the Active Directory itself by MailStore Server. The scope of the synchronization can be limited through filters.
MailStore Server does support neither subdomains nor domain trusts.
Accessing Directoy Service Integration
- Log on to MailStore Client as a MailStore Server administrator.
- Click on Administrative Tools > Users and Privileges and then on Directory Services.
- In the Integration section, change the directory service type to Active Directory.
Connection to Active Directory
For synchronization MailStore Server requires information on how to connect to the Active Directory.
- Server (optional)
DNS name or IP address of an Active Directory domain controller. If the MailStore Server machine is a member of the Active Directory, this setting is detected automatically. - Base-DN (optional)
Base DN of your Active Directory. Often the Base DN can be derived from the Active Directory domain name. For example, if the Active Directory domain name is company.local the Base DN usually is dc=company,dc=local. The Base DN can also be selected by clicking the button left of the text field if access to an Active Directory domain controller is available. If the MailStore Server machine is a member of the Active Directory, this setting is detected automatically. - Authentication
Define how the MailStore Server service should identify itself to the Active Directory:- Standard Authentication
If MailStore Server is not installed directly on an Active Directory domain controller, using standard authentication is required. In this case, fill out the User Name and Password fields; enter the user name in UPN notation, e.g. Administrator@company.local - Windows Authentication
If MailStore Server is installed directly on an Active Directory domain controller, the MailStore Server service already has the necessary privileges to authenticate against Active Directory using Windows authentication.
- Standard Authentication
User Database Synchronization
After configuring the connection settings as described above, you can specify filter criteria for the Active Directory synchronization in this section.
- Synchronize Microsoft Exchange users only
Only user accounts with email addresses configured in Active Directory will be taken into account by the synchronization. Clear this checkbox only if all Active Directory users should be created as MailStore Server users as well. - Synchronize enabled users only
Only user accounts enabled in Active Directory will be taken into account by the synchronization. Deactivating this option may be useful if certain Exchange mailboxes should be archived whose Active Directory user accounts are deactivated by default. - Synchronize users visible in address lists only
Only Active Directory user accounts will be taken into account by the synchronization whose Exchange mailboxes are not hidden from Exchange address lists. - Sync only these groups
Choose one or several Active Directory security groups if you only want their members to be created as MailStore Server users. That way it's possible to exclude certain Active Directory accounts from being synchronized to MailStore Server, e.g. system accounts.
Options
- Automatically delete users in MailStore Server
Here you can choose whether users whose accounts have been deleted in the Active Directory will also be deleted in MailStore Server's user database by the synchronization. If the archive folder of such a user already contains archived emails, only the user entry but not its archive folder will be deleted in MailStore Server. Additionally, only MailStore Server users that have their authentication method set to Directory Services will be deleted.
Assign Default Privileges
By default, users that have been synchronized to MailStore Server from an Active Directory have the privilege to log on to MailStore Server as well as read access to their own user archive.
You can configure those default privileges before synchronization, for example, to assign the privilege Archive E-mail to all new users. To do this, click on Default Privileges...
More information on managing user privileges and their effects is available in the chapter Users, Folders and Settings which also has details on editing existing privileges.
Run Directory Services Synchronization
Click on Test Settings to check synchronization configuration and the results returned by the Active Directory without any changes to the MailStore Server user database being actually committed.
To finally run the synchronization, click on Synchronize now. The results are shown with any changes committed to the MailStore Server user database.
MailStore Client Single Sign-On
For information on using the single sign-on functionality in Active Directory environments, please refer to the article MailStore Client Deployment.
Choose Version
Please select your version of Microsoft Exchange Server.
- Microsoft Exchange 2003
- Microsoft Exchange 2007
- Microsoft Exchange 2010
- Microsoft Exchange 2013
- Microsoft Office 365
Archiving Emails from Microsoft Office 365
| This tutorial only covers the specifics of archiving from Microsoft Office 365 mailboxes. It is assumed that you already have a MailStore Server installation or test installation and are familiar with the fundamentals of MailStore Server. Please refer to the Quick Start Guide for more information. |
MailStore Server offers several ways to archive emails from Microsoft Office 365 mailboxes, which are described below. If you are not sure which archiving method best suits your company, please refer to chapter Choosing the Right Archiving Strategy.
|
Important notice
Dependent on your Office 365 plan, some archiving methods might not be usable in MailStore. The methods described under Archiving Multiple Office 365 Mailboxes Centrally and Archiving Incoming and Outgoing Emails Directly require functions that are only available in certain Office 365 plans. |
Synchronizing Users
If you synchronize your Office 365 environment with an on premise Active Directory, it is recommended to set up a synchronization as described in chapter Active Directory Integration of the MailStore Server manual.
Archiving Individual Office 365 Mailboxes
Setting Up the Archiving Process
For each mailbox, please proceed as follows:
- Unless the mailbox of the current user is to be archived into his or her own user archive, log on to MailStore Client as MailStore administrator. Only an administrator can archive emails for other users.
- Click on Archive Email.
- From the Email Servers list in the Create Profile area of the window, select Microsoft Exchange to create a new archiving profile.
- A wizard opens to assist in specifying the archiving settings.
- Select Single Mailbox.
- Under Access via, select HTTPS.
| As Office 365 uses trusted certificates, the option Ignore SSL Warnings can be deselected. |
- Under Host, enter the name of the Office 365 Exchange server, usually outlook.office365.com.
| If you do not know the host name, you can find it out by using the MailStore Exchange Autodiscover Tool. |
- Under User Name, enter the Office 365 user name of the user whose emails are to be archived.
| Alternatively, any user with the appropriate access permissions for the mailbox to be archived can be specified. In this case, it is imperative that this mailbox is specified under Mailbox (see below). |
- Under Password, enter the user's Office 365 password.
- As long as the user's email address matches his or her Office 365 user name, the field Mailbox must be left blank. Otherwise, the user's primary email address has to be entered here.
- Click on Test to verify that MailStore can access the mailbox.
- Click on Next.
- If needed, adjust the settings for the List of Folders to be Archived, the filter and the Deletion Rules. By default, no emails will be deleted from the mailbox. The Timeout value only has to be adjusted in specific cases (e.g. with a very slow Internet connection).
- Click on Next to continue.
- If logged on to MailStore Server as MailStore administrator, the Target Archive can be specified. Select the archive of the user for whom the selected mailbox is to be archived. If the user does not exist yet, click on Create a New User.
- Click on Next.
- In the last step, a name for the archiving profile can be specified. After clicking Finish, the archiving profile will be listed under Saved Profiles and can be run immediately, if desired.
More information on how to execute archiving profiles can be found under the topic Email Archiving with MailStore Basics
Archiving Multiple Office 365 Mailboxes Centrally
With MailStore, some or all mailboxes of Microsoft Office 365 can be archived in a single step. All necessary preparations, such as creating MailStore users, can be made automatically. The archiving process can be executed manually or automatically according to a schedule.
|
Important notice
Please make sure that the feature ApplicationImpersonation, which is required in order to archive multiple Office 365 mailboxes in a single step, is available in your Office 365 plan. |
Step 1: Setting up a central user for accessing mailboxes
Before the archiving process can be set up in MailStore, you have to create a user that has access to all mailboxes. Afterwards follow these steps, to grant access permissions to the newly created user on all mailboxes:
- Log into Microsoft's Online Portal with your Office 365 admin account.
- Click on Admin and select Exchange from the drop down menu.
- Navigate to Permissions.
- Under admin roles select + (New).
- Enter a meaningful name and description for the new role group.
- Under Roles add the role ApplicationImpersonation.
- Under Members add the user you want to give permission to access all mailboxes.
- Click on Save to create a new role group.
Step 2: Configuration of MailStore Server
Please proceed as follows:
- Log on to MailStore Client as administrator.
- Click on Archive Email.
- From the Email Servers list in the Create Profile area of the window, select Microsoft Exchange to create a new archiving profile.
- A wizard opens to assist in specifying the archiving settings.
- Select Multiple Mailboxes.
|
Important notice
In order to be able to archive multiple mailboxes, some MailStore users along with their email addresses have to exist in the MailStore user management. If this is not the case, MailStore will offer to set up and execute the Active Directory Synchronization at this point. Once completed, the wizard will resume. If Active Directory Synchronization is not desired, the process can be canceled. In this case, users have to be created manually as described the in chapter User Management. Once finished, click on Archive Email and then on Microsoft Exchange. |
- Under Access via, select HTTPS.
| As Office 365 uses trusted certificates, the option Ignore SSL Warnings can be deselected. |
- Under Host, enter the name of the Office 365 Exchange server, usually outlook.office365.com.
| If you do not know the host name, you can find it out by using the MailStore Exchange Autodiscover Tool. |
- Under User Name, enter the Office 365 user name of the user whose emails are to be archived.
- Under User Name and Password, enter the credentials of a user who has access to all the Office 365 mailboxes to be archived.
- Click on Next to continue.
- If needed, adjust the settings for the List of Folders to be Archived, the filter and the Deletion Rules. By default, no emails will be deleted from the mailbox. The Timeout value only has to be adjusted in specific cases (e.g. with a very slow Internet connection). Please keep in mind that these settings apply to all mailboxes to be archived, as specified at the next step.
- Select the users whose mailboxes are to be archived. The following options are available:
All users with configured email address
Choose this option to archive the mailboxes of all users who are set up, along with their email addresses, in MailStore's user management.
All users except the following
Choose this option to exclude individual users (and thereby their Exchange mailboxes) from the archiving process, using the list of users below.
Only the following users
Choose this option to include individual users (and thereby their Office 365 mailboxes) in the archiving process, using the list of users below. Only the mailboxes of those users explicitly specified will be archived.
Synchronize with Directory Services before archiving
If selected, the MailStore Server user list will be synchronized with a Directory Service (usually Active Directory) before any archiving process is executed.
If your Office 365 environment is synchronized with an on-premise Active Directory, updates or additions of AD users will be reflected in MailStore Server as well before archiving. That way, once the archiving process is executed, their Office 365 mailboxes are archived automatically. In such a scenario, this option is especially recommended when the archiving process is to be executed regularly according to a schedule.
- In the last step, a name for the archiving profile can be specified. After clicking Finish, the archiving profile will be listed under Saved Profiles and can be run immediately, if desired.
More information on how to execute archiving profiles can be found under the topic Email Archiving with MailStore Basics
Archiving Incoming and Outgoing Emails Directly
With the support of Office 365 Exchange's journal function, MailStore can archive the incoming and outgoing emails of all users automatically. This is the only way to ensure that all emails are archived in their entirety
|
Important notice
The Office 365 Exchange's journal function, which is required to archive incoming and outgoing emails directly, is only available in certain Office 365 plans. |
Basic Functionality
Microsoft Office 365 Exchange provides the option to take down all incoming, outgoing and internal email traffic. At the time of sending and receiving, a copy of the respective email is created and stored in a mailbox called Journal Mailbox. Additionally, the email is provided with a Journal report containing information about the actual senders and recipients.
MailStore can be configured to archive this Journal mailbox at regular intervals. During this process, the emails from the Journal mailbox will be assigned to their respective MailStore users (i.e. their user archives) automatically. This means that all users are able to view only their own emails.
Before the archiving process can be set up in MailStore, journaling has to be set up for the Office 365 Exchange environment. Please proceed as follows:
Step 1: Creating a Mailbox for Journaling
The following steps describe how to set up journaling for your Microsoft Office 365 account.
- Log into Microsoft's Online Portal with your Office 365 admin account.
- Click on Admin and select Exchange from the drop down menu.
- Click on compliance management and then on journal rules.
Click on + (New)
- The dialog window New Journal Rule opens:
- Enter a name for the journal rule, e.g. Journaling.
- In the If the message is sent to or received from... section select whether the rule should apply to all messages or to specific users or groups.
- Under Journal the following messages..., choose whether to capture all messages, internally sent messages only, or only those messages with an external sender or recipient.
- Enter the email address of the previously created journal user in the Send journal reports to: box.
- Click on save to activate the rule.
- If you have not set up a recipient for None Delivery Reports (NDRs) for undeliverable journal reports yet, you are asked to do it now. Just follow the onscreen instructions.
Step 2: Configuration of MailStore Server
Setting up the archiving profile is very similar to a non-hosted Exchange 2010 environment.
|
Important notice
Office 365 currently supports only external, Non-Office 365 mailboxes as journal mailboxes. In case the journal mailbox is a regular IMAP mailbox, you still have to select Microsoft Exchange > In- and Outbound E-mail Automatically under Archive E-mail in order to ensure that MailStore processes the journal reports correctly. Access via usually needs to be set to IMAP, IMAP-TLS or IMAP-SSL. The provider of such an IMAP mailbox must not remove the X-MS-Journal-Report header from the journal emails.
|
Please note that MailStore Server is not able to delete Office 365 journal emails from GMail mailboxes.
Please proceed as follows:
- Start MailStore Client on the computer that is to execute the archiving task regularly and according to a schedule. This can be the MailStore server machine or any user computer. Log on as administrator.
- Click on Archive Email.
- From the list in the upper area of the window, select Microsoft Exchange to create a new archiving profile.
- A wizard opens to assist in specifying the archiving settings.
- Select In- and Outbound Email Automatically.
|
Important notice
In order to be able to archive emails immediately upon sending and receiving, some MailStore users along with their email addresses have to exist in the MailStore user management. If this is not the case, MailStore will offer to set up and execute the Active Directory Synchronization at this point. Once completed, the wizard will resume. If Active Directory Synchronization is not desired, the process can be canceled. In this case, users have to be created manually as described the in chapter User Management. Once finished, click on Archive Email and then on Microsoft Exchange.
|
- Under Access via, select the protocol to be used to access the journal mailbox.
Depending on the protocol chosen, there is the option to Ignore SSL Warnings. Generally, these warnings appear if an unofficial or selfsigned certificate is used on the mail server.
- Under Host, enter the name of the mail server that hosts the journal mailbox.
- Under User Name and Password, enter the credentials of a user who has access to the journal mailbox.
- If the journal mailbox is accessed via HTTP/HTTPS on a Microsoft Exchange Server, the primary email address of the journal mailbox has to be entered in the field Mailbox (opt.) if it is different from the user's Windows login name. Otherwise, the field can be left blank. If the journal mailbox is accessed via IMAP/POP3, this field is grayed out.
- If the option Synchronize with Active Directory before archiving is selected, the MailStore Server will synchronize its user list with Active Directory before any archiving process is executed.
If your Office 365 environment is synchronized with an on-premise Active Directory, updates or additions of AD users will be reflected in MailStore Server as well before archiving. This ensures that their current Office 365 email addresses are known to MailStore Server, so that their journaled emails are sorted into the correct archives (see below). In such a scenario, this option is especially recommended when the archiving process is to be executed regularly according to a schedule. - Depending on the setting Messages with unknown e-mail addresses, such messages will either be archived into the configured folder or not at all.
- Select the option Delete them in origin mailbox only if Office 365 journaling has been tested sufficiently. Even without this setting, MailStore will not archive any duplicate emails.
- Click on Test to verify that MailStore can access the mailbox.
- Click on Next to continue.
- A Timeout value can be specified. Change this value only in case of definite need (e.g. with very slow servers).
- Click on Next to continue.
- At the last step, a name for the archiving profile can be specified. After clicking Finish, the archiving profile will be listed under Saved Profiles and can be run immediately, if desired.
More information on how to execute archiving profiles can be found under the topic Email Archiving with MailStore Basics
See Also
Archiving Emails from Microsoft Exchange 2013
| This tutorial only covers the specifics of archiving a Microsoft Exchange 2013 server. It is assumed that you already have a MailStore Server installation or test installation and are familiar with the fundamentals of MailStore Server. Please refer to the Quick Start Guide for more information. |
MailStore Server offers several ways to archive emails from a Microsoft Exchange 2013 server, which are described below. If you are not sure which archiving method best suits your company, please refer to chapter Choosing the Right Archiving Strategy.
Synchronizing Users
As Microsoft Exchange requires the existence of an Active Directory, it is recommended to set up a synchronization as described in chapter Active Directory Integration of the MailStore Server manual.
Archiving Individual Mailboxes
By following the procedure described here, a single Exchange mailbox can be archived for a specific MailStore user. The archiving process can be executed manually or automatically according to a schedule.
Setting Up the Archiving Process
For each mailbox, please proceed as follows:
- Unless the mailbox of the current user is to be archived into his or her own user archive, log on to MailStore Client as MailStore administrator. Only an administrator can archive emails for other users.
- Click on Archive Email.
- From the Email Servers list in the Create Profile area of the window, select Microsoft Exchange to create a new archiving profile.
- A wizard opens to assist in specifying the archiving settings.
- Select Single Mailbox.
- Under Access via, select the protocol to be used to access the Exchange server. Whenever possible, HTTPS should be used.
| Depending on the protocol chosen, there is the option to Ignore SSL Warnings. Generally, these warnings appear if an unofficial or selfsigned certificate is used on the server. |
- Under Host, enter the name of the Exchange server.
| If it is a externally hosted mailbox you are about to archive and do not know the host name, you can find it out by using the MailStore Exchange Autodiscover Tool. |
Under User Name, enter the Windows login name of the user whose emails are to be archived (e.g. peter.stein@domain.local or peter.stein@domain.com).
| Alternatively, any user with the appropriate access permissions for the mailbox to be archived can be specified. In this case, it is imperative that this mailbox is specified under Mailbox (see below). |
- Under Password, enter the user's password.
- As long as the user's email address matches that of the user's Windows login name, the field Mailbox must be left blank. Otherwise, the user's primary email address has to be entered here.
- Click on Test to verify that MailStore can access the mailbox.
- Click on Next.
- If needed, adjust the settings for the List of Folders to be Archived, the filter and the Deletion Rules. By default, no emails will be deleted from the mailbox. The Timeout value only has to be adjusted in specific cases (e.g. with very slow servers)
|
Important notice
Did you specify IMAP as the protocol and have also defined a deletion rule? If so, empty folders (folders containing no emails, such as Deleted Items or Contacts) have to be added to the list of excluded folders manually. This is the only way to avoid these folders being archived and deleted according to the deletion rule specified. Please read more in chapter Archiving Specific Folders.
|
- Click on Next to continue.
- If logged on to MailStore Server as MailStore administrator, the Target Archive can be specified. Select the archive of the user for whom the selected mailbox is to be archived. If the user does not exist yet, click on Create a New User.
- Click on Next.
- In the last step, a name for the archiving profile can be specified. After clicking Finish, the archiving profile will be listed under Saved Profiles and can be run immediately, if desired.
More information on how to execute archiving profiles can be found under the topic Email Archiving with MailStore Basics
Archiving Multiple Exchange Mailboxes Centrally
With MailStore, some or all mailboxes of an Exchange server can be archived in a single step. All necessary preparations, such as creating MailStore users, can be made automatically. The archiving process can be executed manually or automatically according to a schedule.
Step 1: Setting up a central user for accessing mailboxes
Before the archiving process can be set up in MailStore, a user with access to all mailboxes to be archived has to be created. The corresponding method is called impersonation in Microsoft Exchange.
The following preconditions have to be met to be able to configure Exchange Impersonation:
- Administrative access to the Microsoft Exchange 2007 system on which the Client Access Role is installed
- Domain Administrator privileges
- An installation of Remote PowerShell on the machine which is used to execute the commands or access to the Exchange 2013 Server via Remote Desktop.
The following commands are executed in the Microsoft Exchange Management Shell:
Add access privileges
New-ManagementRoleAssignment -Name:"MailStore Impersonation" `

-Role:ApplicationImpersonation -User:serviceaccount@domain.tld|
Information Title
serviceaccount@domain.tld is the user account in UPN (User Principal Name) notation which you will use to access the mailboxes from MailStore. Please make sure that this user is not a member of any Exchange or Windows administrative group. |
Check access privileges
Get-ManagementRoleAssignment -Role:ApplicationImpersonation -RoleAssigneeType:User `

   | Format-List *
Get-ManagementRoleAssignment -Identity:"MailStore Impersonation" `
| Format-List *Remove access privileges
The following command is only to be used, if you want to remove access privileges from serviceaccount@domain.tld
Remove-ManagementRoleAssignment "MailStore Impersonation"Step 2: Configuration of MailStore Server
Please proceed as follows:
- Log on to MailStore Client as administrator.
- Click on Archive Email.
- From the Email Servers list in the Create Profile area of the window, select Microsoft Exchange to create a new archiving profile.
- A wizard opens to assist in specifying the archiving settings.
- Select Multiple Mailboxes.
- In order to be able to archive multiple mailboxes, some MailStore users along with their email addresses have to exist in the MailStore user management. If this is not the case, MailStore will offer to set up and execute the Active Directory Synchronization at this point. Once completed, the wizard will resume. If Active Directory Synchronization is not desired, the process can be cancelled. In this case, users have to be created manually as described the in chapter User Management. Once finished, click on Archive Email and then on Microsoft Exchange.
- Under Access via, select the protocol to be used to access the Exchange server. Whenever possible, HTTPS should be used.
| Depending on the protocol chosen, there is the option to Ignore SSL Warnings. Generally, these warnings appear if an unofficial or selfsigned certificate is used on the server. |
- Under Host, enter the name of the Exchange server.
| If it is externally hosted mailboxes you are about to archive and do not know the host name, you can find it out by using the MailStore Exchange Autodiscover Tool. |
- Under User Name and Password, enter the access data of a user who has access to all the Exchange mailboxes that are to be archived.
- Click on Next to continue.
- If needed, adjust the settings for the List of Folders to be Archived, the filter and the Deletion Rules. By default, no emails will be deleted from the mailbox. The Timeout value only has to be adjusted in specific cases (e.g. with very slow servers). Please keep in mind that these settings apply to all mailboxes to be archived, as specified at the next step.
- Select the users whose mailboxes are to be archived. The following options are available:
All users with configured email address
Choose this option to archive the mailboxes of all users who are set up, along with their email addresses, in MailStore's user management.
All users except the following
Choose this option to exclude individual users (and thereby their Exchange mailboxes) from the archiving process, using the list of users below.
Only the following users
Choose this option to include individual users (and thereby their Exchange mailboxes) in the archiving process, using the list of users below. Only the mailboxes of those users explicitly specified will be archived.
Synchronize with Active Directory before archiving
If selected, the MailStore user list will be synchronized with Active Directory before any archiving process is executed. This has the advantage that, for example, new employees will be created as MailStore users before archiving, so once the archiving process is executed, their Exchange mailbox is archived automatically as well. This option is especially recommended when the archiving process is to be executed regularly according to a schedule.
- In the last step, a name for the archiving profile can be specified. After clicking Finish, the archiving profile will be listed under Saved Profiles and can be run immediately, if desired.
More information on how to execute archiving profiles can be found under the topic Email Archiving with Mailstore Basics
Archiving Incoming and Outgoing Emails Directly
With the support of the Exchange Server Journaling functionality, MailStore can archive the incoming and outgoing emails of all users automatically. This is the only way to ensure that all emails are archived in their entirety
Basic Functionality
Microsoft Exchange Server provides the option to take down all incoming, outgoing and internal email traffic. At the time of sending and receiving, a copy of the respective email is created and stored in a mailbox called Journal Mailbox. Additionally, the email is provided with a Journal report containing information about the actual senders and recipients.
MailStore can be configured to archive this Journal mailbox at regular intervals. During this process, the emails from the Journal mailbox will be assigned to their respective MailStore users (i.e. their user archives) automatically. This means that all users are able to view only their own emails.
Before the archiving process can be set up in MailStore, Journaling has to be set up for the Exchange Server. Please proceed as follows:
Step 1: Creating a Mailbox for Journaling
To set up a new Exchange user with a meaningful name, e.g. journal, please proceed as follows:
- Start the Exchange admin center and click log on.
- In the recipientsmailboxes section click on the plus sign ('New').
- Enter journal as Alias.
- Select the option New user.
- Enter the data as shown below:
- Click on More options...
- Click on Browse to select a mailbox database.
- Click on save. The user journal is created.
Step 2: Configuring Exchange Journaling
Two types of journaling are available in Exchange 2013: standard and premium journaling. While standard journaling always includes all send and received emails of a mailbox database, premium journaling can be limited to particular recipients or distribution lists and the scope (internal, external, global) of the journal rule can be defined. Additionally premium journaling rules can be replicated throughout the whole Exchange organization.
| Premium journaling requires Exchange Enterprise CALs. |
Configure Standard Journaling
Log on to the Exchange admin center and select the databases tab in the servers section.
- Doubleclick on the mailbox database for which you want to set up standard journaling and select the Maintenance tab.
- Below Journal recipient: click on browse
- Select the user from the recipient list that was created in step 1 and confirm with OK
- The following screenshot shows an example of a standard journaling configuration:
- To confirm the changes and active the journaling, click on OK.
Once the new configuration has come into effect, a copy of all incoming and outgoing emails is stored in the Journal mailbox (along with a report). MailStore can now be configured to archive the Journal mailbox in regular intervals as described below.
Log on to the Exchange admin center and select the journal rules tab in the compliance management section.
Click on + (New)
The dialog window New Journal Rule opens: 
- Enter a name for the journal rule, e.g. Journaling.
- In the If the message is sent to or received from... section select whether the rule should apply to all messages or to specific users or groups.
- Under Journal the following messages..., choose whether to capture all messages, internally sent messages only, or only those messages with an external sender or recipient.
- Enter the email address of the previously created journal user in the Send journal reports to: box.
- Click on save to activate the rule. Please keep in mind that in complex Microsoft Exchange environments it may take several minutes until the new rule becomes effective.
Once the new configuration has come into effect, a copy of all incoming and outgoing emails that adhere to the rule's parameters is stored in the Journal mailbox (along with a report called Envelope). MailStore can now be configured to archive the Journal mailbox in regular intervals as described below.
Step 3: Configuration of MailStore Server
Please proceed as follows:
- Start MailStore Client on the computer that is to execute the archiving task regularly and according to a schedule. This can be the MailStore server machine or any user computer. Log on as administrator.
- Click on Archive Email.
- From the list in the upper area of the window, select Microsoft Exchange to create a new archiving profile.
- A wizard opens to assist in specifying the archiving settings.
- Select In- and Outbound Email Automatically.
- In order to be able to archive emails immediately upon sending and receiving, some MailStore users along with their email addresses have to exist in the MailStore user management. If this is not the case, MailStore will offer at this point to set up and execute the Active Directory Synchronization. Once completed, the wizard will resume. If Active Directory Synchronization is not desired, the process can be canceled. In this case, users have to be created manually as described in chapter User Management. Once finished, click on Archive Email and then on Microsoft Exchange.
- Under Access via, select the protocol to be used to access the Exchange server. Whenever possible, HTTPS should be used.
| Depending on the protocol chosen, there is the option to Ignore SSL Warnings. Generally, these warnings appear if an unofficial or selfsigned certificate is used on the server. |
Under Host, enter the name of the Exchange server.
| If it is a externally hosted mailboxes you are about to archive and do not know the host name, you can find it out by using the MailStore Exchange Autodiscover Tool. |
- Under User Name and Password, enter the access data of a user who has access to the Exchange Journal mailbox (i.e. the user that has been created when setting up the Journal mailbox).
- As long as the user's email address matches that of the user's Windows login name, the field Mailbox (opt.) can be left blank. Otherwise, the user's email address has to be entered here.
- Synchronize with Active Directory before archiving (recommended): If this option is selected, the MailStore user list will be synchronized with Active Directory before any archiving process is executed. This has the advantage that, for example, new employees will be created as MailStore users before archiving, so once the archiving process is executed, their Exchange mailbox is archived automatically as well.
- Select the option Delete them in origin mailbox only if Exchange Journaling has been tested sufficiently. Even without this setting, MailStore will not archive any duplicate emails.
- Click on Test to verify that MailStore can access the mailbox.
- Click on Next to continue.
- A Timeout value can be specified. Change this value only in case of definite need (e.g. with very slow servers).
- Click on Next to continue.
- At the last step, a name for the archiving profile can be specified. After clicking Finish, the archiving profile will be listed under Saved Profiles and can be run immediately, if desired.
More information on how to execute archiving profiles can be found under the topic Email Archiving with Mailstore Basics
Public Folders
MailStore Server can archive the emails from the public folders of Microsoft Exchange servers and make them available to some or all MailStore users. The archiving process can be executed manually or automatically according to a schedule.
Preparation
During archiving, emails are always assigned to individual users. Even when archiving a public folder, the user (or the user archive), for whom the emails are to be archived, has to be specified.
For this reason, first create a MailStore user for whom the public folder is to be archived. This user can be called publicfolder, for example. Next, all other users can be given access to the archive of the user publicfolder. This way, the archived content of the public folder is available to all MailStore users.
If MailStore users are not to have access to the archived public folder, skip this step and simply archive the emails to the user archive of the administrator (admin).
Information about how to create a new user in MailStore is available in the chapter User Management.
To be able to access all objects stored in all public folders without any problems, it is recommended to execute the following commands on the Exchange 2013 server hosting the respective public folders.
- First, add the role Public Folder Management to a serviceAccount@domain.tld
Add-Rolegroupmember -Identity "Public Folder Management" -Member serviceAccount- Next, use the PowerShell Script AddUsersToPfRecursive.ps1 to add "Editor" permissions for all public folders. Execute it within the Exchange Management Shell.
.AddUsersToPfRecursive.ps1 -TopPublicFolder "" -User serviceAccount@domain.tld -Permission EditorserviceAccount@domain.tld is now able to read, write and delete all objects stored in public folders. Don't forger to substitute serviceaccount@domain.tld with the Windows Useraccount in UPN (User Principle name) notation you want to use for archiving.
Setting up the Archiving Process
Please proceed as follows:
- Log on to MailStore Client as administrator.
- Click on Archive Email.
- From the Email Servers list in the Create Profile area of the window, select Microsoft Exchange to create a new archiving profile.
- A wizard opens to assist in specifying the archiving settings.
- Select Public Folders.
- Under Access via, select the protocol to be used to access the Exchange server. Whenever possible, HTTPS should be used.
| Depending on the protocol chosen, there is the option to Ignore SSL Warnings. Generally, these warnings appear if an unofficial or selfsigned certificate is used on the server. |
- Under Host, enter the name of the Exchange server.
- Under User Name, enter the Windows login name of the user who has full access to the public folder (e.g. peter.stein@domain.local or peter.stein@domain.com).
- As long as the user's email address matches that of the user's Windows login name, the field Mailbox (opt.) must be left blank. Otherwise, the user's email address has to be entered here.
- Under Password, enter the user's password.
- Change the preset value under Mailbox (opt.) only if needed.
- Click on Test to verify that MailStore can access the mailbox.
- Click on Next to continue.
- If needed, adjust the settings for the List of Folders to be Archived, the filter and the Deletion Rules. By default, no emails will be deleted from the mailbox. The Timeout value only has to be adjusted in specific cases (e.g. with very slow servers).
- Click on Next to continue.
- At the next step, the Target Archive can be specified. Select the archive of the user for whom the selected mailbox is to be archived (see section "Preparation" above). If the user does not exist yet, please click on Create a New User, then click on Next.
- At the last step, a name for the archiving profile can be specified. After clicking Finish, the archiving profile will be listed under Saved Profiles and can be run immediately, if desired.
More information on how to execute archiving profiles can be found under the topic Email Archiving with MailStore Basics
Shared Mailboxes
Create a MailStore Server User for a Shared Mailbox
Archiving Shared Mailboxes
In order to archive emails from a shared mailbox you must grant a user account full access to that mailbox (either by delegated access or impersonation) because the Active Directory user account associated with that mailbox is disabled. You can use the service account you created in Archiving Multiple Exchange Mailboxes Centrally for this purpose.
Once you have created the service account, setup a new Single Mailbox archiving profile. Enter the credentials of the service account and fill the optional Mailbox field with the primary e-mail address of your shared mailbox.
Further steps are analog to the archiving of individual Exchange mailboxes.
Throttling in Exchange 2013
Exchange 2013 supports throttling since the RTM version. With throttling you can control, on the server side, the speed as well as the amount of emails individual users can download from the server. For Exchange 2013 this is a standard feature.
| Always enter the UPN (User Principal Name) of the Window user used for archiving as serviceaccount. |
Determining the Throttling Policy Applied to the MailStore serviceaccount
You can use the following Powershell script to check if the serviceaccount that MailStore uses for archiving is slowed down by a throttling policy:
  Param([Parameter(Mandatory=$True)][string]$serviceAccount)

 $policy = (Get-ThrottlingPolicyAssociation -Identity $serviceAccount).ThrottlingPolicyId

 $policy = switch($policy) {$null {Get-ThrottlingPolicy | Where ThrottlingPolicyScope -eq `

 'Global'} default {$policy | Get-ThrottlingPolicy}}

 $policy | format-list -property Name, ThrottlingPolicyScope, EWS*
To use the script, please copy the entire content into a text editor and save the script as policycheck.ps1 (on the desktop of the Exchange server, for example).
The script can now be executed from the Exchange Management Shell with the UPN (User Principal Name) of the Windows user who is used for archiving as parameter. Since, in the context of MailStore Server, only the EWS* values are of any interest, the following result may be displayed:
[PS] C:UsersAdministratorDesktop>.policycheck.ps1 serviceaccount@domain.tld

 Name                  : GlobalThrottlingPolicy_b4ef32cb-3677-44fd-be1a-ad784931f16f

 ThrottlingPolicyScope : Global

 EwsMaxConcurrency     : 27

 EwsMaxBurst           : 300000

 EwsRechargeRate       : 900000

 EwsCutoffBalance      : 3000000

 EwsMaxSubscriptions   : 5000
In this case, no separate policy exists for the serviceaccount. Since the property ThrottlingPolicyScope has the value 'Global', the global throttling policy of the system applies to the serviceaccount. If the value was 'Regular', an individual policy would already have been applied to the serviceaccount whose name would be listed under Name.
Creating and Assigning an Individual Throttling Policy
To avoid interfering with the overall stability of the Exchange 2013 system by using a too liberal policy definition of the default throttling policy, it is advisable to create a separate policy for the serviceaccount. Only two lines are necessary to create a throttling policy for the serviceaccount which is customized for MailStore:
New-ThrottlingPolicy MailStoreServerPolicy -EWSMaxConcurrency Unlimited `

 -EWSMaxSubscriptions Unlimited -EwsCutoffBalance Unlimited -EwsMaxBurst Unlimited `

 -EwsRechargeRate Unlimited -IsServiceAccount -ThrottlingPolicyScope Regular


 Set-ThrottlingPolicyAssociation -Identity serviceaccount@domain.tld `

 -ThrottlingPolicy MailStoreServerPolicy
In line 1, a new throttling policy with the desired values is created, in line 2, this individual throttling policy is assigned to the serviceaccount. The result can be checked again with the script listed above:
 [PS] C:UsersAdministratorDesktop>.policycheck.ps1 serviceaccount@domain.tld

 Name                  : MailStoreServerPolicy

 ThrottlingPolicyScope : Regular

 EwsMaxConcurrency     : Unlimited

 EwsMaxBurst           : Unlimited

 EwsRechargeRate       : Unlimited

 EwsCutoffBalance      : Unlimited

 EwsMaxSubscriptions   : Unlimited
Removing and Deleting an Individual Throttling Policy
To delete an individual throttling policy from a mailbox or user account, execute the following command in the Exchange Management Shell:
Set-ThrottlingPolicyAssociation -Identity serviceaccount@domain.tld -ThrottlingPolicy $nullThis ends the assignment of a throttling policy. To delete the throttling policy from the Exchange system, execute the following command in the Exchange Management Shell:
Remove-ThrottlingPolicy MailStoreServerPolicyConfirm this by entering "Y". The policy is now completely deleted from the system.
See Also
Archiving Emails from Microsoft Exchange 2010
| This tutorial only covers the specifics of archiving a Microsoft Exchange 2010 server. It is assumed that you already have a MailStore Server installation or test installation and are familiar with the fundamentals of MailStore Server. Please refer to the Quick Start Guide for more information. |
MailStore Server offers several ways to archive emails from a Microsoft Exchange 2010 server, which are described below. If you are not sure which archiving method best suits your company, please refer to chapter Choosing the Right Archiving Strategy.
Synchronizing Users
As Microsoft Exchange requires the existence of an Active Directory, it is recommended to set up a synchronization as described in chapter Active Directory Integration of the MailStore Server manual.
Archiving Individual Mailboxes
By following the procedure described here, a single Exchange mailbox can be archived for a specific MailStore user. The archiving process can be executed manually or automatically according to a schedule.
Setting Up the Archiving Process
For each mailbox, please proceed as follows:
- Unless the mailbox of the current user is to be archived into his or her own user archive, log on to MailStore Client as MailStore administrator. Only an administrator can archive emails for other users.
- Click on Archive Email.
- From the Email Servers list in the Create Profile area of the window, select Microsoft Exchange to create a new archiving profile.
- A wizard opens to assist in specifying the archiving settings.
- Select Single Mailbox.
- Under Access via, select the protocol to be used to access the Exchange server. Whenever possible, HTTPS should be used.
| Depending on the protocol chosen, there is the option to Ignore SSL Warnings. Generally, these warnings appear if an unofficial or selfsigned certificate is used on the server. |
- Under Host, enter the name of the Exchange server.
| If it is a externally hosted mailbox you are about to archive and do not know the host name, you can find it out by using the MailStore Exchange Autodiscover Tool. |
- Under User Name, enter the Windows login name of the user whose emails are to be archived (e.g. peter.stein@domain.local or peter.stein@domain.com).
| Alternatively, any user with the appropriate access permissions for the mailbox to be archived can be specified. In this case, it is imperative that this mailbox is specified under Mailbox (see below). |
- Under Password, enter the user's password.
- As long as the user's email address matches that of the user's Windows login name, the field Mailbox must be left blank. Otherwise, the user's primary email address has to be entered here.
- Click on Test to verify that MailStore can access the mailbox.
- Click on Next.
- If needed, adjust the settings for the List of Folders to be Archived, the filter and the Deletion Rules. By default, no emails will be deleted from the mailbox. The Timeout value only has to be adjusted in specific cases (e.g. with very slow servers).
|
Information Title
Did you specify IMAP as the protocol and have also defined a deletion rule? If so, empty folders (folders containing no emails, such as Deleted Items or Contacts) have to be added to the list of excluded folders manually. This is the only way to avoid these folders being archived and deleted according to the deletion rule specified. Please read more in chapter Archiving Specific Folders. |
- Click on Next to continue.
- If logged on to MailStore Server as MailStore administrator, the Target Archive can be specified. Select the archive of the user for whom the selected mailbox is to be archived. If the user does not exist yet, click on Create a New User.
- Click on Next.
- In the last step, a name for the archiving profile can be specified. After clicking Finish, the archiving profile will be listed under Saved Profiles and can be run immediately, if desired.
More information on how to execute archiving profiles can be found under the topic Email Archiving with MailStore Basics
Archiving Multiple Exchange Mailboxes Centrally
With MailStore, some or all mailboxes of an Exchange server can be archived in a single step. All necessary preparations, such as creating MailStore users, can be made automatically. The archiving process can be executed manually or automatically according to a schedule.
Step 1: Setting up a central user for accessing mailboxes
Before the archiving process can be set up in MailStore, a user with access to all mailboxes to be archived has to be created. The corresponding method is called impersonation in Microsoft Exchange.
The following preconditions have to be met to be able to configure Exchange Impersonation:
- Administrative access to the Microsoft Exchange 2007 system on which the Client Access Role is installed
- Domain Administrator privileges
- An installation of Remote PowerShell on the machine which is used to execute the commands or access to the Exchange 2010 Server via Remote Desktop.
The following commands are executed in the Microsoft Exchange Management Shell:
Add access privileges
 New-ManagementRoleAssignment -Name:"MailStore Impersonation" `

-Role:ApplicationImpersonation -User:serviceaccount@domain.tld|
Important notice
serviceaccount@domain.tld is the user account in UPN (User Principal Name) notation which you will use to access the mailboxes from MailStore. Please make sure that this user is not a member of any Exchange or Windows administrative group. |
Check access privileges
 Get-ManagementRoleAssignment -Role:ApplicationImpersonation -RoleAssigneeType:User `

   | Format-List *
Get-ManagementRoleAssignment -Identity:"MailStore Impersonation" `
| Format-List *Remove access privileges
The following command is only to be used, if you want to remove access privileges from serviceaccount@domain.tld
Remove-ManagementRoleAssignment "MailStore Impersonation"Step 2: Configuration of MailStore Server
Please proceed as follows:
- Log on to MailStore Client as administrator.
- Click on Archive Email.
- From the Email Servers list in the Create Profile area of the window, select Microsoft Exchange to create a new archiving profile.
- A wizard opens to assist in specifying the archiving settings.
- Select Multiple Mailboxes.
- In order to be able to archive multiple mailboxes, some MailStore users along with their email addresses have to exist in the MailStore user management. If this is not the case, MailStore will offer to set up and execute the Active Directory Synchronization at this point. Once completed, the wizard will resume. If Active Directory Synchronization is not desired, the process can be cancelled. In this case, users have to be created manually as described the in chapter User Management. Once finished, click on Archive Email and then on Microsoft Exchange.
- Under Access via, select the protocol to be used to access the Exchange server. Whenever possible, HTTPS should be used.
| Depending on the protocol chosen, there is the option to Ignore SSL Warnings. Generally, these warnings appear if an unofficial or selfsigned certificate is used on the server. |
- Under Host, enter the name of the Exchange server.
| If it is externally hosted mailboxes you are about to archive and do not know the host name, you can find it out by using the MailStore Exchange Autodiscover Tool. |
- Under User Name and Password, enter the access data of a user who has access to all the Exchange mailboxes that are to be archived.
- Click on Next to continue.
- If needed, adjust the settings for the List of Folders to be Archived, the filter and the Deletion Rules. By default, no emails will be deleted from the mailbox. The Timeout value only has to be adjusted in specific cases (e.g. with very slow servers). Please keep in mind that these settings apply to all mailboxes to be archived, as specified at the next step.
- Select the users whose mailboxes are to be archived. The following options are available:
All users with configured email address
Choose this option to archive the mailboxes of all users who are set up, along with their email addresses, in MailStore's user management.
All users except the following
Choose this option to exclude individual users (and thereby their Exchange mailboxes) from the archiving process, using the list of users below.
Only the following users
Choose this option to include individual users (and thereby their Exchange mailboxes) in the archiving process, using the list of users below. Only the mailboxes of those users explicitly specified will be archived.
Synchronize with Active Directory before archiving
If selected, the MailStore user list will be synchronized with Active Directory before any archiving process is executed. This has the advantage that, for example, new employees will be created as MailStore users before archiving, so once the archiving process is executed, their Exchange mailbox is archived automatically as well. This option is especially recommended when the archiving process is to be executed regularly according to a schedule.
- In the last step, a name for the archiving profile can be specified. After clicking Finish, the archiving profile will be listed under Saved Profiles and can be run immediately, if desired.
More information on how to execute archiving profiles can be found under the topic Email Archiving with MailStore Basics
Archiving Incoming and Outgoing Emails Directly
With the support of the Exchange Server Journaling functionality, MailStore can archive the incoming and outgoing emails of all users automatically. This is the only way to ensure that all emails are archived in their entirety
Basic Functionality
Microsoft Exchange Server provides the option to take down all incoming, outgoing and internal email traffic. At the time of sending and receiving, a copy of the respective email is created and stored in a mailbox called Journal Mailbox. Additionally, the email is provided with a Journal report containing information about the actual senders and recipients.
MailStore can be configured to archive this Journal mailbox at regular intervals. During this process, the emails from the Journal mailbox will be assigned to their respective MailStore users (i.e. their user archives) automatically. This means that all users are able to view only their own emails.
Before the archiving process can be set up in MailStore, Journaling has to be set up for the Exchange Server. Please proceed as follows:
Step 1: Creating a Mailbox for Journaling
To set up a new Exchange user with a meaningful name, e.g. journal, please proceed as follows:
- Start the Exchange Management Console and click on Recipient Configuration.
- Click on New Mailbox.
- Select User Mailbox and click on Next.
- Select New User and click on Next.
- Enter journal as user name (see screen shot below) and confirm by clicking on Next.
- Click on Browse to select a mailbox database and click on Next.
- Confirm the summary by clicking on New. The user journal is created.
Step 2: Configuring Exchange Journaling
Two types of journaling are available in Exchange 2010: standard and premium journaling. While standard journaling always includes all send and received emails of a mailbox database, premium journaling can be limited to particular recipients or distribution lists and the scope (internal, external, global) of the journal rule can be defined. Additionally premium journaling rules can be replicated throughout the whole Exchange organization.
| Premium journaling requires Exchange Enterprise CALs. |
Configure Standard Journaling
Open the Exchange Management Console. In the tree structure, open Organization Configuration and then Mailbox.
- Click on the Database Management tab.
- Right click on the mailbox database for which you want to set up standard journaling and select Properties and then select the Maintenance tab.
- Tick Journal Recipient and click on Browse
- Select the user from the recipient list that was created in step 1 and confirm with OK
- The following screenshot shows an example of a standard journaling configuration:
- To confirm the changes and active the journaling, click on OK.
Once the new configuration has come into effect, a copy of all incoming and outgoing emails is stored in the Journal mailbox (along with a report). MailStore can now be configured to archive the Journal mailbox in regular intervals as described below.
Open the Exchange Management Console. In the tree structure, open Organization Configuration and then Hub Transport. Click on the Journal Rules tab and in the area on the right on New Journal Rule.
The dialog window New Journal Rule opens:
- Enter a name for the journal rule, e.g. Journaling.
- Click on Browse and select the user "journal" created above.
- Under Scope, choose Global to capture all messages, Internal to capture internally sent messages only, or External to capture only those message with an external sender or recipient.
- Make sure that the checkbox Enable Rule is activated.
- Click on New to activate the rule. Please keep in mind that in complex Microsoft Exchange environments it may take several minutes until the new rule becomes effective.
Once the new configuration has come into effect, a copy of all incoming and outgoing emails is stored in the Journal mailbox (along with a report called Envelope). MailStore can now be configured to archive the Journal mailbox in regular intervals as described below.
Step 3: Configuration of MailStore Server
Please proceed as follows:
- Start MailStore Client on the computer that is to execute the archiving task regularly and according to a schedule. This can be the MailStore server machine or any user computer. Log on as administrator.
- Click on Archive Email.
- From the list in the upper area of the window, select Microsoft Exchange to create a new archiving profile.
- A wizard opens to assist in specifying the archiving settings.
- Select In- and Outbound Email Automatically.
- In order to be able to archive emails immediately upon sending and receiving, some MailStore users along with their email addresses have to exist in the MailStore user management. If this is not the case, MailStore will offer at this point to set up and execute the Active Directory Synchronization. Once completed, the wizard will resume. If Active Directory Synchronization is not desired, the process can be canceled. In this case, users have to be created manually as described in chapter User Management. Once finished, click on Archive Email and then on Microsoft Exchange. #
- Under Access via, select the protocol to be used to access the Exchange server. Whenever possible, HTTPS should be used.
| Depending on the protocol chosen, there is the option to Ignore SSL Warnings. Generally, these warnings appear if an unofficial or selfsigned certificate is used on the server. |
- Under Host, enter the name of the Exchange server.
| If it is a externally hosted mailboxes you are about to archive and do not know the host name, you can find it out by using the MailStore Exchange Autodiscover Tool. |
- Under User Name and Password, enter the access data of a user who has access to the Exchange Journal mailbox (i.e. the user that has been created when setting up the Journal mailbox).
- As long as the user's email address matches that of the user's Windows login name, the field Mailbox (opt.) can be left blank. Otherwise, the user's email address has to be entered here.
- Synchronize with Active Directory before archiving (recommended): If this option is selected, the MailStore user list will be synchronized with Active Directory before any archiving process is executed. This has the advantage that, for example, new employees will be created as MailStore users before archiving, so once the archiving process is executed, their Exchange mailbox is archived automatically as well.
- Select the option Delete them in origin mailbox only if Exchange Journaling has been tested sufficiently. Even without this setting, MailStore will not archive any duplicate emails.
- Click on Test to verify that MailStore can access the mailbox.
- Click on Next to continue.
- A Timeout value can be specified. Change this value only in case of definite need (e.g. with very slow servers).
- Click on Next to continue.
- At the last step, a name for the archiving profile can be specified. After clicking Finish, the archiving profile will be listed under Saved Profiles and can be run immediately, if desired.
More information on how to execute archiving profiles can be found under the topic Email Archiving with MailStore Basics
Public Folders
MailStore Server can archive the emails from the public folders of Microsoft Exchange servers and make them available to some or all MailStore users. The archiving process can be executed manually or automatically according to a schedule.
Preparation
During archiving, emails are always assigned to individual users. Even when archiving a public folder, the user (or the user archive), for whom the emails are to be archived, has to be specified.
For this reason, first create a MailStore user for whom the public folder is to be archived. This user can be called publicfolder, for example. Next, all other users can be given access to the archive of the user publicfolder. This way, the archived content of the public folder is available to all MailStore users.
If MailStore users are not to have access to the archived public folder, skip this step and simply archive the emails to the user archive of the administrator (admin).
Information about how to create a new user in MailStore is available in the chapter User Management.
To be able to access all objects stored in all public folders without any problems, it is recommended to execute the following commands on the Exchange 2010 server hosting the respective public folders.
- First, add the role Public Folder Management to a serviceAccount@domain.tld
Add-Rolegroupmember -Identity "Public Folder Management" -Member serviceAccount- Next, use the PowerShell Script AddUsersToPfRecursive.ps1 to add "Editor" permissions for all public folders. Execute it within the Exchange Management Shell.
.AddUsersToPfRecursive.ps1 -TopPublicFolder "" -User serviceAccount@domain.tld -Permission EditorserviceAccount@domain.tld is now able to read, write and delete all objects stored in public folders. Don't forger to substitute serviceaccount@domain.tld with the Windows Useraccount in UPN (User Principle name) notation you want to use for archiving.
Setting up the Archiving Process
Please proceed as follows:
- Log on to MailStore Client as administrator.
- Click on Archive Email.
- From the Email Servers list in the Create Profile area of the window, select Microsoft Exchange to create a new archiving profile.
- A wizard opens to assist in specifying the archiving settings.
- Select Public Folders.
- Under Access via, select the protocol to be used to access the Exchange server. Whenever possible, HTTPS should be used.
| Depending on the protocol chosen, there is the option to Ignore SSL Warnings. Generally, these warnings appear if an unofficial or selfsigned certificate is used on the server. |
- Under Host, enter the name of the Exchange server.
- Under User Name, enter the Windows login name of the user who has full access to the public folder (e.g. peter.stein@domain.local or peter.stein@domain.com).
- As long as the user's email address matches that of the user's Windows login name, the field Mailbox (opt.) must be left blank. Otherwise, the user's email address has to be entered here.
- Under Password, enter the user's password.
- Change the preset value under Mailbox (opt.) only if needed.
- Click on Test to verify that MailStore can access the mailbox.
- Click on Next to continue.
- If needed, adjust the settings for the List of Folders to be Archived, the filter and the Deletion Rules. By default, no emails will be deleted from the mailbox. The Timeout value only has to be adjusted in specific cases (e.g. with very slow servers).
- Click on Next to continue.
- At the next step, the Target Archive can be specified. Select the archive of the user for whom the selected mailbox is to be archived (see section "Preparation" above). If the user does not exist yet, please click on Create a New User, then click on Next.
- At the last step, a name for the archiving profile can be specified. After clicking Finish, the archiving profile will be listed under Saved Profiles and can be run immediately, if desired.
More information on how to execute archiving profiles can be found under the topic Email Archiving with MailStore Basics
Shared Mailboxes
Create a MailStore Server User for a Shared Mailbox
Archiving Shared Mailboxes
In order to archive emails from a shared mailbox you must grant a user account full access to that mailbox (either by delegated access or impersonation) because the Active Directory user account associated with that mailbox is disabled. You can use the service account you created in Archiving Multiple Exchange Mailboxes Centrally for this purpose.
Once you have created the service account, setup a new Single Mailbox archiving profile. Enter the credentials of the service account and fill the optional Mailbox field with the primary e-mail address of your shared mailbox.
Further steps are analog to the archiving of individual Exchange mailboxes.
Throttling in Exchange 2010 SP1
Exchange 2010 supports throttling since the RTM version. With throttling you can control, on the server side, the speed as well as the amount of emails individual users can download from the server. Since SP1 for Exchange 2010 this is a standard feature. When installing SP1 an experimental throttling policy may be activated which is unsuitable for productive operations.
| Always enter the UPN (User Principal Name) of the Window user used for archiving as serviceaccount. |
Determining the Throttling Policy Applied to the MailStore serviceaccount
You can use the following Powershell script to check if the serviceaccount that MailStore uses for archiving is slowed down by a throttling policy:
$policy = $null

 $policyLink = (Get-Mailbox serviceaccount).ThrottlingPolicy

 if ($policyLink -eq $null)

 {

   $policy = Get-ThrottlingPolicy | where-object {$_.IsDefault -eq $true}

 }

 else

 {

   $policy = $policyLink | Get-ThrottlingPolicy

 }


 $result = $policy | format-list -property Name, IsDefault, EWS*

 $result
To use the script, please copy the entire content into a .TXT file, change serviceaccount to the UPN (User Principal Name) of the Windows user who is used for archiving, and save the script as policycheck.ps1 (on the desktop of the Exchange server, for example).
The script can now be executed from the Exchange Management Shell. Since, in the context of MailStore Server, only the EWS* values are of any interest, the following result may be displayed:
 [PS] C:usersAdministratorDesktop>.policycheck.ps1


 Name                          : DefaultThrottlingPolicy_8c5771...

 IsDefault                     : True

 EWSMaxConcurrency             : 100

 EWSPercentTimeInAD            : 50

 EWSPercentTimeInCAS           : 90

 EWSPercentTimeInMailboxRPC    : 60

 EWSMaxSubscriptions           : 5000

 EWSFastSearchTimeoutInSeconds : 60

 EWSFindCountLimit             : 1000
In this case, no separate policy exists for the serviceaccount. Since the property IsDefault is true, the default throttling policy of the system applies to the serviceaccount. If the value was false, an individual policy would already have been applied to the serviceaccount whose name would be listed under Name.
Creating and Assigning an Individual Throttling Policy
To avoid interfering with the overall stability of the Exchange 2010 system by using a too liberal policy definition of the default throttling policy, it is advisable to create a separate policy for the serviceaccount. Only three lines are necessary to create a throttling policy for the serviceaccount which is customized for MailStore:
 New-ThrottlingPolicy MailStore

  Get-ThrottlingPolicy MailStore | Set-ThrottlingPolicy -EWSFindCountLimit 2500 '

 -EWSPercentTimeInAD 70 -EWSPercentTimeInCAS 120 -EWSPercentTimeInMailboxRPC 80

  Set-Mailbox "servcieaccount" -ThrottlingPolicy MailStore
In line 1, a new throttling policy is created, line 2 defines the desired values for the policy, and in line 3, the individual throttling policy is assigned to the serviceaccount.
|
Information Title
Please note that a mailbox must be set up for the serviceaccount in order to be able to assign a policy to it. |
Removing and Deleting an Individual Throttling Policy
To delete an individual throttling policy from a mailbox or user account, execute the following command in the Exchange Management Shell:
Set-Mailbox "Serviceaccount" -ThrottlingPolicy $nullThis ends the assignment of a throttling policy. To delete the throttling policy from the Exchange system, execute the following command in the Exchange Management Shell:
Remove-ThrottlingPolicy MailStoreConfirm this by entering "Y". The policy is now completely deleted from the system.
See Also
Archiving Emails from Microsoft Exchange 2003
MailStore Server offers several ways to archive emails from a Microsoft Exchange 2003 server, which are described below. If you are not sure which archiving method best suits your company, please refer to chapter Choosing the Right Archiving Strategy.
Synchronizing Users
As Microsoft Exchange requires the existence of an Active Directory, it is recommended to set up a synchronization as described in chapter Active Directory Integration of the MailStore Server manual.
Archiving Individual Mailboxes
By following the procedure described here, a single Exchange mailbox can be archived for a specific MailStore user. The archiving process can be executed manually or automatically according to a schedule.
Setting Up the Archiving Process
For each mailbox, please proceed as follows:
- Unless the mailbox of the current user is to be archived into his or her own user archive, log on to MailStore Client as MailStore administrator. Only an administrator can archive emails for other users.
- Click on Archive Email.
- From the Email Servers list in the Create Profile area of the window, select Microsoft Exchange to create a new archiving profile.
- A wizard opens to assist in specifying the archiving settings.
- Select Single Mailbox.
- Under Access via, select the protocol to be used to access the Exchange server. Whenever possible, HTTPS should be used.
| Depending on the protocol chosen, there is the option to Ignore SSL Warnings. Generally, these warnings appear if an unofficial or selfsigned certificate is used on the server. |
- Under Host, enter the name of the Exchange server.
| If it is a externally hosted mailbox you are about to archive and do not know the host name, you can find it out by using the MailStore Exchange Autodiscover Tool. |
- Under User Name, enter the Windows login name of the user whose emails are to be archived (e.g. peter.stein@domain.local or peter.stein@domain.com).
| Alternatively, any user with the appropriate access permissions for the mailbox to be archived can be specified. In this case, it is imperative that this mailbox is specified under Mailbox (see below). |
- Under Password, enter the user's password.
- As long as the user's email address matches that of the user's Windows login name, the field Mailbox must be left blank. Otherwise, the user's primary email address has to be entered here.
- Click on Test to verify that MailStore can access the mailbox.
- Click on Next.
- If needed, adjust the settings for the List of Folders to be Archived, the filter and the Deletion Rules. By default, no emails will be deleted from the mailbox. The Timeout value only has to be adjusted in specific cases (e.g. with very slow servers).
|
Information Title
Did you specify IMAP as the protocol and have also defined a deletion rule? If so, empty folders (folders containing no emails, such as Deleted Items or Contacts) have to be added to the list of excluded folders manually. This is the only way to avoid these folders being archived and deleted according to the deletion rule specified. Please read more in chapter Archiving Specific Folders. |
- Click on Next to continue.
- If logged on to MailStore Server as MailStore administrator, the Target Archive can be specified. Select the archive of the user for whom the selected mailbox is to be archived. If the user does not exist yet, click on Create a New User.

- Click on Next.
- In the last step, a name for the archiving profile can be specified. After clicking Finish, the archiving profile will be listed under Saved Profiles and can be run immediately, if desired.
More information on how to execute archiving profiles can be found under the topic Email Archiving with MailStore Basics
|
Information Title
Important notice for Microsoft Exchange 2003: A newly created mailbox, that has never been accessed with Outlook Web Access, may be in a state that MailStore Server is unable to archive email from. In that case it is required that you (or the mailbox owner) logs into the mailbox at least one time using Outlook Web Access in order to correctly initialize the WebDAV interface for that mailbox. |
Archiving Multiple Mailboxes Centrally
MailStore can archive some or all Exchange mailboxes in one step either manually or according to a schedule. All necessary preparations, such as adding MailStore users, can be made automatically.
Before the archiving process can be set up in MailStore, a user with access to all mailboxes to be archived has to be added.
| To be able to archive multiple mailboxes of an Exchange 2003 server in one step, Service Pack 2 must be installed. |
Step 1: Preparation: Setting up a central user for accessing mailboxes
- Add a new user with full access to all mailboxes. This user does not need to have an Exchange mailbox.
- Start Microsoft Exchange System Manager. It is generally located in the Start menu under Microsoft Exchange | System-Manager.
- From the tree structure, select the appropriate Exchange server, the storage group (e.g. First Storage Group) and the mailbox store.
- Right-click onto the mailbox store and select Properties. Click on the Security tab.
- Click on Add to add the new MailStore user and grant the Send As and the Receive As Privileges.
|
|
|


Step 2: Setting Up the Archiving Process
Please proceed as follows:
- Log on to MailStore Client as administrator.
- Click on Archive Email.
- From the Email Servers list in the Create Profile area of the window, select Microsoft Exchange to create a new archiving profile.
- A wizard opens to assist in specifying the archiving settings.
- Select Multiple Mailboxes.
- In order to be able to archive multiple mailboxes, some MailStore users along with their email addresses have to exist in the MailStore user management. If this is not the case, MailStore will offer to set up and execute the Active Directory Synchronization at this point. Once completed, the wizard will resume. If Active Directory Synchronization is not desired, the process can be cancelled. In this case, users have to be created manually as described the in chapter User Management. Once finished, click on Archive Email and then on Microsoft Exchange.
- Under Access via, select the protocol to be used to access the Exchange server. Whenever possible, HTTPS should be used.
| Depending on the protocol chosen, there is the option to Ignore SSL Warnings. Generally, these warnings appear if an unofficial or selfsigned certificate is used on the server. |
- Under Host, enter the name of the Exchange server.
| If it is externally hosted mailboxes you are about to archive and do not know the host name, you can find it out by using the MailStore Exchange Autodiscover Tool. |
- Under User Name and Password, enter the access data of a user who has access to all the Exchange mailboxes that are to be archived.
- Click on Next to continue.
- If needed, adjust the settings for the List of Folders to be Archived, the filter and the Deletion Rules. By default, no emails will be deleted from the mailbox. The Timeout value only has to be adjusted in specific cases (e.g. with very slow servers). Please keep in mind that these settings apply to all mailboxes to be archived, as specified at the next step.
- Select the users whose mailboxes are to be archived. The following options are available:
All users with configured email address
Choose this option to archive the mailboxes of all users who are set up, along with their email addresses, in MailStore's user management.
All users except the following
Choose this option to exclude individual users (and thereby their Exchange mailboxes) from the archiving process, using the list of users below.
Only the following users
Choose this option to include individual users (and thereby their Exchange mailboxes) in the archiving process, using the list of users below. Only the mailboxes of those users explicitly specified will be archived.
Synchronize with Active Directory before archiving
If selected, the MailStore user list will be synchronized with Active Directory before any archiving process is executed. This has the advantage that, for example, new employees will be created as MailStore users before archiving, so once the archiving process is executed, their Exchange mailbox is archived automatically as well. This option is especially recommended when the archiving process is to be executed regularly according to a schedule.
- In the last step, a name for the archiving profile can be specified. After clicking Finish, the archiving profile will be listed under Saved Profiles and can be run immediately, if desired.
More information on how to execute archiving profiles can be found under the topic Email Archiving with MailStore Basics
|
Important notice for Microsoft Exchange 2003:
A newly created mailbox, that has never been accessed with Outlook Web Access, may be in a state that MailStore Server is unable to archive email from. In that case it is required that you (or the mailbox owner) logs into the mailbox at least one time using Outlook Web Access in order to correctly initialize the WebDAV interface for that mailbox. |
Archiving Incoming and Outgoing Emails Directly
With the support of the Exchange Server Journaling functionality, MailStore can archive the incoming and outgoing emails of all users automatically. This is the only way to ensure that all emails are archived in their entirety.
Basic Functionality
Microsoft Exchange Server provides the option to take down all incoming, outgoing and internal email traffic. At the time of sending and receiving, a copy of the respective email is created and stored in a mailbox called Journal Mailbox. Additionally, the email is provided with a Journal report containing information about the actual senders and recipients.
MailStore can be configured to archive this Journal mailbox at regular intervals. During this process, the emails from the Journal mailbox will be assigned to their respective MailStore users (i.e. their user archives) automatically. This means that each user is able to view only their own emails.
Before the archiving process can be set up in MailStore, Journaling has to be set up for the Exchange server. Please proceed as follows:
Step 1: Activating Envelope Journaling
| Envelope Journaling is first available for Exchange 2000 Server with Post-Service Pack 3 and Exchange Server 2003 with Service Pack 1. |
Start MailStore Client and log on as MailStore administrator. Click on Management Shell and enter the following command:
exejcfgThe Envelope Journaling feature in Microsoft Exchange is now activated. After pressing Enter, a success message should appear on the screen:
Successfully ENABLED Envelope Journaling for COMPANYStep 2: Creating a Mailbox for Journaling
Create a new user whose Exchange mailbox is to be used for Journaling. Through the console Active Directory Users and Computers, add a new user with a meaningful name, e.g. journal.
Step 3: Configuring the New Mailbox as Journal Mailbox
Open the Exchange System Manager. In the tree Server, open the server name as well as the First Storage Group. Right-click on Mailbox Store and select Properties.
The dialog window Mailbox Store Properties opens:
- Mark the checkbox Archive all messages sent or received by mailboxes on this store.
- Click on Browse.
- Enter the name of the new user, e.g. journal.
- Click on Check Names. The name will be underlined and provided with additional information.
- Click on OK.
- In the Properties dialog window, click on OK again.
Please keep in mind that in complex Microsoft Exchange environments it may take a few minutes until the Journaling settings become active.
Step 4: Setting up the Archiving Process
Please proceed as follows:
- Start MailStore Client on the computer that is to execute the archiving task regularly and according to a schedule. This can be the MailStore server machine or any user computer. Log on as administrator.
- Click on Archive Email.
- From the list in the upper area of the window, select Microsoft Exchange to create a new archiving profile.
- A wizard opens to assist in specifying the archiving settings.
- Select In- and Outbound Email Automatically.
- In order to be able to archive emails immediately upon sending and receiving, some MailStore users along with their email addresses have to exist in the MailStore user management. If this is not the case, MailStore will offer at this point to set up and execute the Active Directory Synchronization. Once completed, the wizard will resume. If Active Directory Synchronization is not desired, the process can be canceled. In this case, users have to be created manually as described in chapter User Management. Once finished, click on Archive Email and then on Microsoft Exchange.
- Under Access via, select the protocol to be used to access the Exchange server. Whenever possible, HTTPS should be used.
| Depending on the protocol chosen, there is the option to Ignore SSL Warnings. Generally, these warnings appear if an unofficial or selfsigned certificate is used on the server. |
- Under Host, enter the name of the Exchange server.
| If it is a externally hosted mailboxes you are about to archive and do not know the host name, you can find it out by using the MailStore Exchange Autodiscover Tool. |
- Under User Name and Password, enter the access data of a user who has access to the Exchange Journal mailbox (i.e. the user that has been created when setting up the Journal mailbox).
- As long as the user's email address matches that of the user's Windows login name, the field Mailbox (opt.) can be left blank. Otherwise, the user's email address has to be entered here.
- Synchronize with Active Directory before archiving (recommended): If this option is selected, the MailStore user list will be synchronized with Active Directory before any archiving process is executed. This has the advantage that, for example, new employees will be created as MailStore users before archiving, so once the archiving process is executed, their Exchange mailbox is archived automatically as well.
- Select the option Delete them in origin mailbox only if Exchange Journaling has been tested sufficiently. Even without this setting, MailStore will not archive any duplicate emails.
- Click on Test to verify that MailStore can access the mailbox.
- Click on Next to continue.
- A Timeout value can be specified. Change this value only in case of definite need (e.g. with very slow servers).
- Click on Next to continue.
- At the last step, a name for the archiving profile can be specified. After clicking Finish, the archiving profile will be listed under Saved Profiles and can be run immediately, if desired.
More information on how to execute archiving profiles can be found under the topic Email Archiving with MailStore Basics
|
Important notice for Microsoft Exchange 2003:
A newly created mailbox, that has never been accessed with Outlook Web Access, may be in a state that MailStore Server is unable to archive email from. In that case it is required that you (or the mailbox owner) logs into the mailbox at least one time using Outlook Web Access in order to correctly initialize the WebDAV interface for that mailbox. |
Public Folders
MailStore Server can archive the emails from the public folders of Microsoft Exchange servers and make them available to some or all MailStore users. The archiving process can be executed manually or automatically according to a schedule.
Preparation
During archiving, emails are always assigned to individual users. Even when archiving a public folder, the user (or the user archive), for whom the emails are to be archived, has to be specified.
For this reason, first create a MailStore user for whom the public folder is to be archived. This user can be called publicfolder, for example. Next, all other users can be given access to the archive of the user publicfolder. This way, the archived content of the public folder is available to all MailStore users.
If MailStore users are not to have access to the archived public folder, skip this step and simply archive the emails to the user archive of the administrator (admin).
Information about how to create a new user in MailStore is available in the chapter User Management.
Setting up the Archiving Process
Please proceed as follows:
- Log on to MailStore Client as administrator.
- Click on Archive Email.
- From the Email Servers list in the Create Profile area of the window, select Microsoft Exchange to create a new archiving profile.
- A wizard opens to assist in specifying the archiving settings.
- Select Public Folders.
- Under Access via, select the protocol to be used to access the Exchange server. Whenever possible, HTTPS should be used.
| Depending on the protocol chosen, there is the option to Ignore SSL Warnings. Generally, these warnings appear if an unofficial or selfsigned certificate is used on the server. |
- Under Host, enter the name of the Exchange server.
- Under User Name, enter the Windows login name of the user who has full access to the public folder (e.g. peter.stein@domain.local or peter.stein@domain.com).
- As long as the user's email address matches that of the user's Windows login name, the field Mailbox (opt.) must be left blank. Otherwise, the user's email address has to be entered here.
- Under Password, enter the user's password.
- Change the preset value under Mailbox (opt.) only if needed.
- Click on Test to verify that MailStore can access the mailbox.
- Click on Next to continue.
- If needed, adjust the settings for the List of Folders to be Archived, the filter and the Deletion Rules. By default, no emails will be deleted from the mailbox. The Timeout value only has to be adjusted in specific cases (e.g. with very slow servers).
- Click on Next to continue.
- At the next step, the Target Archive can be specified. Select the archive of the user for whom the selected mailbox is to be archived (see section "Preparation" above). If the user does not exist yet, please click on Create a New User, then click on Next.
- At the last step, a name for the archiving profile can be specified. After clicking Finish, the archiving profile will be listed under Saved Profiles and can be run immediately, if desired.
More information on how to execute archiving profiles can be found under the topic Email Archiving with MailStore Basics
|
Important notice for Microsoft Exchange 2003:
A newly created mailbox, that has never been accessed with Outlook Web Access, may be in a state that MailStore Server is unable to archive email from. In that case it is required that you (or the mailbox owner) logs into the mailbox at least one time using Outlook Web Access in order to correctly initialize the WebDAV interface for that mailbox. |
Troubleshooting
The settings described above work in most cases. Yet, depending on the configuration of Microsoft Exchange Server, it is possible that a connection or registration fails even if all data has been entered correctly. If the suggestions in the corresponding error messages do not eliminate the problem, please try one or more of these alternative settings:
- Use HTTP instead of HTTPS.
- Make sure that the field Mailbox (opt.) contains the user's email address if it is different from the user's Windows login name.
- Use IMAP (unencrypted), IMAP-TLS or IMAP-SSL (both encrypted) instead of HTTP(S). To use IMAP, it has to be activated in Exchange.
See Also
Compliance General
MailStore Server offers several compliance features enabling you to meet operational as well as legal compliance requirements.
| MailStore writes changes to these settings into the Windows event log. Additional information about recording events is available in chapter Auditing. |
Email Preview
By default, MailStore administrators can access all contents of the archive. This means that the entire contents of other user archives can be viewed as well.
To prevent the administrator from previewing the emails of other users, please proceed as follows:
- Log on as MailStore administrator (admin).
- Click on Administrative Tools > Compliance and then on Compliance General.
- Under Email Preview, click on Block Preview.
If the preview is blocked, the folder Other Archives (Limited Access) and all its subfolders will appear grey. Administrators continue to be able to view the folder structures and their contents, including the header fields sender, recipient, subject and date, but no longer the email contents or any of the file attachments.
Retention Policies
Various operational or legal provisions regulate the minimum retention periods for emails liable to be archived. By predefining a storage guideline in MailStore you can define the earliest point in time at which emails may be removed from the archive.
To specify the retention policy, please proceed as follows:
- Log on as MailStore administrator (admin).
- Click on Administrative Tools > Compliance and then on Compliance General.
- Under Retention Policies, click on Change....
- Using the slide control, set the earliest point in time from which on archived emails may be deleted.
- Click on OK to confirm.
Please note that at no time does MailStore remove emails from the archive automatically. Therefore, this setting only applies to users with the Delete Emails privilege.
Legal Hold
With the Legal Hold feature deleting emails from the archive can be temporarily prohibited. This may become necessary in case of legal disputes to prevent the deletion of emails which may serve as evidence.
To enable or disable Legal Hold, please proceed as follows:
- Log on as MailStore administrator (admin).
- Click on Administrative Tools > Compliance and then on Compliance General.
- Under Legal Hold, click on Enable Legal Hold/Disable Legal Hold.
Auditor Access
In case of an audit by a third party (e.g. tax inspector) it may become necessary to grant this party read-access to the entire archive. With the Auditor Access feature, a special user can be set up in MailStore who automatically has read-access to all user archives.
To set up an auditor user, please proceed as follows:
- Log on as MailStore administrator (admin).
- Click on Administrative Tools > Compliance and then on Compliance General.
- Under Auditor Access, click on Create Auditor User....
- In the Create Auditor User window, create a password for the new auditor user. The user name is generated automatically and has the following format based on the time of creation:
auditor-YYYYMMDD-HHMMSS - Click on OK to create the new user.
Using MailStore Client, the auditor user can now log on to MailStore Server and browse the archive. However, an auditor user can neither archive or export any emails nor change his or her own password.
Auditing
With MailStore Server, selected events can be written into the Windows event log allowing you to track the activities of both administrators and users. This enables a company's compliance officer, for example, to oversee compliance with legal and operational regulations.
Changing the Auditing Settings
To change the auditing settings, please proceed as follows:
- Start MailStore Client as MailStore administrator (admin).
- Click on Administrative Tools > Compliance and then on Auditing.
- From the list, select the event whose auditing status you would like to change.
- Change the auditing status by clicking the Enable or Disable buttons located beneath the list of events.
| The event ComplianceChangeSettings, which protocols changes of the settings under Compliance General, cannot be disabled. |
Please note that some events may generate a large number of entries in the Windows event log. Only enable such events if you are sure that you need the information.
Implementation Guide Overview
Select one of the options below to start the implementation process.
- Archiving Emails Without Your Own Emailserver
- Archiving Emails from Google Apps for Business
- Archiving Emails from IceWarp Mail Server
- Archiving Emails from Kerio Connect
- Archiving Emails from Zimbra
- Archiving Emails from Microsoft Exchange 2003
- Archiving Emails from Microsoft Exchange 2007
- Archiving Emails from Microsoft Exchange 2010
- Archiving Emails from Microsoft Exchange 2013
- Archiving Emails from Microsoft Office 365
Archiving Emails from IceWarp Mail Server
| This tutorial only covers the specifics of archiving an IceWarp mail server. It is assumed that you already have a MailStore Server installation or test installation and are familiar with the fundamentals of MailStore Server. Please refer to the Manual or the Quick Start Guide for more information. |
MailStore Server offers several ways to archive emails from an IceWarp mail server, which are described below. If you are not sure which archiving method best suits your company, please refer to the chapter Choosing the Right Archiving Strategy.
Synchronizing Users
MailStore Server offers special support for synchronizing users with an IceWarp Mail Server. Information about setup is available in chapter IceWarp Server Integration of the manual.
Archiving Individual Mailboxes
Using the procedure described below you can archive an individual IceWarp Mail Server mailbox for a specific MailStore user. The archiving process can be executed manually or according to a schedule.
Setup of the Archiving Process
For each mailbox please proceed as follows:
- Unless you want to archive your own mailbox into your personal user archive, please log on as MailStore administrator. Only a MailStore administrator can archive emails for other users.
- Click on Archive Email.
- From the list Email Server under Create Profile select IceWarp Mail Server to create a new archiving profile.
- A wizard opens to help specify the archiving settings.
- Select Single Mailbox.
- Fill out the fields Email Address, Host, Access via, User Name and Password. Click on Test to verify the data entered.
For the IMAP-TLS and IMAP-SSL protocols only: You have the option to ignore SSL security warnings. Generally, these warnings appear if an unofficial certificate is used on the server.
- Click on Next.
- If needed, adjust the list of folders to be archived (only available with IMAP), the deletion rules (only available with IMAP), the filter (also only available with IMAP) and the timeout value in seconds. The timeout value only has to be adjusted in specific cases (e.g. with very slow servers).
- Click on Next.
- If logged on to MailStore Server as administrator, the target archive can be specified at the next step. Select the archive of the user for whom the mailbox is to be archived.
- At the last step, a name for the new archiving profile can be specified. After clicking on Finish, the archiving profile will be listed under Saved Profiles and can be run immediately, if desired.
Archiving Multiple Mailboxes in One Step
Starting with version 10.4, IceWarp Mail Server allows users with the appropriate user privileges to access the mailboxes of other users via IMAP. Once a new user has been created or an existing user has been provided with the corresponding privileges, please proceed as follows:
- Log on to MailStore Client as MailStore administrator.
- Click on Archive Email.
- From the list E-Mail-Server under Create Profile select IceWarp Mail Server to create a new archiving profile.
- A wizard opens to help specify the archiving settings.
- Select Multiple Mailboxes.
- To be able to archive multiple mailboxes, MailStore users along with their email addresses have to be set up in the MailStore user management.
- Under Host enter the name of your IceWarp mail server.
- Under Access via select the protocol to be used to access the IceWarp mail server. Wherever possible, you should always choose IMAP-TLS or IMAP-SSL.
| If you would like to automate the archiving process and access the IceWarp mail server using IMAP-TLS or IMAP-SSL, you should enable the option Ignore SSL Warnings. Otherwise, if an unofficial or self-signed certificate is used on the IceWarp mail server, the automatic execution of the archiving process will fail. |
- Under User Name and Password enter the access data of a user who has access to all IceWarp mailboxes to be archived. With IceWarp Mail this is a user with administrative privileges.
- Click on Next to continue.
- Customize the List of Folders to be Archived, the filter and the Deletion Rules as needed. By default, no emails will be deleted from the mailbox. The timeout value only has to be adjusted as needed (e.g. with very slow servers). Please keep in mind that these settings apply to all mailboxes to be archived.
- Click on Next to continue.
- Select the users whose mailboxes you would like to archive. The following options are available:
All users with a configured email address
Choose this option to archive the mailboxes of all users who are set up in the MailStore user management along with their email addresses.
All users except the following
Using the list below, this feature allows you to exclude individual users (and thereby their IceWarp mailboxes) from the archiving process.
Only the following users
Using the list below, this feature allows you to include individual users (and thereby their IceWarp mailboxes) in the archiving process. Only the mailboxes of users who were explicitly specified will be archived.
Synchronize with directory services before archiving
If this option is enabled, the MailStore user list is synchronized with the configured directory service before every archiving process. This has the advantage that new employees, for example, will be set up as MailStore users automatically before archiving allowing MailStore to archive their IceWarp mailboxes automatically as well. This feature is especially recommended for archiving mailboxes according to a schedule.
- Finally, you can choose a name for the new archiving profile. Once you click on Finish, the archiving profile will be listed under Saved Profiles and can be executed right away.
Additional information about executing archiving profiles is available in chapter Email Archiving with MailStore Basics.
Archiving All Incoming and Outgoing Emails Directly
IceWarp Mail Server allows you to deliver all emails to a separate IceWarp Mail Server archiving mailbox. From this IceWarp Mail Server archiving mailbox and using the respective archiving profile, the archiving process can be executed with MailStore Server. The emails are distributed among the archives of the corresponding MailStore users.
Step 1: Setup of the IceWarp Mail Server Archiving Feature
To create a central multidrop mailbox to which copies of all incoming and outgoing emails are delivered, IceWarp Mail Server's archiving feature must first be activated and configured. Please proceed as follows:
- Log on to IceWarp Server Administrator or IceWarp WebAdmim as administrator.
- Change to Advanced view.
- Click on Mail and then on Archive.
- Under General, activate the archiving feature of your IceWarp Mail Server.
- Enter an Archive to Directory e.g. C:Archive and optionally a Directory trailer path. IceWarp Mail Server creates a folder structure below the archive directory in the format DomainMailboxDirectory trailer path.
- Under Options enable Do not archive RSS and Do not archive spam if applicable.
- Click on Apply to save these settings.
Step 2: Setup of an IceWarp Mailbox to Access the IceWarp Archive
Once the archiving feature has been set up, an IceWarp user with access to the IceWarp archive has to be created. This user is later used by MailStore to retrieve the messages.
- Log on to IceWarp Server Administrator or IceWarp WebAdmim as administrator.
- Click on Domains & Accounts > Management.
- Click on the domain in which you would like to create the new user.
- Create the new IceWarp user.
- In the Options tab under Mailbox enter the full path of the archive directory specified in step 1 into the field Mailbox path.
- Click on Apply to finish.
Step 3: Configuration of MailStore Server
- Start MailStore Client on the computer from which the archiving task is to be initiated according to a schedule. This can be the MailStore Server computer or any other machine. Log on as MailStore administrator using MailStore Client.
- Click on Archive Email.
- From the Email Server list under Create Profile select IceWarp Mail Server to create a new archiving profile.
- A wizard opens to help specify the archiving settings.
- Select Multidrop Mailbox and click OK.
- Fill out the fields Access via, Host, Username and Password. Click on Test to verify the data entered.
For the TLS and SSL protocols only: You have the option to ignore SSL warnings. Generally, these warnings appear if an unofficial certificate is used on the server.
- Adjust any further settings such as how to handle emails with unknown addresses or asking MailStore to delete emails after they have been archived. The latter option is especially sensible when dealing with mailboxes that are exclusively used for archiving.
- Click on Next.
- The timeout value only has to be adjusted on a case-by-case basis (e.g. with very slow servers).
- Click on Next.
- At the last step, select a name for the new archiving profile. After clicking on Finish, the archiving profile will be listed under Saved Profiles and can be run immediately, if desired.
Archiving Emails from Kerio Connect
| This tutorial only covers the specifics of archiving a Kerio Connect server (former Kerio MailServer). It is assumed that you already have a MailStore Server installation or Test installation and are familiar with the fundamentals of MailStore Server. Please refer to the Manual or the Quick Start Guide for more information. |
MailStore Server offers several ways to archive emails from a Kerio Connect server which are described below. If you are not sure which archiving method best suits your company, please refer to the chapter Choosing the Right Archiving Strategy.
Synchronizing Users
MailStore Server offers special support for synchronizing users with an Kerio Connect server. Information about setup is available in chapter Kerio Connect Integration of the manual.
Archiving Individual Mailboxes
Using the procedure described below you can archive an individual Kerio Connect mailbox for a specific MailStore user. The archiving process can be executed manually or according to a schedule.
Setup of the Archiving Process
For each mailbox please proceed as follows::
- Unless you want to archive your own mailbox into your personal user archive, please log on as MailStore administrator. Only a MailStore administrator can archive emails for other users.
- Click on Archive Email.
- From the list Email Server under Create Profile select Kerio Connect to create a new archiving profile.
- A wizard opens to help specify the archiving settings.
- Select Single Mailbox.
- Fill out the fields Email Address, Host, Access via, User Name and Password. Click on Test to verify the data entered.
For the IMAP-TLS and IMAP-SSL protocols only: You have the option to ignore SSL security warnings. Generally, these warnings appear if an unofficial certificate is used on the server.
- Click on Next.
- If needed, adjust the list of folders to be archived (only available with IMAP), the deletion rules (only available with IMAP), the filter (also only available with IMAP) and the timeout value in seconds. The timeout value only has to be adjusted in specific cases (e.g. with very slow servers).
- Click on Next.
- If logged on to MailStore Server as administrator, the target archive can be specified at the next step. Select the archive of the user for whom the mailbox is to be archived.
- At the last step, a name for the new archiving profile can be specified. After clicking on Finish, the archiving profile will be listed under Saved Profiles and can be run immediately, if desired.
Hint: If MailStore Server is configured to automatically delete successfully archived emails from the mailboxes and you do not want these emails moved to the "Deleted Items" folder by Kerio Connect, follow the instructions under Permanently Deleting Successfully Archived Emails in the Archiving Incoming and Outgoing Emails Directly section of this document.
Archiving Multiple Mailboxes in One Step
Kerio Connect allows to access the mailboxes of other users via IMAP by using a master password.
Step 1: Defining a Master Password
- Log on to Kerio Connect Administration with an administrative user.
- Click on Configuration > Advanced Options and open the Master Authentication tab.
- Set the Enable master authentication on this server option.
- Adjust the Allow master authentication only from IP address group to your needs.
- Enter a complex password in the field Master password and confirm the password by entering it again in the Confirm password field.
- Click on Apply to save changes.
Step 2: Configuration of MailStore Server
- Log on to MailStore Client as MailStore administrator.
- Click on Archive Email.
- From the list E-Mail-Server under Create Profile select Kerio Connect to create a new archiving profile.
- A wizard opens to help specify the archiving settings.
- Select Multiple Mailboxes.
- To be able to archive multiple mailboxes, MailStore users along with their email addresses have to be set up in the MailStore user management.
- Under Server Name enter the name of your Kerio Connect server.
- Under Access via select the protocol to be used to access the Kerio Connect server. Wherever possible, you should always choose IMAP-TLS or IMAP-SSL.
| If you would like to automate the archiving process and access the Kerio Connect server using IMAP-TLS or IMAP-SSL, you should enable the option Ignore SSL Security Warnings. Otherwise, if an unofficial or self-signed certificate is used on the Kerio Connect server, the automatic execution of the archiving process will fail. |
- Under Password enter the master password defined in step one.
- Click on Next to continue.
- Customize the List of Folders to be Archived, the filter and the Deletion Rules as needed. By default, no emails will be deleted from the mailbox. The timeout value only has to be adjusted if necessary (e.g. with very slow servers). Please keep in mind that these settings apply to all mailboxes to be archived.
- Click on Next to continue.
- Select the users whose mailboxes you would like to archive. The following options are available:
All users with a configured email address
Choose this option to archive the mailboxes of all users who are set up in the MailStore user management along with their email addresses.
All users except the following
Using the list below, this feature allows you to exclude individual users (and thereby their Kerio Connect mailboxes) from the archiving process.
Only the following users
Using the list below, this feature allows you to include individual users (and thereby their Kerio Connect mailboxes) in in the archiving process. Only the mailboxes of users who were explicitly specified will be archived.
Synchronize with a directory service before archiving
If this option is enabled, the MailStore user list is synchronized with the configured directory service before every archiving process. This has the advantage that new employees, for example, will be set up as MailStore users automatically before archiving allowing MailStore to archive their Kerio Connect mailboxes automatically as well. This feature is especially recommended for archiving mailboxes according to a schedule.
- Finally, you can choose a name for the new archiving profile. Once you click on Finish, the archiving profile will be listed under Saved Profiles and can be executed right away.
Additional information about executing archiving profiles is available in chapter Email Archiving with MailStore Basics.
Hint: If MailStore Server is configured to automatically delete successfully archived emails from the mailboxes and you do not want these emails moved to the "Deleted Items" folder by Kerio Connect, follow the instructions under Permanently Deleting Successfully Archived Emails in the Archiving Incoming and Outgoing Emails Directly section of this document.
Archiving Incoming and Outgoing Emails Directly
The Kerio Connect server offers an easy way to deliver all emails to a Kerio Connect specific archiving mailbox. MailStore Server archives this mailbox by means of an archiving task of type Archiving IMAP and POP3 Multidrop Mailboxes.
Step 1: Setting up a Kerio Connect Archiving Mailbox
- Click on Configuration and then on Archiving and Backup.
- Open the Archiving tab.
- Select the checkbox Enable email archiving.
- Select the checkbox Archive to the remote email address and enter the email address of the archive mailbox (e.g. journal@mydomain.tld) into the text field. Please note, that this email address must not be assigned to any MailStore user.
- Select all four options under Archive:
- Local messages
- Incoming messages
- Outgoing messages
- Relayed messages
Step 2: Permanently Deleting Successfully Archived Emails
To enable the automatic expunge feature, you need to manually edit the mailserver.cfg file by following these steps:
Step 3: Configuration of MailStore Server
- Start MailStore Client on the computer from which the archiving task is to be initiated according to a schedule. This can be the MailStore Server computer or any other machine. Log on as MailStore administrator using MailStore Client.
- Click on Archive Email.
- From the Email Server list under Create Profile select Kerio Connect to create a new archiving profile.
- A wizard opens to help specify the archiving settings.
- Select Multidrop Mailbox and click OK.
- Fill out the fields Access via, Host, Username and Password. Click on Test to verify the data entered.
For the TLS and SSL protocols only: You have the option to ignore SSL warnings. Generally, these warnings appear if an unofficial certificate is used on the server.
- Adjust any further settings such as how to handle emails with unknown addresses or asking MailStore to delete emails after they have been archived. The latter option is especially sensible when dealing with mailboxes that are exclusively used for archiving.
- Click on Next.
- The timeout value only has to be adjusted on a case-by-case basis (e.g. with very slow servers).
- Click on Next.
- At the last step, select a name for the new archiving profile. After clicking on Finish, the archiving profile will be listed under Saved Profiles and can be run immediately, if desired.
Archiving Emails from MDaemon
| This tutorial only covers the specifics of archiving an MDaemon mail server. It is assumed that you already have a MailStore Server installation or test installation and are familiar with the fundamentals of MailStore Server. Please refer to the Manual or the Quick Start Guide for more information. |
MailStore Server offers several ways to archive emails from an MDaemon mail server which are described below. If you are not sure which archiving method best suits your company, please refer to chapter Choosing the Right Archiving Strategy.
Synchronizing Users
In addition to the internal user databases, MDaemon may also use SQL databases or LDAP directory services such as Active Directory or OpenLDAP to manage and authenticate users. It is recommended to set up directory service synchronization in MailStore as well. Additional information on synchronizing users can be found in the corresponding chapters of the MailStore Server manual:
Archiving Individual Mailboxes
By following the procedure described here, a single MDaemon mailbox can be archived for a specific MailStore user. The archiving process can be executed manually or automatically according to a schedule.
Setting Up the Archiving Process
For each mailbox please proceed as follows:
- Unless the mailbox of the current user is to be archived into his or her own user archive, log on to MailStore Client as MailStore administrator. Only an administrator can archive emails for other users.
- Click on Archive Email.
- From the Email Servers list under Create Profile select Alt-N MDaemon to create a new archiving profile.
- A wizard opens to assist in specifying the archiving settings.
- Select Single Mailbox.
- Fill out the fields Email Address, Host, Access via, User Name and Password. Click on Test to verify the data entered.
For the IMAP-TLS and IMAP-SSL protocols only: You have the option to ignore SSL security warnings. Generally, these warnings appear if an unofficial certificate is used on the server.
- Click on Next.
- If needed, adjust the list of folders to be archived (only available with IMAP), the deletion rules (only available with IMAP), the filter (also only available with IMAP) and the timeout value in seconds. The timeout value only has to be adjusted in specific cases (e.g. with very slow servers).
- Click on Next.
- If logged on to MailStore Server as administrator, the target archive can be specified at the next step. Select the archive of the user for whom the mailbox is to be archived.
- At the last step, a name for the new archiving profile can be specified. After clicking on Finish, the archiving profile will be listed under Saved Profiles and can be run immediately, if desired.
Archiving Multiple Mailboxes in One Step
- Log on to MailStore Client as administrator.
- Click on Archive Email.
- From the Email Servers list under Create Profile select Alt-N MDaemon to create a new archiving profile.
- A wizard opens to assist in specifying the archiving settings.
- Select Multiple Mailboxes.
- In order to be able to archive multiple mailboxes, some MailStore users along with their email addresses have to exist in the MailStore user management.
- Under Host enter the name or IP address of your MDaemon server.
- From Access via select the protocol used to access the MDaemon server. It is recommended to select either IMAP-TLS or IMAP-SSL.
| When using the IMAP-TLS or IMAP-SSL protocols with a self-signed SSL certificate, you have to set the option Ignore SSL security warnings if you want to execute the archiving profile based on a scheduled task. Otherwise the execution of the task will fail. |
- Under User Name and Password, enter the access data of a user who has access to all the MDaemon mailboxes to be archived. This is usually a MDaemon administrator.
- Under Special Folder (optional) you may enter the name of the IMAP folder containing sent messages.
- Click on Next to continue.
- If needed, adjust the settings for the List of Folders to be Archived, the filter and the Deletion Rules. By default, no emails will be deleted from the mailbox. The Timeout value only has to be adjusted in specific cases (e.g. with very slow servers). Please keep in mind that these settings apply to all mailboxes to be archived.
- Click Next to continue.
- Select the users whose mailboxes are to be archived. The following options are available:
All users with configured email address
Choose this option to archive the mailboxes of all users who are set up in MailStore's user management along with their email addresses.
All users except the following
Choose this option to exclude individual users (and thereby their MDaemon mailboxes) from the archiving process using the list of users below.
Only the following users
Choose this option to include individual users (and thereby their MDaemon mailboxes) in the archiving process using the list of users below. Only the mailboxes of those users explicitly specified will be archived.
Synchronize with Active Directory before archiving
If selected, the MailStore user list will be synchronized with a directory service before any archiving process is executed. This has the advantage that, for example, new employees will be created as MailStore users before archiving, so once the archiving process is executed, their MDaemon mailbox is archived automatically as well. This option is especially recommended when the archiving process is to be executed regularly according to a schedule.
- Finally, a name for the archiving profile can be specified. After clicking on Finish, the archiving profile will be listed under Saved Profiles and can be executed right away.
More information on how to execute archiving profiles can be found in chapter Email Archiving with MailStore Basics.
Archiving Incoming and Outgoing Emails Directly
The MDaemon mail server offers an easy way to deliver all emails to an MDaemon specific multidrop mailbox. MailStore Server archives this mailbox by means of an archiving task of type Archiving IMAP and POP3 Multidrop Mailboxes.
Step 1: Create a new account to be used as multidrop mailbox for archiving
- Add a new account by selecting Accounts and then New Account.
- Name the account mailstore and assign a strong password.
- In the following screenshot you can see the sample configuration for the mailbox mailstore@example.com
Step 2: Create a new content filter rule for archiving
- Open the content filter editor by selecting Security an then Content Filter.
- If not yet enabled, enable the rules processing engine.
- Click on New rule.
- Choose a name for the new rule, e.g. "MailStore Archiving".
- Under Conditions... select the checkbox If ALL MESSAGES and under Actions... select the checkbox COPY the message to FOLDER....
- In the text area on the bottom of the window, click on the link specify information.
- In the window Copy message to folder... click on Browse.
- Select the directory of the account you created in step 1.
- Click on OK to confirm the path specified.
- The configuration is now complete.
- Click on OK to save the new content filter rule.
Step 3: Configuration of MailStore Server
- Start the MailStore Client on the computer used to execute the archiving profile based on a scheduled task. This can be the MailStore Server computer or any other machine. Log in as MailStore administrator (admin).
- Click on Archive Email.
- From the Email Servers list under Create Profile select Alt-N MDaemon to create a new archiving profile.
- A wizard opens to assist in specifying the archiving settings.
- Select Multidrop Mailbox and click OK.
- Fill out the fields Access via, Host, Username and Password. Click on Test to verify the data entered.
For the TLS and SSL protocols only: You have the option to ignore SSL warnings. Generally, these warnings appear if an unofficial certificate is used on the server.
- Adjust any further settings such as how to handle emails with unknown addresses or asking MailStore to delete emails after they have been archived. The latter option is especially sensible when dealing with mailboxes that are exclusively used for archiving.
- Click on Next.
- The timeout value only has to be adjusted on a case-by-case basis (e.g. with very slow servers).
- Click on Next.
- At the last step, select a name for the new archiving profile. After clicking on Finish, the archiving profile will be listed under Saved Profiles and can be run immediately, if desired.
Archiving Emails from Google Apps for Business
| Please note: This tutorial only covers the specifics of archiving Google Mail mailboxes based on Google Apps for Business. It is assumed that you already have a MailStore Server installation or test installation and are familiar with the fundamentals of MailStore Server. Please refer to the Quick Start Guide for more information. |
MailStore Server offers several ways to archive emails from Google Mail mailboxes, which are described below. If you are not sure which archiving method best suits your company, please refer to chapter Choosing the Right Archiving Strategy.
Synchronizing Users
Google Apps for Business may use LDAP directory services such as Active Directory to create and manage users. As MailStore Server also supports Active Directory and other LDAP directory services, it is recommended to set up synchronization in MailStore as well. Additional information on synchronizing users can be found in the corresponding chapters in Active Directory Integration or Generic LDAP Integration of the MailStore Server manual.
Archiving Individual Mailboxes
Setting Up the Archiving Process
For each mailbox, please proceed as follows:
- Unless the mailbox of the current user is to be archived into his or her own user archive, log on to MailStore Client as MailStore administrator. Only an administrator can archive emails for other users.
- Click on Archive Email.
- From the Email Servers list in the Create Profile area of the window, select Google Mail to create a new archiving profile.
- A wizard opens to assist in specifying the archiving settings.
- Fill out the fields Email Address and Password. Click on Test to verify the data entered.
- Click on Next.
- If needed, adjust the list of folders to be archived, the deletion rules, the filter and the timeout value in seconds. The timeout value only has to be adjusted in specific cases (e.g. with very slow servers).
- Click on Next.
- If logged on to MailStore Server as administrator, the target archive can be specified at the next step. Select the archive of the user for whom the mailbox is to be archived.
- At the last step, a name for the new archiving profile can be specified. After clicking on Finish, the archiving profile will be listed under Saved Profiles and can be run immediately, if desired.
More information on how to execute archiving profiles can be found under the topic Email Archiving with MailStore Basics
Archiving Multiple Mailboxes Centrally
As MailStore Server currently does not support the OAuth 2.0 authentication method of Google Apps for Business, archiving of multiple mailboxes is only possible based on a CSV file via IMAP. Please refer to the corresponding chapter Batch-archiving IMAP Mailboxes / Multiple IMAP Mailboxes (CSV File) in the MailStore Server manual.
Archiving Incoming and Outgoing Emails Directly
MailStore Server can archive all incoming and outgoing emails of all users within a Google Apps for Business email domain. Using this scenario it is possible to ensure a complete and compliant archive.
Basic Functionality
In Google Apps for Business, Google Mail can be configured to forward a copy of all incoming, outgoing or internal email traffic to an external multidrop mailbox.
MailStore Server can be configured to archive this multidrop mailbox at regular intervals. During this process, the emails from the multidrop mailbox will be assigned to their respective MailStore users (i.e. their user archives) automatically. This means that each user is able to view only their own emails.
Before the archiving process can be set up in MailStore Server, email forwarding has to be set up for the Google Apps for Business email domain.
Configuring email forwarding for your Google Apps for Business email domain
Please proceed as follows:
- Log on to your Google Apps for Business domain as an administrator.
- On the Settings tab, select Gmail in the Services section.
- Configure Receiving routing:
- Under Also deliver to, activate the Add more recipients option.
- Select Advanced and activate the Change envelope recipient option.
- Enter the email address of the multidrop mailbox into the Replace recipient field.
- Activate the Add X-Gm-Original-To header option.
- Click on Save further down the window and then on Add setting.
- Repeat steps 1 to 5 for Sending routing.
- Click on Save changes.
|
Important
The multidrop mailbox needs to be an external IMAP mailbox, that must not belong to the Google Apps for Business email domain because the Gmail duplicate detection would drop identical emails that have been addressed to several recipients. By using an internal Gmail mailbox completeness of the archive cannot be achieved. |
Setting up the Archiving Process
The above settings will ensure that a copy of all emails will be forwarded to a single external multidrop mailbox. MailStore extracts the sender and recipient information from the email headers to assign them to the appropriate users. By using this type of mailboxes it is possible to archive all incoming and outgoing emails.
Setting up archiving processes for multidrop mailboxes is done using archiving profiles. General information about archiving profiles is available in chapter Working with Archiving Profiles.
Please proceed as follows:
- Log on as MailStore administrator using MailStore Client.
- In MailStore, click on Archive Email.
- To create a new archiving profile, select Other Server via IMAP/POP3 from the Email Server list in the Create Profile area of the application window.
- A wizard opens guiding you through the setup process.
- Select Multidrop Mailbox and click OK.
- Fill out the fields Access via, Host, Username and Password. Click on Test to verify the data entered.
For the TLS and SSL protocols only: You have the option to ignore SSL warnings. Generally, these warnings appear if an unofficial certificate is used on the server.
- Adjust any further settings such as how to handle emails with unknown addresses or asking MailStore to delete emails after they have been archived. The latter option is especially sensible when dealing with mailboxes that are exclusively used for archiving.
- Click on Next.
- The timeout value only has to be adjusted on a case-by-case basis (e.g. with very slow servers).
- Click on Next.
- At the last step, select a name for the new archiving profile. After clicking on Finish, the archiving profile will be listed under Saved Profiles and can be run immediately, if desired.
Further information about archiving profiles is available in chapter Working with Archiving Profiles.
MDaemon Integration
Synchronizing User Accounts with an MDaemon User Database
In addition to adding users manually (which is described in chapter User Management), MailStore Server can synchronize its internal user database with an MDaemon user database on the basis of the USERLIST.DAT of your MDaemon server.
During synchronization user information such as user names and email addresses are read from the MDaemon user database and recorded in MailStore Server's user database. MailStore Server makes no changes to the MDaemon user database itself. Synchronization can be limited to individual or multiple domains and groups.
Accessing the Directory Service Integration
- Log on to MailStore Client as a MailStore Server administrator.
- Click on Administrative Tools > Users and Privileges and then on Directory Services.
- In the Integration section, change the directory service type to MDaemon USERLIST.DAT.
Connection to the MDaemon
For synchronization MailStore Server requires information on how to access the MDaemon App directory.
- MDaemon App Directory
Enter the path to the App directory of your MDaemon installation. The App directory contains the files Userlist.dat and Groups.dat. If MailStore Server is installed on the same computer as the MDaemon Server, the MDaemon App directory is detected automatically.
If MailStore Server is not installed on the same machine, share the App directory of the MDaemon server with the MailStore Server computer and enter the share's UNC path into the field MDaemon App Directory (e.g. MDAEMONMDApp).
| To access the MDaemon App directory through a network share it may be necessary to configure a startup script for the MailStore Server Service. |
- Code Page
You only have to change this option if the encoding of the filesUserlist.dat and Groups.dat differs from the standard encoding of the MailStore Server computer.
User Database Synchronization
After configuring the connection settings as described above, you can specify filter criteria for the MDaemon user database synchronization in this section.
- MDaemon Groups
Choose one or more groups to let only their members be created as MailStore Server Users. If no groups are selected, all users will be synchronized.
Options
- Automatically delete users in MailStore Server
Here you can choose whether users whose accounts have been deleted in the MDaemon will also be deleted in MailStore Server's user database by the synchronization. If the archive folder of such a user already contains archived emails, only the user entry but not its archive folder will be deleted in MailStore Server. Additionally, only MailStore Server users that have their authentication method set to Directory Services will be deleted.
Assign Default Privileges
By default, users that have been synchronized to MailStore Server from an MDaemon have the privilege to log on to MailStore Server as well as read access to their own user archive.
You can configure those default privileges before synchronization, for example, to assign the privilege Archive E-mail to all new users. To do this, click on Default Privileges...
More information on managing user privileges and their effects is available in the chapter Users, Folders and Settings which also has details on editing existing privileges.
Run Directory Services Synchronization
Click on Test Settings to check synchronization configuration and the results returned by the MDaemon without any changes to the MailStore Server user database being actually committed.
To finally run the synchronization, click on Synchronize now. The results are shown with any changes committed to the MailStore Server user database.
Login with MDaemon Credentials
By default, each user created in MailStore Server has a local password. The MailStore Server administrator can specify this password during creation of a new user account. The respective user can later change this password in MailStore Client's Quick Access section if he or she has ample privileges.
Alternatively, if an MDaemon is available, you can configure MailStore Server to allow users to log on to MailStore Server using their MDaemon credentials. To achieve this, you have to configure the following settings in the Authentication section:
- MDaemon IMAP Server
Enter the IP address or the DNS name of the MDaemon server against which authentication should be performed. - IMAP Server Access
Configure whether the connection to the MDaemon IMAP server should be unencrypted or IMAP-TLS/IMAP-SSL encrypted. - Ignore SSL Security Warnings (only when using IMAP-TLS or IMAP-SSL)
Activate this option if a self-signed or non-public certificate is used on the MDaemon IMAP server. Otherwise the authentication will permanently fail.
|
Important Notice
If your MDaemon users authenticate against an Active Directory, you must disable ... honor APOP & CRAM-MD5 under Setup > Default Domain / Servers > Default Domain & Servers > Servers in your MDaemon Server. Otherwise users will not be able to log on to MailStore Server. |
Procedure for Users Created by Synchronization with MDaemon
If you have created MailStore Server users by MDaemon synchronization as described in the previous section, no further action is required. In this case, MailStore Server has already configured all necessary settings automatically for you.
Procedure for Manually Created Users
If you have created MailStore Server users manually and want them to be able to log on using their MDaemon credentials, please proceed as follows:
- Configure the MDaemon integration as described in chapter Synchronizing User Accounts with an MDaemon User Database.
- Verify that the names of the MailStore Server users match those of the corresponding MDaemon users.
- In the General Information section of the user properties select Directory Services for Authentication.